Greetings, dear friends and blog guests. Today we’ll talk about how to create a menu in a VK group and how to do it in the new design of the social network. There are really significant changes that you need to be aware of, because if the menu is made in the old design, which I wrote about in the article here, then the pictures may look askew.
The VKontakte group menu is its face. This is what the user sees when he first enters the community, and how accessible and attractive everything is designed largely determines whether he will become a permanent member of the group.
IMPORTANT: After changing the general design in VK, the sizes of pictures for the menu on the social network also changed. Check your work and make changes in the groups discussed below.
How to make a menu in a VKontakte group
In order to create your menu, you need to go to the VKontakte group you created. Next, on the main page of the community, find the “Customize” or “Add link” button and click it.
After this, you will see an office in which all the settings for your menu take place. To add a new link, click on the “New link” button.
Next, the settings window opens in front of you. In it you can add a cover, title and a link to the desired application. Fill in all fields and click on the “Save” button.
After this, you return to the main page of your VKontakte group and see the updated menu.
Menumake - VKontakte group menu generator
In order for your group to be successful, you need to not only add interesting materials in a timely manner, the design of the group and navigation in the form of a beautiful menu are equally important. The menu is very convenient for users, since with its help the group can be easily divided into sections, and your subscriber can easily find the materials that interest him. Another positive point is adding links to your website or affiliate programs in the navigation.
How to divide VKontakte group posts into sections . To do this, for each entry we create a hashtag of the form: #hashtag@id_of_your_group_ontakte. For example, the hashtags of a group on our site will look like this: #design@vgrafike1 # [email protected] #design@vgrafike1 PS Become subscribers of our group, and you will be the first to know the news of our site + tips for creating VKontakte groups and other social network profiles.
You can create a group menu yourself in Photoshop from scratch or from existing PSD templates, but to do this you need not only to be able to use Adobe Photoshop, but also to know the wiki markup that is used to add links to the menu. However, there is a tool that will do all the routine work for you. This is a menu generator - Menumake. The service is very easy to use, but so that you don’t have any questions, I will tell you how to use it in detail in this article.
Find out how to create a VKontakte account using a photo status and how to create a VK slideshow.
So, go to the menumake website >>>
- Simple registration and login is carried out through a VKontakte account. Attention! If you have several accounts, then choose the one that is the administrator or editor of the vk group.
- On the main page of the service you can add another account. To do this, you need to log out of your vk account and log into another account. Now click the “Add account” button in the Menumake service.
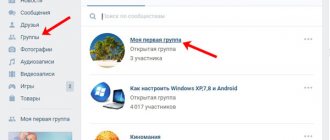
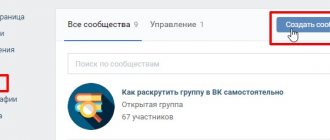
- Here is a list of groups of which you are an administrator or editor. Opposite each group there is a “Create Menu” button. Click on it and start creating
- Creating a beautiful menu in the designer can be based on a template, or you can create a unique design manually. To create from a template, click on the “Select Template” button. Now we fill in the menu items: on the left is the text on the button, on the right is the link to the page. We delete an unnecessary item using the “-” icon, and if we need a lot of buttons, then click “add item”.
- Let's move on to setting up the design. Choose a background. You can select a background image from the service’s gallery, you can make a simple plain background (just a color) or upload your own. To do this, use the appropriate service tabs.
- We adjust the indents, choose the color of the buttons, fonts, etc.
- When everything is ready, proceed to downloading. Click on the “download menu” button under the preview, top up your account with 200 rubles. Agree that this is a small amount, and the services of a designer would cost you much more. You can top up your account through WebMoney, Yandex Money, payment using a bank card or using PayPal.
- After payment, the service prepares the menu - cutting it into parts and loading them into a separate album, closed from prying eyes. A page will be created in your group where your menu will be posted.
- A nice bonus is that the generator itself creates the cover for your menu. This is the "Open Menu" button in your background. Pin it to your group page for quick access to the navigation page.
So, if you are seriously planning to promote your VKontakte group, then I advise you to pay attention to this service. After all, there are no trifles in promotion. And creating navigation across group sections will make it more user-friendly, which will ultimately increase the loyalty of your audience.
How to remove a link from a menu?
Sometimes during work there is a need to change or delete one of the menu items. You can do this by going to the “Settings” section.
Next, next to the desired item, click on the “Change” button.
In the window that opens, find “Delete link” and click on it.
After this, to confirm, click on the “Delete” button again.
All after these steps, when you return to the main page of your VKontakte community, you will see a new updated menu.
How to create a menu in a VK group: step-by-step instructions
The whole process can be divided into 2 stages:
- Working in Photoshop;
- Adding sections and pictures in the group itself.
To accurately answer the question of how to create a menu in a VKontakte group, you should visually imagine the future design with all the sections, and then, in the process, you can add items that still come to mind.
At the first stage, a group avatar and images for the menu itself are created. A single image for both the avatar and the menu will look more harmonious.
The choice or creation of an avatar should be taken very seriously, since many users pay special attention to it. You can find a suitable picture on the Internet and add an inscription or some elements to it in Photoshop, or you can make an absolutely unique image yourself. Since we also need to make a drop-down menu, we look for or create a picture that best suits the theme of the group or just take a beautiful background. Work with the image will take place in Adobe Photoshop, since the functionality of conventional photo editors is not enough for all the necessary operations. All sizes are set by the social network VKontakte itself, and significant deviations up or down will lead to the fact that the avatar will either not load at all or will not be one with the menu.
Algorithm of actions:
- Open Photoshop and go to “file” – “create” and set the width and height: 760X500, respectively.
- Select the “cutting” tool, and then “split fragment”. Divide the image into 3 parts horizontally. For a fragment from the left or right edge in the drop-down window (depending on which part you want to see on the avatar), write the width and height values – 200XX and Y) – 560 and 0. This will be the group’s avatar.
- For the next fragment, set the width and height to 50X500, and write 510 and 0 in the coordinates. This is the space between the group avatar and the menu. This part will not be needed later.
- Again, select “split fragment” and divide vertically into 2 parts. For the fragment on top we set the following values: width – 510, height – 182, coordinates – 0. This is the space above the menu. This part will also not be visible in the group.
- Now we copy the selected or created image to the created and divided object. If the CTRL+V hotkeys don't work, simply open the location on your computer where the image is saved and drag it into Photoshop.
- We divide the remaining space vertically into as many fragments as there are sections in the menu. You don't have to set values for them. We write the name of each section.
- The last step is saving the images. You need to save the pictures like this: file – save for the Web. This method is suitable for later versions of Photoshop. If there is no “save for Web” in the “file” section, then we proceed as follows:
– Click “save” and select the .JPEG format. Save the image in any folder.
– Go to the “file” item, select “export” - “save for Web”. We leave all parameters as they are. Click “save” again.
– Select a folder on your computer and save the images there. They should end up looking like this:
Now let’s proceed to the second stage to figure out exactly how to create a menu in the VKontakte group - directly adding the menu to the public. For this:
- First of all, you need to connect Materials, since this is the only way to add any sections on the main page. To do this, go to Community Management and at the very bottom of the page select “Materials”, and then “open”. Save the changes.
- We upload all the photos to the group, except for the avatar and those parts that are not needed. In order for the photos to be displayed on the main page, you need to go back to Community Management and click opposite the “photos” - “open” tab.
- Uploading an avatar.
- The next step is to enable wiki markup mode. You can do this by clicking the diamond icon on the right side of the page in the “edit” section.
- Here we insert the code for markup: [[photo130629256_437784914|nopadding;510x83px|https://vk.com/gim130629256]], where [[photo130629256_437784914 is a link to the photo (section), and https://vk.com/gim130629256] ] – link to the section or page where you will go by clicking on the photo. You can add both links to sections on VKontakte itself and to external resources.
- This code is duplicated as many times as there are sections in the menu, each time inserting links. If desired, we also change the “latest news” tab, for example, to “menu.
- Click “save page”, return to the main section of the group and refresh the page. The menu is closed by default, but the user, by clicking on the corresponding name, will be able to open its sections and navigate through them.
This completes the whole process, but you should definitely check whether the links work and whether the borders of the photo match.
FAQ
In this section you will find questions that beginners most often ask:
- What can you add to the menu?
In the menu on the community page, you can add any link to resources inside VKontakte, except for the wiki menu, it is prohibited to add it to links. In addition, it is also prohibited to add any links to external resources.
- What are the restrictions?
First of all, the name in the menu can contain no more than 20 characters. It is also worth saying that the minimum cover size for a picture must be at least 376x256 pixels.
- How can I use the menu?
You can use it to add a link to a promotion or a discounted product, price list and payment terms, put a link to the best articles of the group, a portfolio or an application for online recording.
- How to remove an item from the menu?
In fact, you cannot completely remove an element, but you can turn off its visibility by going to the “Settings” section, clicking on the change of the desired item and checking the “Remove visibility” checkbox there. After saving all changes, the icon will disappear,
How to customize the VKontakte community menu
What can be added to the menu
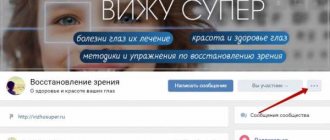
In the group menu, which users will see at the very top, below the main information and above the feed, you can add links to articles, albums, products, posts and much more. The menu is displayed on all platforms - in the web version, in the mobile version and in VKontakte mobile applications.
Also, you can add links to resources within VKontakte to the menu, with the exception of links to wiki pages. It is prohibited to publish links to external sites.
Each menu item (link) can be customized: add a title and cover. The name can contain up to 20 characters. The minimum cover size is 376x256 pixels. In addition to links, the menu displays community applications and the store, if it is connected in the community.
How to setup
To add a group menu to VK, follow these steps.
Step 1 . Go to the community settings: “Settings - Menu”.
Step 2 . Click New Link.
Step 3 . Set up the link point by point:
- Upload a cover image (minimum dimensions 376x256 pixels).
- Enter a name (up to 20 characters).
- Please enter the link address.
Ready! This way you can add 7 items for the group menu.
How to remove or change a link in a menu
If necessary, you can change and delete added links. To do this, go to the same settings item. Next to the item you want to edit, click “Edit”.
The element editing panel will open. Next, select and click on the desired element to edit or delete it.
This is interesting: How to promote a group on VK yourself
Result:
Now after reading this article you will be able to create your own menu in a group. Use it wisely and you are sure to get good results from it. In addition, if you are just starting to master VK, I recommend that you familiarize yourself with the courses for VKontakte, which will help you achieve maximum results in minimal time.
If this information was useful to you and you liked the article about creating a menu in your VKontakte community. Write your comments and suggestions. Sincerely, Yuri, see you on the pages of the iprodvinem.ru blog.
Types of menus and their features
The first step when creating a community is to decide on its main goal. The future design of the menu and its functional features depend on this. Depending on the goals of the group, the menu can be:
- for an information platform;
- for the trading platform;
- for a training site.
The main part of VKontakte publics is informational. These are communities where the user is provided with some kind of entertaining or educational content. For such a group, it is best to use a menu that displays the main topics. Thus, popular publics create sections: news, latest publications, popular publications, as well as sections specifically on the topic of the group.
The menus of trading and educational publics may be similar. The goal of both is to help its user navigate the range of goods or services. The menu for sales, as a rule, includes sections such as Product Catalog, Payment, Delivery, Promotions and discounts, and for training it may be limited to sections describing services, since the main thing here is that the user finds the training program or material he needs.
Preparing to create
Before you create a clickable menu in the VKontakte group, you need to prepare for the procedure. To get started, do the following:
- Go to your public page through the community management section.
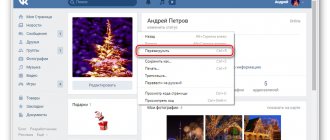
- Under the group avatar, click on the three dots icon to open an additional list.
- Click on Community Management;
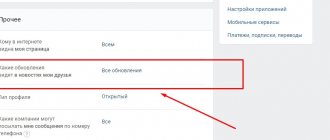
- Go to the public settings, then click on Sections;.
- In the window that opens, find Materials; and select the status Restricted; in the drop-down list. If you leave them open, then any public member can edit posts.
- To save the settings, click the corresponding button at the bottom of the page.
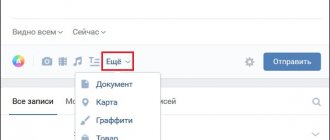
To create a menu in the VKontakte group, return to the main page and go to the “Recent Posts” section; It is located immediately below the name of the public page and its status. Click the button to edit. A special window will open where you need to find an icon in the editor toolbar in the form of two brackets <>. Click on it to activate wiki markup mode. After which you can change the inscription “Latest news”; to the right word. After the completed manipulations, you will be able to create a menu in the VKontakte group;