Hello, friends! Many users of the social network VKontakte have their own community. We have already figured out how to create a menu in a group on VK to make it easier for subscribers to find what interests them. Now let's learn how to change the name and its address.
I think you noticed that the link to the group consists of the standard word “club” and a set of numbers, but if you want to promote your community so that new users subscribe to it, then you need to make the address more memorable. For example, it may be the same as the name.
Why might a name change be necessary? For example, when creating a group, you hastily came up with its name, and after some time, a more interesting word came to mind. Or you found many other communities on VKontakte with a name like yours. Maybe you just want to completely change the theme of the community, and instead of flowers, start writing about the lives of animals.
As you can see, the reasons may be different. Now let's deal with the questions that interest us.
What does the name mean and how important is it?
The name is placed in the header of each association. It speaks to its main topic and arouses initial interest among future subscribers.
Sometimes, after creating a community, the administrator comes to the conclusion that it is necessary to change its name.
Why do they change the names of VKontakte groups?
- The name affects rankings. If a social network user searches for a community using keywords and cannot find it, then most likely the keywords were not used in the name.
- The site address has changed or a new administrator has appeared (the group was sold, transferred to another administrator, the main domain of the site has changed) - therefore, it is necessary to change the name in VK.
- The community is well ranked by the low-frequency keyword, and there was a need to promote it by the related high-frequency keyword (for example, the community is visible in the search for “cheap women’s clothing”; the administrator wants to promote it for the query “women’s clothing”).
Some people also refer to the name as the web address of the community on the Internet - using it, the visitor directly enters the association through a browser, and in the search it is displayed precisely at this address. The standard address looks like this:
To improve perception and brand compliance, it is recommended to change this web address, for example, to this:
In this example, the address is similar to the official company name, site and community. It looks more visual and is easier to remember.
Whatever the reason for changing the name, let's figure out how it can be done.
How to change the name of a group in VK in a mobile application (from a phone)
Important Note
If your group was previously dedicated to, say, Internet jokes, and later you changed its name, for example, to “Saunas in Moscow,” then it may be banned for a sudden change in topic.
Changing the name in VK is not difficult. The main thing is to come up with an easy, correct name, and then people will remember it.
Almost every registered user of the popular social network VKontakte is a member of at least one group or public page.
At the same time, many users create their own groups and are actively involved in filling and promoting them.
We have the following issues on the agenda:
The first question that immediately arises is why you need to create a VKontakte group? Most often they do this just for fun. In this case, a person chooses a topic close to himself and gathers an interested audience.
Sometimes groups are created for the purpose of mutual assistance (material, informational or some other). And sometimes - to earn money (for the purpose of subsequent placement of advertising posts, links, announcements, etc.).
Creating a VKontakte group
The question of how to open a VKontakte group is technically quite easy to solve. Here you will not need any special knowledge and skills (for example, as with). So, you are already registered on VKontakte and, therefore, you have your own personal page.
To create your own group, select “My Groups” in the side menu of your page (number 1 in Fig. 1). The “Popular Communities” advertising block will appear with the “Subscribe” offer, as well as a list of all the communities in which you are a member. You need to click on the “Create a community” button (number 2 in Fig. 1), located in the upper right corner.
Rice. 1. To open a VKontakte group, on your page, click on the “Create Community” button. Rice. 2. Enter the name of the group, select the type and click on the “Create community” button
We confirm the creation of our group by clicking on the “Create community” button (number 3 in Fig. 2). After this, a page with the settings for this group will open.
Group settings
The first tab with settings is called “Information” (number 1 in Fig. 3). All the main community management options are located here.
In the “Name” item (number 2 in Fig. 3), you can edit the name of the newly created group.
In the “Page Address” section, you can change the community URL if desired. To do this, instead of the standard URL in the “club82063972” format, specify some simpler and more memorable address, for example, superknigi. If the selected URL is already taken, you will see the corresponding message.
In the “Community Description” item (number 4 in Fig. 3), you can place a small text description. Usually they talk about what the group is dedicated to.
Below, select a topic from the list that will open after clicking on the small black triangle - it is marked with number 5 in Fig. 3. We indicate your website, of course, if it exists (number 6 in Fig. 3). You can even indicate your location using the corresponding menu item (number 7 in Fig. 3).
Each of these categories can be turned off, made open or limited. For example, when turned off, no one will be able to write anything on the wall. If you turn off photos and videos, no one will be able to add them.
In limited condition
a specific category can only be changed by a community administrator or moderator. For example, only administrators and moderators can write on the wall, only administrators and moderators can add audio and video recordings.
Open
categories may be subject to changes by ordinary users. Users have the opportunity to add comments to the wall, photos to albums, videos, etc.
In the last item “Group Type” (number 11 in Fig. 3), you can set the format for new members to join the community. All users without exception can join an open group. In a closed group - only after the approval of the administrator or moderator. As for the private group, you can get here only by invitation of one of the administrators.
In Fig. 3 (numbers 8 -11) shows the default group settings, that is, such settings are offered automatically. You can agree with these settings, or you can configure them at your own discretion, as described above.
At the end, do not forget to approve your changes by clicking on the “Save” button (number 12 in Fig. 3).
The second tab in the community settings is called “ Members”
"(next to number 1 in Fig. 3). Here you can view a list of users currently in your group. Each user can be removed from the group, or appointed as a leader (the person will have moderator rights).
The third tab is called " Blacklist"
" This is where users are posted who have been blocked from your community for some reason (insulting other members, spam, etc.).
How to make a link in a group
Rice.
4 Create a link in your group Fig. 5 Enter the URL of a link to a VKontakte group or an external site. I entered the address of a free course from my website. Then click on the “Add link” button (number 2 in Fig. 5).
Rice. 6 Enter the link text
In the window marked 1 in Fig. 6 “Enter link text”, click the mouse and enter the text of your link. For example, I entered “Computer literacy for beginners in 30 days.” After this, click on the “Add” button (number 2 in Fig. 6). The result is a link as shown in Fig. 4, number 2.
How to select the author of a post in a group?
The “Send Settings” menu will appear, where you can select on whose behalf the post will be published:
- On your own behalf, or
- On behalf of the community.
If you check the box next to “On behalf of the community,” the post will be published on behalf of the group.
Rice. 7. Selecting an author when publishing a post in a group
I invite you to the group “Computer literacy with Nadezhda”
I am happy to invite everyone to join the new VK public.
From this article you will learn how to create a group on VK in 2020 and configure it correctly.
In particular, select the type of community, the name of the group, set up the main sections, fill out the description, put a memorable community avatar, upload a beautiful cover, and so on. If you are a beginner and are just starting to figure out how to work VKontakte, this step-by-step manual will be especially useful for you.
Advantages and capabilities of the VKontakte group:
- Fast
creation. After reading the article to the end, you will understand that creating a group takes 10-15 minutes. - For free.
You can create a VKonakte group absolutely free, and with proper promotion, it can be compared in effectiveness to a landing page or website. - Easy
to use. Most of the actions related to business promotion in VK are intuitive and simple. - A lot of
information. There are many articles and videos on the Internet about the work of VKontakte: promotion, monetization, etc. - The largest
audience is a Russian-speaking audience of all ages - among them there are definitely your clients.
How to create a group on VK: step by step
Step 1:
Community creation
So, we already have a personal page and we need to create a group on VK so that we can place all advertising materials there and not spam our account. On the left side of the menu, click on the “Groups” tab. A page will open that shows what groups we are in. At the top, click “Create a community.”
Step 2:
Choosing a community type
As you can see, VKontakte itself explains for what purposes this or that type of group is suitable. Choose what suits you. And don’t be afraid, if necessary, the community type can be changed at any time in the settings.
Step 3:
Next, another pop-up window appears, where, depending on the selected type of community, we will need to write a name, indicate a category or topic, whether it will be an open or closed community, add a link to the site and a physical address ( if any
).
In the group name
enter the name of the group. How to name a VKontakte group?
- Use the name of the company or brand.
- First name or last name for a personal blog.
- A keyword by which potential clients may search for you.
For example
, if you are engaged in repairs in Moscow, then it is better to name the group [
Repair in Moscow
] and write the name of the company or brand through a dash or vertical slash. Finally, click on the “Create Community” button and go to the page of the new group.
This is what the newly created group looks like. All that remains is to set it up and fill it.
Name change
If you need to change the name of your community from a computer or laptop, then go to your VKontakte page, select “Groups” in the menu on the left and click on the desired community.
The name is displayed on the main page at the top.
Under your avatar, click on the three horizontal dots and select “Manage Community” from the drop-down list.
Next, on the “Settings” tab, in the “Basic Information” section, in the “Name” field, delete the old one and write a new one. To save changes, click the “Save” button below.
The name of your community will be changed.
How to set up a group on VK
Step 4:
Avatar
A VKontakte group avatar is an icon that is displayed next to the group’s posts in the news feed. To install it, click “Upload photo” in the upper right corner.
Recommended avatar size 200x200 pixels
. Try to ensure that the picture chosen as your avatar is bright, concise and memorable. This will help followers differentiate your group's posts from others. After loading, VKontakte will first offer to crop the main image, and then adjust the thumbnail.
Step 5:
To continue setting up the group, click on “Manage” directly under the newly installed avatar.
Next, fill in the basic information about the group; this is what users who land on your page will see. In the description of the community we write what the group is about, for companies we list a list of services or goods, write a unique selling proposition
(your benefits).
Here we can make the group closed or open ( it’s better to make it open
), put a nice page address and upload a community cover.
Step 6:
Recently, beautiful covers can be added to VKontakte groups, with basic information about the group and additional indicators. For example, like our group
:
To add such a cover, you need to go to the community settings, click “Upload”, select a pre-prepared picture on your PC (1590 by 400 pixels in JPG, GIF or PNG format) and click “Save”.
To ensure that the cover displays correctly on tablets and mobile devices, it is better to place text and other important elements in the center.
Step 7:
At this point in the settings of your new VKontakte group, you need to enable or disable certain sections. We recommend disabling sections that you do not intend to use.
You can also configure the access level for all sections: open or limited. This affects who can add content to these sections. Open
- can be added by everyone,
limited
- only administrators and community editors.
Here you can turn on products, set the main and secondary blocks. This is what will be shown first when visiting a group; by default, the group description or pinned post
.
These are the basic settings that need to be made after creating a group. At your discretion, you can set up a comment filter, add links, enable messages, connect additional applications, etc.
How to enter a first and last name in English transcription using an anonymizer
There is a special anonymizer site on the Internet that allows you to log into VKontakte and other social networks incognito. Let's look at how to use it to change your last name in VK. Necessary:
- Go to the anonymizer website.
- Select “ Open VK ”.
- A new page will appear where you will need to log in to VKontakte by entering your username and password.
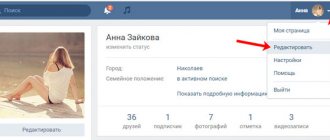
- Next, to change your first and last name, you need to go to edit your personal information by clicking on the profile icon in the upper right corner and selecting “ Edit ”.
- You will find yourself on the page for editing your data. Now let's figure out how to change the first and last name VC into English. You need to select the language of the social network - English, native languages - English, while Russian must be deleted, and any foreign city must be specified as the location.
- After this, you must enter your nickname in Latin transcription. In this case, both the first and last names must be similar to real ones. For example, Nick Volkov, Adam Smit and so on. The rubbish of an incoherent set of letters will not work.
- After this, you need to save changes to your personal information.
During the day, the changes will be reviewed by the administrator and approved by him.
How to fill a newly created group
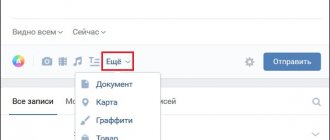
To add the first entry on behalf of the group, click in the empty field where the inscription “Add entry” looms temptingly. If next to the entry field the avatar of your personal page is lit, then click on the arrow at the bottom right and select “On behalf of the community” so that the entry can be seen by those who are subscribed to the group.
How to create a group discussion
Create discussions where users can leave reviews, discuss topical issues, share their vision, opinions, etc.
In order to create a new discussion, you must first enable them. Go to the group settings and go to the “Sections” tab. Choose one of the options:
- open
- everyone can create and delete discussions; - limited
- only community administrators can create new discussions.
After that, return to the main page of your group and under the main photos, click “Add discussion”.
Group album and photos
Turn on the Photos section in Settings and create a group album. Post only real photos! This will help build trust. Click “Add photos” in the lower right menu of the group and upload them from your device.
The photos you add will be uploaded to the group's main album.
Also on the right you can find the “Photo Albums” tab and add a new photo album calling it, for example, “Repair of one-room apartments.” This way you will divide all the photos into separate categories for the convenience of users.
How to add products to a group
Another advantage of VK is the opportunity to create and develop an online store based on social media. networks. To do this, go to the “Section” tab in the settings again and turn on “Products”
.
Settings will open in which you need to specify:
- the city
in which your store operates; - enable or disable comments on products;
- choose the monetary unit in which the cost of goods will be measured (ruble, tenge, euro, dollar or Belarusian ruble);
- configure where purchase requests will be sent: in community messages or in personal messages to administrators;
- store description.
Then you can add product cards on the community home page.
You need to fill out the product card as follows:
- category
- select the category to which the product belongs, or if there are no suitable ones, put “Other”; - name and description of the product
- write the name of the product, a short description and its characteristics; - photos
- you can upload different color options, as well as photos from different angles; - cost
- the price of a product or service being sold.
If a product is out of stock, it is not necessary to remove it from the display case and then add it again, just put it on.
How to make a group interesting?
To make your group interesting, you need to make an effort and follow a few simple rules.
- Create quality content. Do not constantly publish posts with the content “Buy, order, call” and so on. There should be selling posts, but in moderation.
- The time when you could post cats and demotivators is long gone. Therefore, first, think carefully about what might be interesting to your target audience.
- Be consistent. Don't abandon the group and publish 1-2 posts a day.
- Make polls
about what content your subscribers would like to see. - Post real photos
of your office, store, warehouse, your workplace and yourself.
Conclusion.
Well, now we have figured out how to create a group on VK, set it up correctly, add photos and the first entry.
Write in the comments the address of the group you created following our guide! Let's see who did better
Are you interested in creating a VKontakte community? Then let's first look at the main differences!
The main differences between the Public Page and the VKontakte Group
| Group | Public page | Conclusion | |
| Purpose | For discussions and associations of interests | To publish news on behalf of a company or famous person | Choose the type of community that suits your goals. |
| Privacy | Open, closed, private | Open | The group can be made closed or private. The public page is always open. |
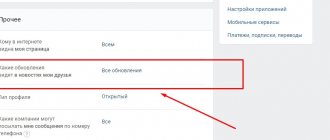
| Profile display | To view the groups to which the user is subscribed, you need to click “Show detailed information”. But they are not always visible: if the group is private or users have hidden their display in the privacy settings, you will not see them. | Public pages to which the user is subscribed are located under the block with friends, and this list cannot be hidden in any way. | People see interesting public pages on friends’ pages and subscribe to them. This happens less often with groups due to their poor location and privacy settings. |
| Inviting friends | Yes | No | You can invite friends to join your group. To do this, go to “Community Management” - “Participants” - “Invitations”. Public pages do not have this feature. |
| Posts from subscribers | In groups, you can enable the “Open Wall” mode. Any user can write a post on such a wall, and it will be seen by everyone who enters the group. However, such posts do not appear in the news feeds of group members. | Any user can propose a post in the public, administrators will be able to publish it on behalf of the community with the signature of the author. Before publication, the proposed post is not seen by anyone except administrators, and after that it appears in the news feeds of subscribers. | If you need moderation of posts, it is better to give preference to the community. |
| Changing community type | Yes | Yes | A public page can be transferred to a group and vice versa. But only the creator of the community can do this. Changing the community type again is possible only after 30 days. Also, to transfer the number of participants must be no more than 10,000, otherwise the decision will be made by VKontakte support at your request." |
| User Content | Not only the wall can be “open” in groups, but also almost all sections: photos, videos, music, documents, photo albums, etc. | Administrators in public spaces can give users permission to upload photos to certain albums - nothing more. Users cannot add anything else. | Want a lot of user-generated content? Then a group is best for you. As for the public, users can only upload photos and propose posts for publication. But even this is enough. |
| Places and check-ins | In group management, you can specify a location. It will appear in the description. People who will be near the specified place, when creating a record and attaching their location to it, will be able to select your group as a point to mark. | You can specify several places in a public page at once. They are displayed in the hotel block in the right column on the page. However, unlike groups, you can check in in these places only through the community itself. | If you are the owner of an offline business, your visitors often visit your establishment and check in, then you should choose a group. If there are few check-ins and you realize that this function is not effective and does not provide the desired result, you can always change the type of community. |
| Group | Public page | |
| Live broadcasts | ✅ | ✅ |
| Ability to pin a post | ✅ | ✅ |
| Subscribe to notifications | ✅ | ✅ |
| Community online | ✅ | ✅ |
| Detailed statistics | ✅ | ✅ |
| Comment ban | ✅ | ✅ |
| Goods | ✅ | ✅ |
| Money transfers | ✅ | ✅ |
| Applications and widgets | ✅ | ✅ |
| Dynamic cover | ✅ | ✅ |
Perhaps these are all important differences.
Most likely, you don’t need a group “just to have it.” You are pursuing a specific goal, right? Most likely, you want to make your brand more recognizable, or perhaps you want to increase sales or you want to attract new customers. To achieve these goals, it is very important to properly create a VK community and configure it. I will help you deal with this quickly and completely.
Are you ready to learn all the intricacies of doing business on VKontakte?
Then let's get down to business!
Changing the group name
Each VK.com user has the open ability to change the name of the community, regardless of its type. Thus, the methodology discussed in this article applies to both public pages and groups.
A renamed community does not require the creator to remove any additional information from the group.
It is recommended to change the name only if absolutely necessary, for example, when you are going to completely change the direction of the public’s development, allowing for the loss of a certain number of participants.
It is most convenient to manage a group from the computer version, however, within the framework of the article we will also consider solving the issue using the VK application.
Method 1: full version of the site
For users using the full version of the site through an Internet browser, changing the public name is much easier than in the case of mobile platforms.
- Go to the “Groups” section through the main menu, switch to the “Management” tab and go to the main page of the edited community.
Find the “…” button located next to the signature “You are in a group” or “You are subscribed” and click on it.
Using the list provided, enter the “Community Management” section.
On the left side of the page, find the “Title” field and edit it according to your preferences.
At the bottom of the “Basic Information” settings block, click the “Save” button.
Go to the main page of the public through the navigation menu to ensure that the group name has been successfully changed.
How to create a VKontakte group?
Creating a group on VK in 7 simple steps:
Important! The title should contain a keyword by which potential subscribers can search for you.
- Fill in information about your group:
- Create a page address
The page address should be simple and memorable so that it is not difficult to find you.
- Create an avatar for your group
- If your company has a brand name, then decorate the avatar with the colors of your company, and also use the logo to better remember your company.
- When searching, the first thing a person sees is the group’s avatar. It is visible in the news feed and in search results. Your task is to make it very high quality!
- The avatar should be meaningful and intriguing. If you decide to add text to it, check whether it will be readable in miniature.
- Community Avatar - 200 pixels wide x 500 pixels high
- Use no more than 2 fonts.
How to create a menu for a VKontakte group?
For convenient navigation of subscribers on the site, a menu is often used when creating a VKontakte group.
The main features of a good menu:
- Everything is structured;
- It is easy to find the information you are interested in;
- Beautiful and clear design.
How to create a menu:
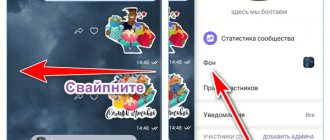
This post will be pinned to the top so that new subscribers will see it immediately.
To prevent a new subscriber from changing everything in your menu, make sure that only the group administrator can edit. Allow subscribers to view only.
Let's take a closer look at how to properly set up a group.
Original name for the VKontakte community
So, what group name can you come up with on VK? First you need to analyze whether it is worth creating a group? After all, it needs to be regularly replenished with various interesting posts so that subscribers do not leave. If, after analyzing the situation, a person understands that he wants to do all this, then he should move on to the next step. You need to choose the topic of the community to decide which audience to invite. Next, the name suggests itself.
If the group is aimed at advertising and posting beautiful and fashionable things for girls, then we can call it “Top Clothes”. If for guys, then “Men's Wardrobe”. If the community publishes posts with pictures from all over the world, you can come up with a name for the group: “From all over the world” or “The world in the palm of your hand.”