How to take a photo with a webcam from a computer
Now let’s take a step-by-step look at how you can take such a photo:
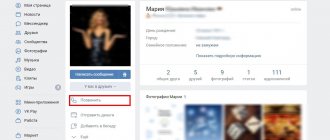
- Open your VK page and click on the wall, there you have an icon with a camera. In the same way, you can update your avatar.
How to take a photo from a webcam in VK from a computer Click on it and a window appears asking you to upload a photo or take a photo. If there is no such icon, then your webcam is not connected. Icon for turning on the webcam in VK
- Click on this icon and you will appear on the screen. Everything is very easy, take a photo, select a thumbnail and publish the photo.
If the camera is connected and the problem persists, check its access to Flash Player.
These were instructions on how to take a photo from a webcam on a computer; you can also do it on your phone.
Problem
You won't be able to find out immediately why the webcam isn't working. There can be many reasons for this problem. Therefore, it is important to step by step understand what happened to your device and why the system does not want to interact with it.
The problem itself can also manifest itself in several ways. First, the user can see an error notification. Secondly, you can notice that the system does not see the device at all. Thirdly, the webcam does not work on the computer due to system failures.
How to take a webcam photo from your phone
You can do it like this:
- Open your wall and start writing a new post or go to your private messages and create a new one.
How to take a photo from a webcam in the VK mobile application
Source
In applications
If your webcam does not work in Skype and other applications, but all other options do not suit you, then there is only one thing left to do - check the settings of the program in which you are working. In cases where several cameras were connected to the computer, all the settings for operation may be reset.
Launch, for example, “Skype”, then visit the settings (section “Video”). There you set the camera model you need, adjust the microphone volume and adjust the image quality. Now you just need to save your changes. You can try chatting on camera. Everything should work.
What are video calls in VK Messenger
The social network VKontakte offers updated functionality that has been in beta testing for a long time - video calls to friends. You can call from your mobile phone, laptop or computer. In order for the function to be available, you need to download the VK application for Android or iOS and install the latest version of the VK Me messenger (VK Messenger).
Calls to VK messenger
To ensure data confidentiality, the device is end-to-end encrypted.
To start a dialogue, you need to open a conversation with the desired person (a friend in VK) and click on the icon in the form of a phone, which is located in the upper right corner. Next, the subscriber chooses whether this will be a video conversation or only a voice call. You can change the communication mode at any time throughout the conversation.
Example programs
There are many programs for setting up a webcam. For example, WebcamMax can be installed to prank or amuse friends. The utility adds many animation effects, it can replace the user's face with another, or insert a creeping line.
But there are few similar image adjustment programs. Most of all utilities are designed for video surveillance or general communication. For example, WebCam Monitor will quickly turn your system into a video surveillance platform. To do this, you can set the recording time period, set continuous shooting or record movements.
Reading time: 34 min
The webcam has gained great popularity due to its accessibility and ease of use, but like any popular thing, difficulties can arise with it, the main of which is the failure of the equipment itself or, more likely, a software failure.
In fact, equipment has any defects or breaks down much less often than drivers fail. In this regard, first of all, you should go through all the possible methods for solving system failures provided in the article.
The webcam is an integral part of laptops, netbooks and other gadgets of this type, so first of all, especially if you have an old computer, check whether your camera is turned on at all. It is not uncommon that the image capture device is locked, to activate it you should press the corresponding button, if there is one, or the key combination Fn + F1-12, the required number varies depending on your computer.
Before you begin solving the problem, you should analyze, perhaps you know what caused the webcam not to work, usually: you updated the drivers for it, installed or updated Windows to a newer version, perhaps there was mechanical damage. After this, you can begin to take action based on the information received.
How to set up video communication equipment
If the user does not use a laptop, but a desktop computer, before making a video call in VK through the computer, you need to configure the equipment:
You can use webcams for communication:
- with USB interface;
- wireless IP or camera with RJ-45 connector;
- with analog/SDI output.
The simplest option would be to connect a camera with a USB port. But, when choosing equipment, you should pay attention to interface support, since cameras with USB 3.0 support may not be compatible with a USB 2.0 connector. Connector 3.0 is most often produced with blue or red markings.
To connect a webcam with a USB interface, follow these steps:
- Connect the camera to the desired connector on your computer.
- Wait for a notification from the OS that a new device has been detected.
- Make sure your computer has the necessary drivers.
- If you are having problems with the software at this point, restart your computer.
- If the operating system does not contain the necessary drivers, use the disk that comes with the camera and install them on the device. If there is no disk, you can download drivers from the Internet.
- Next, check the working condition of the camera.
When identifying and connecting an IP camera, you need to install the IP Camera DirectShow Filter driver, which will allow you to identify the device as a web camera.
If the device has an RJ-45 connector, regardless of the presence or absence of a wireless connection function, the first connection must be made using a cable.
Analog cameras are connected using a composite to USB converter.
- If the microphone is integrated into the device, the installation will be performed automatically.
- If the microphone is used as a separate element, it may be necessary to install the appropriate drivers. After connecting, check the operating condition of the equipment.
How to watch VK Live broadcasts online?
You can not only create your own streams, but also watch video broadcasts of other users. In order not to miss online videos of your idols, friends or interesting communities, you can subscribe to their streams. By default, you are subscribed to all broadcasts of your friends and groups you joined.
When choosing a broadcast, you can filter the focus of the proposed streams by geolocation, gender and topic:
- all broadcasts;
- from your city;
- only young men;
- only girls;
- computer games;
- TV and radio.
Unfortunately, so far only such filters are available. As you can see in the screenshot, now there are only two filter options by topic: “Computer games” and “TV and radio”. It is quite possible that the creators plan to expand this functionality with other parameters.
How to make changes to your account privacy settings
After completing the equipment setup process, you need to set up your personal account. For this:
- Log in to your account (your VK page).
- Open the My Settings menu.
- Go to the "Privacy" tab.
- Find the Contact Me section.
- Click on the line “Who can call me via video call.”
Account privacy settings - Select the desired item in the drop-down window. It's best to set the settings to "All Friends".
- Next, go to the “My Friends” tab.
- In the list of friends, next to the name, the video camera icons should appear.
The presence of a camera icon means that the subscriber’s friends also have the correct settings for a VKontakte video call from a computer or any other device. In the absence of such designations, the subscriber will not be able to make calls because his friends do not have a camera connected or changes have not been made to their account settings.
Settings
If you have updated the application and the version of Android on your device is one of the latest, but you are still unable to get through, then you need to set up video calling correctly. To do this, open the page menu by clicking on the three horizontal lines at the bottom, and then go to settings - the gear in the top right.
Next, select “Privacy”.
Scroll down a little and click on the line “Who can call me.”
In the next window you need to, well, or select the option that suits you: only friends, certain groups, etc.
These are the nuances that users who are trying to use the new feature and make a video call on VKontakte may encounter. I hope the recommendations described will help you, and in the future the developers will make sure that absolutely everyone can make video calls on VK.
How to activate the video call feature
After completing the preparatory operations, to make a video call on VKontakte from your computer, follow these steps:
- View your list of friends who are online.
- Select the desired subscriber and go to his page.
- Make sure that a button with a video camera appears next to the “Send Messages” section.
How to call VKontakte via webcam - Next, click on the button to make a video call.
- After this, a dialog box will appear on the screen asking you to install Adobe Flash Player.
- In this window, click on the “Allow” checkbox.
- In the same section, select “Remember”.
- Close the dialog box.
Exceptions
What to do if the webcam does not work? This question is usually asked by those users who purchased a device from a little-known manufacturer. System failure also occurs less frequently.
In this case, there is only one solution to the problem: independently find, download and install the necessary files for the device to work. What do I need to do? It’s good if the webcam manufacturer has its own website. Then you can go to it, specify the device model and install the corresponding files.
If there is no official resource, you can try entering the webcam model in the search and look for drivers on the forums.
You will also be lucky if there was a disk in the box along with the device. In this case, you can install all the necessary drivers from there. Although most computers are now produced without disk drives, and this is another problem. In this case, you will have to find a computer that has a disk drive, install the disk there and copy all the necessary files to the flash drive.
It is also worth remembering some nuances. For example, it is best to install drivers before connecting the device to the computer. Also, if downloading the software does not solve the problem, the device is most likely faulty. You may need to take a closer look and notice some physical damage to the case, buttons, or cable.
How to solve problems with video calling
The video camera button may not be displayed on the page of the desired subscriber for the following reasons:
- if the latest updates have not been installed;
- In the privacy settings, there is a ban on video chats with other subscribers.
Notification about the need to update the application
If the button does not work, there are several ways to solve the problem:
- Use Skype to check equipment: video camera, microphone.
- Update camera drivers if necessary.
- To solve the sound problem, go to settings and turn on the microphone in operating mode.
- After each stage of setup or other operation, you should click on updating your personal page on social media. networks. You can also log out and log in again.
After such manipulations, the system will accept the updates and a camera button for making video calls will appear on the screen.
Source
How to disable the service?
The simplest way to deactivate video calls will require the account owner to simply change the privacy settings. For this you will need:
- Visit the social network settings section.
- Select the tab dedicated to privacy.
- Find an item related to video calls.
- Select an item that prohibits anyone from calling.
- Save changes.
To restore the function and restart the services, you only need to make the changes again, changing the circle of people who can call the account owner. You won't have to do anything additional.
How to set up a webcam in Contact?
How to set up a webcam in Contact?
In Internet category Asked by Analak
1 Reply 1019 months ago
- tell friends
- Add to favorites
- Share
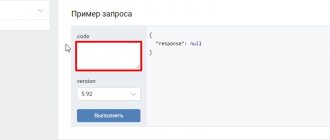
To add a question to a website, blog or forum, simply copy and paste the code into the html:
In order to set up a webcam in Contact, you must first turn it on and configure it. How to do this, I bring to your attention several video presentations on the topic. Here we also talk about laptops and computers.
Many of us not only use social networks for chatting or messaging, but they also want to take advantage of things like video chats.
The fact is that, if you look at it from a practical point of view, the easiest way is to install Skype and enter the contacts that you have entered on the social network. At the moment, this is VKontakte.
That is, you correspond with your friends, they give you Skype coordinates and you already send a request to be added to your contacts.
As for setting up the camera, it was not for nothing that I said that it is easier via Skype than if you do it on VKontakte.
The fact is that in Skype all the webcam settings are at hand, and you can set the desired resolution.
To do this we do the following:
1. Make sure that the camera on the computer is working.
2. Open the main Skype window.
3. Go to the “Tools” menu.
4. There, open the “Settings” item.
5. In this window, look for the “Video Settings” item. There will be a “Set up webcam” button.
6. We go there, and you can set the necessary parameters.
As for how to communicate in Contact via a webcam, you should use the chat application. If there is such an application, then by pressing the button, your computer will ask if you can give permission to use the microphone and video. You will have to agree or refuse this.
Today, in order for the user not to be fooled, manufacturers have set the optimal settings for their webcams, so you should have a camera with optimal parameters working.
Source
Restoring driver compatibility
Quite often, the driver for the webcam itself becomes outdated, as new versions of Windows are released and, therefore, there is no compatibility with these systems. In this case, you should use the camera manufacturer's website, but it happens that there are simply no new drivers. Then the Run programs designed for previous versions of Windows tool can help you:
1.Open the search window on the Start menu bar;
2.Find the desired application by name, you can enter the word of the previous ones;
3.Run the function, preferably with administrator rights;
4.After a while, you will be presented with a list, find the desired element in it or use the “Not in the list” item and specify the path manually;
5.Select the “Program Diagnostics” option, then specify the version of the system with which it should be compatible.
There is a possibility, if you do not have a built-in webcam, that the USB port is not working, try changing it to another one.
Visually check the integrity of the web camera and its cable, as there may be mechanical damage. If you still have questions on the topic “The webcam does not work in Windows 7,8,10, how to solve the problem?”, you can ask them in the comments.
Now I will teach you how to take photos from a webcam to publish them on Vkontakte.
How to turn on the VKontakte web camera. VKontakte webcam: new features
Not long ago I wrote an article about how to make calls. And having learned that the administration of the VKontakte site also “attached” such a function to their site, I decided to figure it out and explain to you how to call on VKontakte
.
I want to say that I only tested the conversational option. At the time of writing, the project is in alpha testing, which means that you may have great difficulties in communicating. However, I managed to call and talk to my friend.
So, let's begin. To call us we need a VKontakte account. The next step is updating adobe flash player. We wrote how to do this in the article.
And so, after the above operations, we can finally try to call. To do this, go to the page of the person we want to contact.
We are interested in the send message button under the photo. Next to it, recently, there has been a button with an image of a webcam, when we click on it, a window pops up in which we need to make some settings. (If you read a similar article about classmates, then you can handle it yourself)
We carry out the settings as shown in the figure below.
Click Allow and Remember, and then Close.
After all the settings, you should be able to connect with your interlocutor. If it goes well, you will hear and maybe even see each other. The conversation window is very similar to the video viewing window. It displays the video or photo of the interlocutor in the middle, and at the bottom: the off button. microphone, on or off video, volume control, and on the right side expand to full page.
And now I want to show what the window will look like if they call you.
Window view “they are calling you”
It displays a photo, as well as two buttons to reply or reject. Click reply and enjoy!
That's all for you nik-tut.
Ask questions in the comments.
Now I will teach you how to take photos from a webcam to publish them on VKontakte.
Some features and concept of the VKontakte video call
Before we tell you about the technical aspects of this procedure, for starters, it is an innovator among all similar sites in this particular area. Back in 2011, this project tried to be implemented in a well-known social network. Odnoklassniki network. Then they tried to implement this function in an application designed for Apple products. Therefore, it turns out that competent VKontakte developers were able to polish this function and successfully place it on their resource.
In order to make a call on VKontakte, you need to go to the page itself, then next to the “ Send message”
” there is a picture in the shape of a camera - this is our video call.
To launch, click on it once. A large black window with various functionality will appear in front of you. But first of all, this application asks you for permission to use your microphone, then your webcam. But after these procedures, you will be able to reach the person you need. This application is equipped with settings that include audio and microphone volume control. The settings are usually left standard, but if the sound quality is poor, it is better to adjust them. To end the call, you need to click on the red button labeled “ End call
”.
If this article helped you or you liked it, don’t forget to like it
, this will help other users find it faster. And I can find out what interests you most in order to prepare and write even more interesting and useful articles! Best regards, Vyacheslav.
How to take a photo from a VKontakte webcam
Let's look at the two options - they are very similar.
Update your profile photo
Go to your page and hover your mouse over your avatar. An additional menu will appear. In it, select the item “Update photo”.
You may be asked to manually launch Adobe Flash Player - do so.
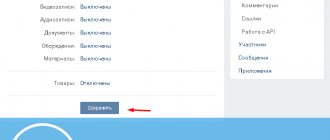
Now you need to activate access to the camera. To do this, set the switch to "Allow" and close the pop-up window.
We catch a suitable angle and click on the “Take photo” button. The photo will be created. If you are satisfied with it, click “Save and continue”. If not, click the “Remove photo” button. And we do it again.
Now from the final image we select the area that we want to use for the avatar (see). Select the desired area, then click “Save and Continue”.
In the next step we do the same for the miniature. When finished, click on the “Save Changes” button.
A photo from the webcam will be taken and placed in the album “Photos from my page”.
We take a photo from the webcam and send it in a message
Open a dialogue with the desired user (see). At the bottom of the screen, hover over the paperclip icon. Select "Photo" from the drop-down menu.
The fact that you won’t surprise us with Skype is already clear, and even our early-rising grandparents chat in the morning with their grandchildren living in America in the evening using practically free video communication. But not everyone knows that the same can be done on the VKontakte social network using the “VKontakte video call” function.
In 2012, a new beta function “video call” appeared for the first million clients of the VKontakte network. After successful testing, this service became available to all service users. Of course, functionally it is much weaker than Skype, but perhaps the goal was not to surpass the competitor at all.
For video communication you will need a video camera and microphone with any interfaces. Also, a flash player must be installed on the computer, preferably the latest version.
To establish a video call, your interlocutor must have a video camera and microphone installed, and the video call function must be enabled in the VKontakte program settings.
If you use a laptop, then you can use the built-in devices accordingly.
How to record an online VK Live broadcast?
Record a video broadcast from a smartphone or tablet
So, you have downloaded and installed the application itself. Upon launch, we are greeted with a rather pleasant and stylish picture:
I would like to note that by default the service does not offer to accept the user agreement, although you can read it by clicking on the corresponding inscription:
An interesting feature of this tape is that the online broadcast, which ends up in, i.e. begins to play - which quickly makes it clear the nature and type of stream.
The tab marked with an asterisk displays the user rating - a list of the most popular streamers with the number of their broadcasts:
Also, one of the service tabs is the “Subscriptions” section, which displays recordings and broadcasts of users and communities to which you have subscribed:
An important section is the “Your Profile” tab, where you can see statistics on broadcasts, subscribers, subscriptions, users who gave you a gift, as well as information on income and current balance:
And finally, the main tab for which we have all gathered here is the bright crimson online broadcast button. By clicking on it, you will be prompted to perform mandatory actions, without which video broadcasting is impossible, namely:
- turn on camera;
- turn on the microphone;
- enable location.
By the way, when organizing the second broadcast, it turned out that the geolocation can be completely disabled:
This moment seemed very strange to us, but it is quite possible that this was simply a flaw on the part of the creators.
First, you need to enter the name of the broadcast, enable or disable comments, and you can also make the broadcast private - exclusively for friends. After all the manipulations have been completed, you need to press the bright “Start Broadcast” button and a countdown will appear on the screen, at the end of which you will be on air!
During the broadcast, viewers can express their emotions through comments, hearts, and stickers.
To end the broadcast, you must click the white cross in the upper right corner of the device display.
Recording a broadcast from a computer or laptop
Now let's move on to how to record a video broadcast from your personal computer.
To do this, you need to go to the full version of the site (on vk.com, not m.vk.com) and go to the videos. You will be greeted by a page like this:
When you click on the “Broadcasts” button, the user is greeted with an entry indicating that the service for live broadcasts from a computer is in beta testing mode. The developers strongly recommend that you read the documentation and conduct a preliminary test of the service:
This message appears only once and when you click on the “Broadcasts” entry again, the user is shown a window with the following content:
As it turns out, starting a video broadcast from a PC is not so easy. Let's look at it in order:
- You need to click on the “Broadcasts” entry and enter the data and parameters of the stream. These include:
- By clicking on the “Save” button, the user will be presented with the following window:
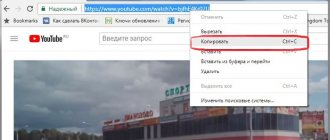
- Next, you need to copy the URL and KEY into the video encoder. This means that if you want to create an online broadcast from a computer, then you need to install the video encoder itself - a special computer program that will allow you to transmit data in a stream (namely recording from a webcam, sound from a microphone, etc.) to the social network VKontakte. The developers strongly recommend that when making any changes, carry out a test broadcast to make sure that the image and sound work and are transmitted correctly. Which video encoder should you choose? The VKontakte developers themselves currently recommend the “Open Broadcaster Software (OBS)” video encoder, which is available for computers running Windows, Mac or Linux. Download “Open Broadcaster Software (OBS)” from the official website. An interesting fact is that on the page for setting up the video encoder there is another option, which, unfortunately, is not yet available - the “XSplit” video encoder:
- The video encoder itself is installed according to the standard scheme. It should be noted that for Windows users the program will require you to install the DirectX development kit (if it is not already installed), which obviously does not speed up the process of launching an online broadcast from your computer.
- After installing the video encoder, you need to open the program and make a number of settings:
- Well, let's begin. To configure the video encoder, select “File” - “Settings” in the horizontal top menu:
- Open the “Broadcasting” section. In the “Broadcast type” field, select “Custom broadcast server”:
- Copy the URL and Key of the broadcast you created and paste it into the appropriate fields of the program. To do this, return to the VKontakte broadcast window and click on the corresponding “URL and Key” in the right side menu. When clicked, a window with broadcast parameters should open. Find the corresponding fields and copy the data:
- Paste the “URL” and “Stream Key” of the video encoder into the appropriate fields and click “OK”:
- Next, go to the “Output” tab and set the video bitrate in the “Video bitrate” field in accordance with the selected broadcast quality:
Video resolution Video bitrate 1280x720 (30 fps) 1 500–4 000 1280x720 (60 fps) 2 250–6 000 1920x1080 (30 fps) 3 000–6 000 1920x1080 (60fps) 4 500–9 000 - In the "Encoder" field, select "Software (x264)". Then you need to set the audio bitrate to “128” in the “Audio bitrate” field. You also need to enable additional encoder settings and make sure that “veryfast” is selected in the “Encoder presets” field. After all the manipulations, click “OK”:
- Let's move on to audio settings. To do this, go to the “Audio” section of the same name, in the “Sampling frequency” field you need to select the value “44.1khz”. In the “Desktop Audio Device” field, you must set the value of the corresponding audio playback device (in this case, if there is only one audio device on your computer or laptop, then leave the value “Default”). In the “Mic/Auxiliary Audio Device” field, select the desired microphone (by analogy, if there is one audio recording device on the computer, then leave it “Default”). Save everything with the “OK” button:
- Now go to the “Video” section and set the base resolution, which matches the resolution of your monitor. Next, we set the output (scaled) resolution - this is the resolution of the stream that will be sent to the VKontakte servers. Note: If you set this value lower than the base value, it will reduce bandwidth consumption and CPU usage. In the “Scaling filter” field you need to select the value “Bicubic (fine scaling, 16 samples)”, and in the “General FPS values” field you need to set the required frame rate - 30 or 60. We complete the setting process by clicking the “OK” button:
- The final touches are the creation of the scene and source, without which video playback will not be possible. To create a scene, you need to click the plus sign “+” in the corresponding “Scenes” block of the video encoder window (lower left corner): After this, we create the source. To do this, click the plus sign “+” in the corresponding “Sources” block of the video encoder window (1). To broadcast from a webcam, select “Video capture device” and click “OK” (2):
- If everything is configured correctly, you will see the corresponding image from the webcam:
- All that remains is to click the “Start broadcast” button in the video encoder window and if everything is configured correctly, the stream will start playing in the corresponding broadcast window on the VKontakte website:
As a result of setting up online broadcasts from a computer, we would like to note that the process itself is very labor-intensive and takes a lot of time. In this regard, it is much easier to start a broadcast from a mobile device. But we understand perfectly well that in some situations you cannot do without broadcasting from a computer.
How to set up the equipment?
First, connect the video camera.
There may be three options:
- web camera with USB interface;
- IP video camera wireless, or with RJ-45 connector;
- video camera with analog or SDI output;
The easiest way is to connect a USB camera. Simply plug the USB connector of the camera cord into the appropriate socket on your computer.
Please note that if your camera has an interface that supports USB 3.0, it is unlikely to work through a USB 2.0 connector. These connectors are compatible and similar in appearance, but have different colors. USB 3.0 is marked in blue, very rarely red.
After connecting, the operating system will detect a new device and if there is a corresponding driver in its database, then you don’t need to do anything, it will automatically install the device software itself. You may need to restart your computer.
If this does not happen, you will need to install the driver from the disk that came with the camera. If there is no such thing, then you need to find it and download it on the Internet.
You can check the camera's performance using the popular Skype application. Select the “Tools” tab at the top of the program window, then “Settings”. You can use the hotkey combination CTR+. And select "Video Settings". If you see an image from the camera in the window that pops up, then everything is fine.
In Windows XP, the camera connection can be checked using standard operating system tools.
You should connect and identify the IP camera in a slightly different way. First you need to install the IP Camera DirectShow Filter driver, which will emulate an IP camera like a web. You can also use VH Multi Camera Studio.
Connect the camera with a cable with an RJ-45 network connector to the computer.
If the camera even has wireless connectivity, the first turn on for setup must be done via a cable.
It may turn out that your computer only has one network connector, which is already used to connect to the Internet. In this case, you will either have to sacrifice the Internet during installation, or install an additional network card.
To see the image, you need to enter the camera's IP address in the browser command line.
If you would like to use a regular video camera, you will have to use cards or external video and audio input modules. For example, Mini Recorder Blackmagic Design for SDI and HDMI interfaces. For an analog camera, you need to purchase a composite signal to USB converter.
A little expensive, but the best device in this regard is the Blackmagic Design Intensity Pro 4K. Although you can choose something simpler, such as EasyCap DVR, which costs only $15. If you don't need to count the beard hairs of your interlocutor, then this device is quite suitable.
But in any case, connecting an analog video camera to the VKontakte service will depend on the compatibility of the software that comes with the device or is supported by it. There is only one piece of advice, even for engineers who despise those who read the instructions before installing equipment, to still read it. You will find a lot of interesting things there.
The microphone integrated into the camera will connect without any problems. But if you have a separate device with a USB interface, then you may need to install a driver. A regular microphone with a mini Jack connector can be safely inserted into the pink jack next to the headphone output.
Examination
Before you figure out why the webcam isn't working, you need to check the device itself. The first thing we recommend doing is checking the functionality. If the device does not work correctly on one computer, you need to try connecting it to another system. If it still doesn’t respond at all, it’s most likely simply faulty.
Next, you will need to understand the performance of the computer. There may be non-working connectors, connecting to which does not give any results. Therefore, many advise switching the webcam from one port to another to eliminate this problem. You can try connecting another device to this port.
For example, most often the webcam is connected via a USB interface. Therefore, you can try connecting a USB flash drive instead. If the system sees the drive, then most likely the webcam is faulty.
Next, you should check for system failures. It is important to remember that the web can work fully and correctly only in one application. If you run several similar programs, the webcam may get confused and not connect at all.
If the webcam does not work in a specific application, but it works in all other programs, then the problem is in the utility. You'll have to find a replacement for it, or contact support, if available.
How to make a video call?
If the camera was successfully connected and it works, then we are on the road to complete success. First, go to the settings of the VKontakte service under your own account. Below the logo, find two words: “My Settings.” Go to the “Privacy” tab. It is located at the top of the screen and look for the line “Who can call me via video call” in the “Contact me” section.
Set it to any variable that suits you, but it’s better to set it to “All friends” first.
Skype
It happens that the webcam does not work in Skype, but works in other programs. This is a common problem along with microphone and headphone errors.
It is worth saying that this program was more popular before than it is now. It was used by many gamers and users for work and study. Now, most players have switched to Discord, significantly reducing the total audience of Skype users.
The rejection of this program is largely due to its countless errors. Firstly, the problem with the webcam not working on Skype is quite common. Along with this, I often encounter problems with headphones and microphones. In addition, many users have questions about the quality of communication. All this led to a decrease in the audience with the advent of other similar programs.
If you notice that the web connection works everywhere except Skype, you need to check some nuances. Perhaps the problem is with the drivers. To exclude it, you need to open the command line using the Win + R key combination. Next, enter the command “devmgmt.msc”. This will take you quickly to the Device Manager menu.
In the list of all devices connected to the system, you need to find the image processing device. Next you need to go there and find the webcam. If one webcam is connected to the system, then one device will be displayed here. If there are any errors with drivers and software, then next to the device name there will be an exclamation mark, a cross or other various markings.
You need to right-click on the device name and open its properties. If everything is in order, the system will tell the user that the device is working correctly. If you notice other notifications in the device status table, it means you will need to update or reinstall the drivers. To do this, you need to remove the non-working driver. To do this, return to the list of image processing devices, right-click on the name of the webcam and click “Delete”.
Next, you need to go to the official website of the device manufacturer, or find drivers on forums and other resources. Then download and install them. Some users advise installing a special program to automatically search for drivers.
Instructions
To make it easier, we summarize the above information into a protocol:
- Register in the VKontakte service if you are not already registered.
- Connect the camera and microphone.
- We install additional video conversion devices if necessary.
- We install drivers and software according to the above recommendations.
- We check the functionality locally.
- We are launching the VKontakte service.
- We are looking for friends with cameras;
- Let's get in touch.
Common problem
What to do if the webcam on your computer does not work? If you know for sure that the problem is not in the device itself, but in the system, then here you need to return to the checks described above.
First, try connecting your device to another computer. If it is displayed correctly there, then you should return to the problematic system. Obviously, if the webcam works fine on another PC, then the problem is most likely with the drivers.
This is the most common problem with various devices, including webcams.
Video calling from phone/tablet
When you set up video communication through the VKontakte service on mobile devices, the problems become much less.
There is no need to connect any devices, because both the tablet and smartphone have both a camera and a microphone. There is some inconvenience in the fact that not all phones are equipped with a camera on the screen side, which means that your interlocutor will see not you, but your knees, for example. Just sometimes turn the back of your smartphone and say: “And this is me!”
But seriously, just to make a video call to a friend you need to go to his VKontakte page and click on the button with a camera image, it is located to the right of “Send messages” under the avatar.
And if your friend is able to receive a video signal, then he will see you.
If there are problems with the connection, either there is no sound or there is no video, first try to check all the functions of a video call on Skype; if the Skype connection works, then VKontakte should also connect. If not, then look for problems in the device and its software.
Do not forget that video communication requires a stable connection with a speed of at least 1 Mbit/s, which the GPRS protocol cannot provide. This means that you will only be able to connect to your boyfriend or girlfriend using a WiFi or 3G connection.
Check if this communication protocol is available in your region.
If anyone doesn’t know, we inform you that on VKontakte it is possible to call a friend via video conference. In order for communication to be available, you need to acquire a microphone and a webcam. If you use a laptop, this problem should not arise.
In order to call a user, go to his page and see a camera icon next to the “Send message” button. Here's what it looks like:
If you hover your mouse over the icon, you will receive a message: “You can call username while he is on the site. To use video, you must turn on your webcam."
Accordingly, if the user is on the site, click on the indicated icon, after which the connection occurs. Please note that at the time of writing, communication requires the use of Adobe Flash Player.
When you call, a connection occurs. In our case, the connection is impossible because the webcam is not installed.
Of course, you can only call those friends who have added this feature.
Restoring driver functionality
Now let’s look at the problems one by one, if you have a webcam displayed in the corresponding menu, you should check if there is an “Enable” button on your webcam, if not, then:
1.Double click on your device;
2.Go to the “Driver” tab;
3.Please note whether the “Roll Back” button is active, if so, then you can use it;
4.Click on the “Update” button and check if the necessary drivers exist, for example in the webcam’s memory.
If you are unable to use the previous step, due to the camera being designated as unidentified equipment, you should go to the website of the laptop manufacturer or the camera itself and download the necessary application. It is preferable to use drivers that you can find on the website of the developer of your computer, since sometimes the camera requires special programs or modified drivers to operate. Also, some manufacturers, such as Lenovo, may require the Lenovo Settings app, go to the Camera tab and turn off Privacy Mode.
Before installation, it is better to remove the old version of the application from your computer; this can also be done from the “Driver” tab in “Device Manager”.
How can I make sure my friends can call me?
First and most importantly, only those users who are friends can make video calls.
To activate the video calling feature, go to “My Settings” and select the “Privacy” tab. Here, in the “Contact me” subsection, next to the item “Who can call me via video call”, put “All friends”.
A camera icon will now appear on your page. You won't see it, but your friends will.
If the icon does not appear, then this may help: click “Edit Page”.
Then select the “Contacts” tab and in the “Mobile phone” and “Additional phone” columns, select “Visible only to friends,” even if the number is missing, and click on the “Save” button.
Now the button should appear and your friends will be able to call you. Of course, if there are cameras and microphones on both sides.
Recently, the administration of the social network has not ceased to delight users with various innovations, useful and not very useful. In any case, expanding functionality is always good. Until today, the webcam on the VKontakte social network was the tool with which you could communicate with your friends via video calling. Just yesterday she expanded her capabilities. Now you will be able to use the new capabilities of uploading photos to Contact, which your camera will help you with.
Today it is integrated into any laptop, and is also present in absolutely every desktop computer, as an additional device. The developers of the social network cannot ignore this fact, and are trying to integrate the webcam into the VKontakte social network as much as possible.
So, yesterday we were pleased with two innovations at the same time that relate directly to photo uploading. As for the first update, it now allows you to quickly and easily take a photo from your VKontakte webcam and attach the photo to messages or to the wall.
Activation
First, you need to update the VK application installed on your phone. If this is done automatically, great. If you don’t know whether automatic updates are enabled, then go to the Play Market or App Store and see if there is a button like “Open” next to the messenger. If “Update” is written opposite, then perform this action.
Secondly, one of the latest versions of the operating system must be installed on the phone. Video calling does not work on Android 4.2.2; the required button does not appear even after activation. But on Android 7 everything works great.
After updating the application, opening the “Notifications” section in your profile, a message will appear at the very top that “VKontakte calls are available.” I didn’t click on it - but in vain! Perhaps after this I would just need to call any friend on Vkontakte via video link, and the service would be activated. But later this notification no longer appeared, so the question: how to activate video calls on VKontakte interested me. And I found a way out!
To do this, click on the magnifying glass icon below and click on the search bar.
Enter “Video calling.” We need a group with this name because it discusses issues that interest us now. The thumbnail should have a white handset on a blue background. Click on the title.
You can “Subscribe” to the group to keep abreast of all the latest news.
Next, scroll down the feed and under the post with the most comments, click on the button that corresponds to them.
Check them out. Here, those users who have video calls are offered to call. This is exactly what we need. Once the person who has this service active dials you, everything should work. Therefore, we find the message: “Who to call?”
Then you need to answer something like: “Me, please” or “Call me. Please".
The girl responded to my request very quickly, and also sent a screenshot that I needed to update VK.
Moreover, they wrote to me in a personal message that an update is required. Since it’s not very convenient to communicate in the comments under a post, I preferred the chat.
The fact that they called me and could not get through was visible in the “Notifications”.
I updated the application, but still nothing worked. In my case, the reason is an outdated version of Android (4.2.2).
Having updated VK on another smartphone, I asked to make the call again: a message appeared in PM that I had one missed call. Immediately after this, this service became available to me.