How to view all contacts
Owners of smartphones running Android OS can manage their chats, invitations and contacts in the Google Hangouts application. First you need to create an account on Google. This is necessary so that the contact list is visible not only on this Android smartphone, but also on all subsequent ones.
Viewing all contacts on a smartphone running Android OS is easy.
- Open the Contacts application by tapping the icon with a silhouette of a person on the screen.
- There is a plus icon in the lower right corner, you need to click on it.
- Select the line Start chat.
- After this, the entire list of contacts appears on the screen.
To quickly find the desired contact, enter the first letters of the name into the search bar located at the top, after which the system displays all saved options with this combination of letters.
How to create a new contact on your phone
On a smartphone, adding a contact to the phone book is as easy as on a feature phone. The sequence of actions will be as follows:
- Open the Contacts application on your smartphone or tablet;
- There is a plus icon in the lower right corner, you need to click on it;
- Enter your name, phone number or email address;
- To select a Google account where the information will be saved, you need to click on the down button next to your email address;
- If you need to provide more information about the subscriber, click on the down arrow next to the Name field;
- You can add a photo of the subscriber by clicking on the camera icon at the top of the screen;
- Additional information or a note can be entered by clicking on the Show other fields section.
After this, all that remains is to click the Save button. All contacts are recorded in the phone book and can be found very quickly if necessary.
Description of basic settings
In order for GetContact to protect your phone from unwanted calls, you need to make it the default application for calls instead of the standard Phone . To do this, in the “Search” below, click on the “Always know who’s calling” and click on the “OK” .
You also need to allow the GetContact window to be overlaid on top of other application windows. To do this, enable the second function “Allow display on screen” and click on the switch in the phone settings.
What parameters are found in each section of the settings menu:
- "Language" . Here you can select the interface language – Russian or English.
- "Notification settings". In this section, you can turn on and off system messages about the appearance of new tags, each entry into the application using the current number, and viewing profile tags by other people. You can enable sending notifications in GetContact itself, via email, WhatsApp, Viber, Telegram or SMS.
- "Account settings". This block displays information about the current profile: name, email, phone number. Using the tab "Account Management" You can temporarily block your account. To unlock your profile, you simply need to log back into your account in the app.
- "Spam settings" . In this section, you need to configure GetContact for an incoming call: warning about spam calls and fraud, or completely blocking such calls. They also warn here: GetContact may consider calls from institutions whose clients the profile owner is spam.
- "Hidden mode settings" . Hidden mode allows you to look at other profiles' tags without revealing your identity. The person will see that his tags were studied by some anonymous person. The downside of the function is that the ability to see for yourself who viewed the tags will immediately be disabled.
- "Ribbon Settings". The section consists of two tabs. Using the first tab "Who is there?" You can add a list of friends (contacts from your address book) who use GetContact to the main screen. The second includes tags that show how the current phone number is recorded by other users.
In order for the application to show a list of contacts from your address book who use GetContact, you need to click on the book icon in the upper left corner in the “Search” and allow the service access to your contacts.
It is not recommended to enable this option unless necessary, because the service will begin to show other profiles as they are recorded in this book, in the form of tags.
To turn off access to contacts back, you need to:
- Open Android settings. Go to the "Applications" .
- Select GetContact from the list.
- Go to the point "Permissions". Click on the active switch "Contacts".
The GetContact interfaces on Android and iOS are slightly different. The section names are identical - the only difference is the location of the links and buttons.
How to edit or delete a contact
If the subscriber has changed his phone or has a new SIM card, the number can be added to a contact already saved in the phone book. The sequence of actions is as follows:
- Open the contacts application;
- Find the contact that needs to be changed;
- In the lower right corner there is a Change tab, you need to click on it;
- Immediately select the desired account if there are several of them;
- Next, they change or add a number, change the name in a separate field, and also add an email address;
- If you need to add some notes, then select the Show other fields section or click the down button;
- If you need to change a contact's photo, click on it and then select another option.
After this, click on the Save button. You can view the changed data by finding the number of the desired subscriber in the phone book.
As a rule, people rarely delete even contacts that are no longer needed, leaving them just in case. But if suddenly the entry needs to be deleted, it is very easy to do.
- Open the Contacts application;
- Find the contact that needs to be deleted and click on it;
- In the upper right corner of the screen, click on the three vertical dots. Here select the line More and then Delete. Next, you just need to confirm your intentions.
To delete several contacts at the same time, you need to click on them individually and hold for a couple of seconds until the check mark appears. After this, you need to click on the Delete icon and confirm your intentions.
How to share a contact
In some cases, it may be necessary to share a contact with another subscriber, but you don’t want to enter data manually. You can share a contact very quickly.
- Open the Contacts application on your smartphone;
- Next, find and select a Contact in the list;
- In the upper right corner of the screen, click on the three vertical dots. Here select More and Share (Send).
- Next, choose the subscriber number with whom you want to share and confirm your intentions.
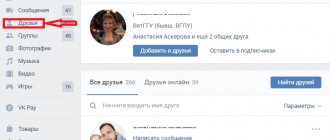
Where are “My Settings” on VKontakte?
Basic settings in VK are located at https://vk.com/settings. To find the page in the full version of the site, click on the user name in the top right. On the phone, in the official application, you will find debugging in the section of the same name. To get to the block, click on the three bars in the lower right corner and tap on the debug icon in the upper one.
Where are contacts stored in the phone memory?
The phone book is one of the most vulnerable places in a mobile device in terms of information leakage. It is useful for users to know where exactly such information is stored.
All contacts on a smartphone with Android OS are stored in the directory at /data/data/com.android.providers.contacts/databases/ in the file contacts.db or on some firmware contacts2.db. To view this directory, you need root rights.
Information may be needed in the following cases:
- If the phone is broken, but its internal memory is active, then you can export the saved contacts;
- If you can’t trust synchronization with Google servers, you can set up automatic transfer of information from your smartphone to your home computer or tablet. An SSH server is most often used for this.
It is more convenient to import and export contacts from an Android phone using the standard Contacts application. This program works great with the common VCard format.
VK for Android | VKontakte application
VKontakte is undoubtedly the most popular Russian-language online communication service. A large part of the audience are mobile device users. It should be noted that using the VKontakte social service on phones, smartphones and tablets is quite convenient. There are two options - log into VKontakte through a browser or download and install the VKontakte application, written specifically for Android users. The VK application for Android will be discussed further.
Main functions of the VKontakte for Android mobile application
In principle, there is no need to list the main functions that the VK for Android application performs. It is clear that the main task is to make navigation through Contact more convenient even in comparison with the mobile version of the site, and to adapt viewing for smartphones and tablets.
However, there are several features of the official application for VKontakte 3.12:
- Reading news from groups and users of the social network VKontakte
- Communication with other users individually and in groups, commenting
- Add photos, videos, write text notes through the mobile phone upload interface
- Playing music and videos
- Creating news and broadcasting it on a social service
- Adding and removing from friends list
- Sending various stickers and gifts to contacts via the VK interface for Android
- View other profiles and edit account information
- Creation and management of photo albums, uploading photos via phone to the service
- Download and upload media files and documents on Android
- Other features
See also : how to download music from VKontakte to your phone?
Where is the best place to save contacts on Android?
On modern smartphones, you can store contact information in three places.
- Internal memory of the mobile device.
- SIM card.
- Cloud services Gmail, iCloud, Dropbox and others.
It is better not to use the first two methods of storing information or to use them only in extreme cases. It is recommended to store only a minimum amount of subscriber data on the SIM card. It is worth understanding that if the SIM card fails or is lost, you will lose all contact information.
You can store complete contacts of subscribers in the internal memory of your phone. But you need to remember that if your smartphone breaks down, all information will be lost. Although many subscribers periodically transfer all their contacts from their smartphone to their computer.
The safest way is to store data in one of the cloud services. For security, it is recommended to set a complex password and enable all types of protection. To prevent information from falling into the hands of third parties, you should use two-factor authentication, where you need to enter a secret code from an SMS message.
Tatiana
I follow news on the mobile services market. Always up to date with the latest events
Ask a Question
Question to the expert
How many contacts can I save on my smartphone?
It all depends on the RAM of the mobile device, but in any case, you can save a thousand numbers.
Where is it better to save subscriber contact information, on the phone or on a SIM card?
All methods have their advantages and disadvantages. But it is most reliable to store contacts in cloud storage; in this case, they can be quickly and easily restored to your smartphone.
How to quickly find the desired contact in the list?
A search bar is provided for this. To use it, click on the magnifying glass icon and then enter the first boxes of the name.
Gone are the days of storing phone numbers and email addresses in a notebook. Nowadays all contact information can be collected on a smartphone. If necessary, contacts can be transferred to other users, supplemented and deleted.
4.6 / 5 ( 33 voices)
0
Author
Tatiana
I follow news on the mobile services market. Always up to date with the latest events
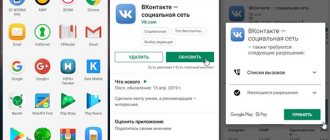
Installation
Those who are interested in the new program are concerned with the question: how to install VKontakte for Android and what capabilities does this program have? There is nothing complicated or overwhelming in this process. It is enough just to clearly and consistently perform certain actions.
The application is constantly updated. New features have been added to it, and the functionality that already exists has been improved. The latest version has added stickers that allow you to express your emotions in an original way without text messages, and the VKontakte authorization error on Android has also been fixed. Therefore, every user can experience the simplicity and convenience of this information product.
In order to install VKontakte on Android, you need to:
- From your Android mobile device, follow the link to Google Play;
- Download the application. Installation occurs automatically, immediately after downloading;
- Run the program;
- Provide your login and password for the social network;