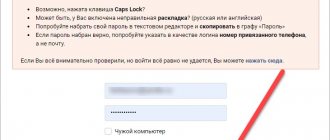
Previously, we looked at several problems with logging into the Odnoklassniki website. And one of the reasons is when you try to install an application on your phone or tablet. And here, of course, you will need to enter a password. And yet you don’t remember him. Although it doesn’t ask for it on the computer. What to do in this case?
Yes, it's really simple. First of all, you have 2 current ways to log into the Odnoklassniki website from your phone.
First of all, do this through the browser itself. It will turn out the same way that you are logging into Odnoklassniki from someone else’s computer, and you will naturally be asked for a password.
Select your problem from the list:
How to open the Odnoklassniki website without a login and password
Open a personal page from someone else’s computer or phone (reading now)
Odnoklassniki are not working today. What to do?
Check the availability of the Odnoklassniki website using the synonymizer
But I really want to surf the site from my phone. Look how convenient it is:
Just enter in the search or in the address bar - classmates:
...and then, when you get to the ok.ru website, you will need to remember your login and password, or make a password request to your email.
How to register a profile through an application on your phone
To create an account, download the Instagram application on Google Play for Android or in the App Store for iOS.
I will show the installation process using Android as an example, but the algorithm is the same for both systems.
1. Go to the Google Play application (App Store)
Google Play icon
2. Enter the name of the application “Instagram”
Search on Google Play
3. Find the desired application and install it on your phone
Instagram icon on Google Play
After the application is installed, go into it to register a profile.
Instagram icon after installation
1. Select “create an account”
Start window in the application during registration
2. Enter your phone number and email
Window for entering a phone number
Email entry window
Once you have entered the data, click the “next” button.
3. After this step, you need to come up with a login (another nickname or profile name) and password
We'll talk about how to come up with a profile name a little later.
At this step, you can also sync your profile with your contacts.
What does it mean?
If you synchronize contacts with Instagram, you will see people who are registered on this social network. This is very convenient, because you won’t have to manually search for your friends and acquaintances. And you can easily choose who to follow. Plus, your friends will be shown your account.
Therefore, I advise you to use this function.
4. After completing all steps you will have access to your profile
Registration completion window
In this window, you can change your username if you suddenly find an error or come up with a new name. This feature will also be available in profile editing.
5. Connect to Facebook
After you register, you will be asked to connect to Facebook.
Window with connecting a Facebook account
This action links two accounts, which allows you to find Instagram users among your Facebook friends and share posts.
If you don't have Facebook or don't want to add it, then skip this step.
That's all. Registration is completed. Congratulations, you have become an Instagram user.
Start page when registration is completed
Now let's look at how to create a profile on Instagram via a computer.
Quick access to my page on Odnoklassniki
If you more often surf the Odnoklassniki website via your phone, then you use the mobile application. It's convenient and fast - you don't need to log in to my page every time.
But on the computer there is more hassle. To open my page on Odnoklassniki, that is, to log into my page, you will have to open your browser, find the desired site, and make the transition. All this is against one quick tap on the smartphone display.
However, the process can be accelerated.
Place a shortcut to my page ok ru Odnoklassniki on your computer desktop. You need to download the social network icon, then copy the web address of the site, and paste it onto your desktop as a shortcut. Next, through Properties, change the icon to the downloaded logo. You can read more about how to create a shortcut for Odnoklassniki on your desktop in separate instructions.
Or make a quick bookmark in your browser. Using Google Chrome as an example, we will tell you how to do this:
- Open my ok ru page;
- Right-click on the tab and select Pin. Now it will always open in the browser minimized (on the left side of the top line of the window);
- Also, you can install the “Visual Bookmarks” plugin, for example, from Yandex. After installation, visual bookmarks open in the add a new tab window - click on the plus sign to the right of the last open one.
- Now click on the empty field and paste the link to my Odnoklassniki page there;
How to register a profile via computer
1. Go to instagram.com
2. Fill in the information on the website: phone or email, first and last name, username and password
Page on the website during registration
Next, all steps are identical to those in the application.
However, I would like to note that the functionality of the application and the website are different. You will not be able to post on the site. You can only view your feed and stories. Therefore, I advise you to install the application on your phone.
Now let's look at how to choose a login for your account.
liveinternet.ru
Logo liventernet.ru
One of the most popular services for a personal blog. Now many answers to your questions can be found on this site. Many search queries show this site on the first page of answers.
At the moment, the site is the largest blogging service in Russia.
This site has a very extensive number of settings for a personal blog. The user can keep a kind of online diary, from which a blog will be formed.
The site provides very extensive opportunities. Adding various media files, creating communities of interests, communicating both in comments and in private messages.
Also, you can create corporate blogs on the portal.
The portal has a technological platform for blogs on individual domains.
On this site you can earn money by having your own personal blog. It is enough to post paid advertising on your blog.
In principle, it is quite a convenient and interesting service. Since the site has been working for a very long time, all the shortcomings have been practically eliminated, which makes working with the service a pleasure.
Go
VIDEO: How to create a diary on LiveInternet
How to create a blog on LiveInternet / How to create a diary on LiveInternet
Setting up a personal page - TOP 15 services for creating a blog
How to choose a login for a profile (nickname, profile name)
Login (profile name, nickname) is the name by which you will be known, searched for and identified on Instagram.
Essentially, this is your name on the social network. And the question arises, how to choose a suitable nickname.
I distinguish four types of logins:
- Personal data . If you want to blog, talk about your life, or just share bright photos with friends and acquaintances, then use your data in your nickname: last name, first name, date of birth, year of birth, etc.
You can also use the English equivalent of the name (Anya - Ann, Lena - Helen, Sasha - Alex, etc.)
This nickname will allow you to remain yourself, and your friends and acquaintances will quickly find you.
An example of such nicknames: helen_evstratova, ann1995, alex23021997, yulia_2201
- Primary activity . If you have a commercial profile (shop, hairdresser, cosmetic services, designer, etc.), then reflect this fact in your nickname. It is also better to indicate the city in this login. This will allow network users to quickly find you for the services they are interested in.
An example of such nicknames: shopchinchin, art.designer, smm.novgorod, cosmetolog48, stylist_moscow
- Nickname . If you are a creative person or want to stand out among users, you can come up with a pseudonym that reveals your extraordinary nature.
An example of such nicknames: yatuta, gno, ladycat, clapgirl, valera_007
- Combination _ Here you can combine two types. For example, combine an activity with personal information or an activity with a creative pseudonym. As they say, only your imagination can do it.
An example of such nicknames: lena_clap (personal information + nickname), yuliacosmetolog (personal information + activity)
These four types will help you come up with a login for your profile, regardless of its direction.
I would also like to note that the following characters can be used in logins: dot, underscore and numbers. Don't forget this when you come up with a nickname.
Now let's smoothly move from login to filling out personal information or the profile header.
Telegram
Telegram logo
A relatively new service, which is just beginning to gain popularity in the CIS countries.
The creator of this cross-platform messenger for smartphones is the well-known Pavel Durov.
Many note the incredible similarity between Telegram and VKontakte. Although what is surprising is that Telegram has gained the greatest popularity in countries such as the USA and Germany and is used everywhere there.
But in Russia he is just beginning his extensive activities.
It is worth noting the incredible advantage of the site over its analogues - the service is built on correspondence encryption technology.
This technology for the service was developed by Pavel’s brother. This advantage makes the service much more secure and private.
Also, the fact is that Telegram does not block various content (as VKontakte does).
This significant advantage has led many bloggers to switch to this platform or use it more extensively than their other blogs on third-party resources.
In principle, having already gained considerable popularity, the service shows itself at its best. This is why in 2021 more and more bloggers are registering on the platform.
Interesting fact! Telegram is not liked in Russia for its secrecy and an overly secure system that cannot be hacked.
Pavel Durov also promised to pay an incredible amount to anyone who can “get” to personal correspondence through hacking.
Go
VIDEO: How will Telegraph blogging platform from Telegram be useful to you?
How will Telegraph blogging platform from Telegram be useful to you?
Setting up a personal page - TOP 15 services for creating a blog
What to write about in the profile header
The profile header is information that is reflected in the profile and contains key points about you and your activities.
There are many recommendations on what to write in this section and in what order the information should be arranged. I will share my algorithms that I use when filling out the profile header.
My algorithms are quite simple and are suitable for both personal and commercial blogs.
When filling out the profile header, provide complete information about yourself so that the new subscriber understands who is in front of him. To achieve this goal, use the following algorithms.
Algorithm 1
- Who am I . In the first line I write who I am: blogger, designer, cosmetologist, makeup artist, funny girl, sports guy
- What I do . In the second line I describe my activities: I crochet, make money on the Internet, blog, take photographs
- How can I be useful to the user ? In the third line, I indicate how I can help a person: I consult on SMM, process photographs, make layouts, knit custom-made scarves.
- Method of communication . In the last line I indicate contacts for communication: direct message, link to instant messengers or website, phone, email
Algorithm 2
- I am X - write who you are, for example, targetologist, copywriter, manicurist, workshop, clothing store.
- I help Y - here you write about who your clients or readers are, for example, I help young mothers, businessmen, aspiring targetologists.
- Using Z - here you write about how you can be useful to your audience, for example, I create an interior, help with design, create sales funnels.
- Contacting you - in this line, indicate your hashtags, for example, branded or with an interesting section, your website or how you can be contacted.
Let's now put it all together and look at it with an example.
Algorithm 1
Example 1 - blogger
Who am I - Beginner blogger What do I do - Write articles for websites How can I be useful - Consult on writing posts Contact method - Write in direct message
Example 2 - designer
Who am I - Designer What do I do - I do painting How can I be useful - I draw portraits to order Method of communication - You can contact me by phone (phone number)
Example 3 - business with English courses
Who we are - English teachers What we do - We conduct online learning courses How we can be useful - We teach you to speak from scratch Method of communication - For contact: (Link to site)
Algorithm 2
Example 1 - targetologist
I am X - Targetologist I help Y - I help businessmen With the help of Z - In promoting your Instagram Contact you - Write in direct
Example 2 - interior designer
I am X - Designer I help Y - I help new residents With the help of Z - Create the interior of your dreams Contact you - My phone number (phone number)
Example 3 - children's clothing store
Who we are - Store "Childhood" What we do - We help young mothers How we can be useful - Select clothes for babies Contact method - For contact: (Link to site)
Thus, these examples show that these two algorithms reveal basic information about the profile owner and the new subscriber will understand who he is dealing with.
However, if you have difficulty filling out these items, then fill out in detail those items that you can.
Now let's look at how to add this information to the profile header.
1. Go to your profile and click “edit profile”
Edit profile icon
2. Enter the necessary information in the “about yourself” field (maximum number of characters - 150)
If you have a link to a website or instant messengers, add it to the “site” field
3. Click “save”
Part of the menu for editing a profile on Instagram
After this, the information will appear in your profile.
Profile header example
Well, we took the first steps to create an account - we came up with a login and added information to the profile header.
Now let's move on to publications: let's look at adding photos or videos to Instagram.
Blogger
Blogger logo
This platform provides the opportunity to blog on a specific topic. However, in addition to this, using the service you can create a website that will be integrated with popular Google tools and services.
Registering on the site is very easy, especially if you already have a Google account.
After registration, you can immediately start creating a new blog by clicking on “New Blog”.
The website builder is very concise and simple. It does not provide many standard templates (about 40), but for many this is quite enough.
The undeniable advantage of the service is that it is completely free. However, this aspect may seem like a disadvantage due to the fact that the storage space for content is very limited (only 1 GB).
In addition, there are a number of other restrictions that emerge as work progresses. However, many have already become accustomed to it and consider this platform to be one of the best for running a personal blog.
Essentially, this is another Google project. Simple and concise, but with its own shortcomings, which after a while may seem insignificant.
How to create a blog quickly and for free. Google Blogger Service
Setting up a personal page - TOP 15 services for creating a blog
Go
VIDEO: How to create a blog for free on Blogger #1
How to create a blog on Blogger for free #1
Setting up a personal page - TOP 15 services for creating a blog
How to post a photo or video on your feed
The process of adding photos and videos to the feed
So, we have created an account. Now it's time to share bright events from your life with the world.
In order to publish a photo or video in your feed you must:
1. Add a photo or video to your feed
If there are no publications on your account yet, you can post a photo or video by clicking on the “+” button in the middle of the page.
For further publications, use the panel below by clicking the “+” button.
Home profile page
2. Select a photo or video to publish
Photos and videos can be selected from the gallery or taken using the camera.
Window with photo or video selection
I also want to note that you can post up to 10 photos and videos.
To do this, when selecting, click the “multiple photos” icon and select photos or videos.
Select multiple photos
Once you have found a suitable photo or video, click the “next” button.
3. Process photos and videos
You can edit a photo or video just like a profile photo, using filters or editing options.
Once you have completed this step, click the “next” button.
Page with filter selection Page with parameter settings
4. Add text and publication locations
You can add a description to a photo or video that contains text and hashtags.
Please note that Instagram allows you to use no more than 2200 characters in the text and no more than 30 hashtags in one publication.
If you want to tag a person in a publication, then indicate his nickname without a space through the @ sign, for example, @helen_evstratova.
More information about attractive texts on Instagram
You can also post on other social networks that are connected to your Instagram.
Window with adding text and selecting accounts for publication
5. Set additional publishing parameters (if desired)
The process of adding people to photos and videos
1. Go to the “tag people” tab
“Tag people” option
2. Click on the photo where you want to tag the person
User mark icon
3. Enter in the search the nickname of the person we want to tag
Entering a person's login to mark
4. A mark with the nickname of the person you specified will appear on the photo
If you need to tag more people, then follow the same procedure (steps 1 - 3).
Once you have tagged all the people in the photo, click the checkmark.
An example of a person's mark in a photo
5. In the menu before publishing a photo you will see all the people you tagged
Example of a post with tagged people
Process of adding a place (geolocation)
1. Select “add place” from the menu
"Add location" option
2. Specify the required location
If you have a location function on your phone, Instagram will suggest places based on that location.
Window with seat selection
3. In the menu before publication you will see the place that was indicated
Once you have filled out all the data (text, location, tagged people), you can safely post the publication by clicking the “share” button
Example of a geolocation tag
6. After these steps, the publication will appear on your profile
Example of an account page with a post
Next, we’ll look at the algorithm for posting photos or videos in stories.
And you can find more information about technical issues related to posting on Instagram in the article: How to make a post on Instagram in 7 steps - detailed instructions for a beginner
Tumblr
Tumblr logo
This is a fairly popular and feature-rich microblogging platform.
The site is quite easy to use and provides a wide range of features.
You can share not only recordings, but also a wide variety of media files.
The service tools are very easy to use. Thanks to them, you can diversify your log and make it more interesting.
Users get to know each other not only by searching for interesting pages, but also by reblogging (sharing another user’s post on your blog).
After publishing a post, it will appear in the feed of all users who follow you.
The site offers 7 types of posts:
- text;
- photo;
- quote;
- link;
- chat;
- audio;
- video.
This is why you can “dance”. The rest depends entirely on the imagination of the blogger himself.
You can blog on this platform not only from your computer, but also download the application to your smartphone to always be online.
Go
VIDEO: WHY I LOVE TUMBLR
WHY I LOVE TUMBLR
Setting up a personal page - TOP 15 services for creating a blog
How to post a photo or video in Stories
Stories is an Instagram feature with which you can post any photo or video for 24 hours.
You can find stories in the top panel of the feed.
Appearance of Stories
Using this function, users share live emotions, events, and funny moments. After 24 hours, the photo or video will be unavailable for viewing and will be moved to your archive.
If you want to post a photo or video in Stories, you must:
1. Go to your profile, click the “+” icon next to your avatar and select “add your story”
Adding a photo or video to Stories on your profile
Window when adding photos
Or click on the camera icon in your Instagram feed.
Adding a photo or video to Stories in the feed
2. Select a photo or video to publish
Just like with a post in the feed, you can select several photos at once (the placement algorithm is similar).
Choosing a photo for Stories
3. Photo or video processing
Using the tools in the top panel, you can add various elements to your photo or video: geolocation, stickers, date, hashtags, animation, text and more.
Toolbar in Stories
4. Once you have finished editing your photo or video, click the "recipient" button
Example of a photo for publication in Stories
5. Next, you need to choose who will see your post.
There are two groups on Instagram: your story and best friends.
When you select the “your story” group, the publication will be seen by all people who follow you.
The “best friends” group is your chosen subscribers with whom you are willing to share publications.
To select any of the categories, simply click on it.
Posting groups
After this, your profile will have a Story and access to the archive where your stories will be stored.
Information about the Stories archive
These are the types of posts available on Instagram. Now let's look at what types of accounts there are.
LiveJournal
LiveJournal logo
A service that is focused specifically on maintaining a personal blog. Usually this happens in the form of a kind of diary.
This platform is called “Live Journal” or simply LJ.
The interface is quite easy to use. When you add a friend, all his posts are displayed in the feed, which is quite convenient.
However, this service limits the number of possible friends (2000 in total). Their number can be increased only by writing to the administration.
That is, one can understand that when maintaining an extensive blog, such a limitation will not be very convenient.
Although many users prefer it as a platform for maintaining a personal blog, there are a number of limitations in the service.
They are removed only after the user pays for a premium account.
Considering that most services are now free, this is a significant disadvantage of the Journal.
Adding media files to recordings is possible. Communication, as well as on many other resources, in private messages and through comments.
Go
VIDEO: LiveJournal how to create a LiveJournal blog
LiveJournal how to create a blog LiveJournal
Setting up a personal page - TOP 15 services for creating a blog
Open accounts and closed ones. What is the difference
The first qualification of Instagram accounts is open and closed.
By default, all profiles are open, that is, publications are available for viewing and action (commenting and liking) by all Instagram users. Also, if your account is open, any user can follow you.
This type of account is great for those who want to promote themselves, their products or services.
However, an open account has one drawback - bot subscriptions. Bots are non-living accounts created for the purpose of performing an automated action, such as posting or commenting.
Such accounts do not bring any benefit, but on the contrary kill activity. Because of this, once a month open accounts must be cleared of such bots manually or using programs.
Therefore, if you do not want your publications to be available to all users or to be followed by everyone who wants to, you can make your account private.
A private account is a profile in which publications are visible only to subscribers. You can also accept or reject your subscription request.
Please note that you can only make your personal account private; a business account does not have this function.
So, how do you make your account private?
1. Go to account settings
Account Settings Icon
2. Select the item “privacy and security”
Account settings menu
3. Select “account privacy”
Part of the “account privacy” section menu
4. Click “OK”
Window with switching account to private
All. Your profile is now private. If you want to make it open again, then follow the same procedure.
Next we will look at another type of qualification: personal and business account.
WordPress.com
WordPress Logo
The site is considered one of the most popular and extensive for personal blogging. This is a site that is a platform for creating websites.
That is, it becomes possible to create a blog completely tailored just for you.
However, it is worth noting that this service is paid. You can, of course, limit yourself to the free version, but it has significantly fewer functions and includes the following parameters:
- traffic counter;
- anti-spam filters;
- SEO;
- design themes, etc.
In principle, for some users, this is quite enough to create a personal blog.
This platform allows you to create bright and beautiful websites that will be configured the way you want.
However, it is worth noting that you will have to tinker with the interface. Understanding the functionality is not so easy.
However, having understood this resource, you can understand that creating a blog on its platform is very interesting.
Otherwise, the site and communication on it will be as you wish. This is a great space for imagination and creativity.
It is worth noting that many popular websites were created thanks to this platform.
Go
VIDEO: Creating a blog on WordPress from scratch►(VIDEO COURSE FOR BEGINNERS)
Creating a blog on WordPress from scratch►(VIDEO COURSE FOR BEGINNERS)
Setting up a personal page - TOP 15 services for creating a blog
How to convert a regular account to a business account
In this part of the article we will consider such an important question: how to transfer a personal account to a business.
But before we move on to the algorithm, let's look at what a business account is for and what it gives the user.
According to statistics, 80% of people are subscribed to one or another business account, so if you decide to promote goods or services through Instagram, then you need such an account.
What does a business account provide?
- Statistics . With this tool, you can track the performance of your posts and get information about your subscribers.
- Promotions. This tool allows you to create advertisements to increase your reach among Instagram users.
- Communication methods . In your business account, you can specify the communication methods that are convenient for you: phone, email and location. In addition, the user will be able to contact you directly from Instagram.
As you may have noticed, all these tools help the account owner develop a promotion strategy.
How to transfer a personal account to a business?
Before you decide to take this action, create an account on Facebook, since without this you will not be able to transfer your personal account to a business.
1. Go to “edit profile”
Edit profile icon
2. Select the option “try Instagram Business tools”
Part of the profile editing menu
3. Review your business account options and click “continue”
An example of a window describing the possibility of a business account
4. Select your account profile
List of proposed business profiles Example of a selected business profile
5. Check your data: confirm or correct it
Data verification window
6. Link your account to Facebook
This action is required to create promotions.
Select the page to which you want to link your Instagram account, or create a new one.
Window with adding a Facebook account
After this action, your personal account will become a business account. Contact options will appear in your profile, and statistics will appear in the menu.
Business account appearance
"Statistics" icon in the "account settings" menu
If you want to return your business account to a personal one, you must:
1. Go to the “account settings” menu
Account Settings Icon
2. Select “account”
Part of the “account setup” menu
3. Select “switch back to personal account”
Account tab menu
4. Click “switch”
Window with switching account to personal
That's it, your account is personal again.
Now we have finished analyzing the settings when creating an Instagram account. All these instructions will introduce you to the basic functions and tools that will allow you to share photos and thoughts with your readers.
However, if you still have questions, write in the comments, we’ll figure it out together.
But one more question remains: what to do when you need two accounts, for example, one personal and the other commercial? The logical answer is to create a second one. We will look at how to do this further.
How to create a second account on Instagram
There are situations when you need to have not one Instagram account, but two or three, for example, if you want to run your personal and business separately or you have several projects that cannot be covered in one account.
And here the question arises: how to create a second account on Instagram?
To do this, go to your account, then go to the menu and select “account settings”
Account Settings Icon
At the bottom of the page click “add account”
Part of the “account setup” menu
If you have a business account, you can immediately add a second business account.
After that, click “register”. You will enter the menu where you create an account, as we discussed in paragraphs 1 and 2 of the article.
Part of the account selection menu
Once you have several accounts, you can switch between them using the menu by clicking settings, then exit and log into the desired account.
Account Settings Icon
“Log out of account” icon Example of selecting an account
Please note that you can have no more than 5 accounts in the application.
TypePad Micro
TypePad Micro logo
Another platform for creating websites. However, compared to WordPress, the service interface is much more convenient. In addition, the resource allows you to import and export blog content from/to other resources.
This aspect will help to transfer a finished blog (or one that has just begun to emerge) to a new platform without unnecessary copying and a lot of unnecessary “movements”.
However, a significant disadvantage of the service is that it is paid. This aspect, in an era of a large number of free services, leads to the loss of its popularity.
Otherwise, the resource is very interesting and convenient. All aspects of a blog are limited by the blogger's imagination and can have many different functions.
Communication in the way that is most convenient for the site owner. Adding files is also limited to the owner only.
Such services allow the blogger to roam to the fullest extent of his soul.
Go