What videos can be hidden on VK
Once added to your personal page, the video becomes available to other users.
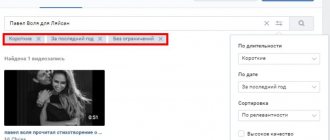
We go to our video materials by clicking on the corresponding link in the profile. In the “My Videos” section there are 2 tabs: “Added” and “Downloaded”.
The first tab contains all files that were added from other people's pages or from a computer. In the uploaded ones, we see only those materials that we uploaded to the social network ourselves.
So, in this last directory, you can use the settings to hide all contents from prying eyes. And “Added” are a little more difficult to hide; they are only partially editable. This tab also contains entries that were previously designated as “Videos of me.” After updating VKontakte, this block was abolished, as was the ability to tag people in videos.
Conclusion: you can restrict access to all video materials, but using different methods. Let's start with something simple.
How to create a live broadcast on VKontakte
This method of creating a VKontakte broadcast involves the use of special software that allows you to demonstrate the screen of your monitor, or the use of professional video equipment.
Let me remind you that if you want to start live broadcasting via a mobile device, then the simple and convenient VK Live program is suitable for this.
Using this online method you can:
- share images from the screen, external video camera or game;
- conduct live broadcasts from a variety of places;
- be able to organize uninterrupted transmission of television channels and radio stations;
- and much more.
Creating a broadcast for broadcasting using software:
1. To do this, you need to open the full version of VKontakte from your PC.
2. Select the place where the broadcast will be posted - your personal page, group or community in which you are an administrator.
3. Open the video page of the page or community, depending on where you will broadcast.
4. Click on the “Broadcast” button. It is located in the upper right corner of the page.
Important to remember! The broadcast can be started only once, and only by one administrator. To launch several parallel broadcasts, all subsequent ones must be created by other administrators.
- upload broadcast cover. To do this, click on “Upload your own” and select an image from your computer;
- adjust the image size to have an aspect ratio of 16 by 9 so that the image is displayed correctly;
- also set the optimal cover size – 800 by 450 pixels;
- make a description and assign a title for the broadcast;
- select a category for broadcast;
- If you select the “Computer games” category, you must also indicate the name of the game
- open the “Video encoder settings” section and click on “Show link and key”. This is done to generate software settings for video broadcasting;
Remember! Never share your link and key with anyone, because with their help absolutely anyone can broadcast from your page.
If necessary, you can re-generate the settings by clicking on “Generate new settings”.
- After doing the above, go back to the browser and click "Preview". This is done to check the signal. In this mode, the stream will be visible only to you, and the broadcast stub will be displayed to other users;
- Click on the “Notify subscribers about the start of the broadcast” checkbox. After this, your subscribers will receive a notification. This function is available once per hour;
- click on “Save” and proceed to check the signal;
- run the stream in the software and look in the browser to see if everything is fine with the broadcast signal;
- if everything is fine with the broadcast, then click “Publish”;
- after all of the above, the broadcast will be available for public viewing, and to the right of the video people will be able to chat;
- to end the broadcast you just need to stop it in the broadcasting software;
- after the broadcast ends, you can still resume it within a minute, and after 60 seconds it will finally end and a complete recording of the entire broadcast will appear.
We recommend that, among other things, you try to use the OBS program, especially for Vkontakte. This program greatly simplifies the process of creating a stream, and is a good assistant for beginners.
Working with settings
This option is suitable for media files that you personally uploaded and those in which you were once tagged by other users. To see which ones you can customize, hover your mouse over the cover. If a pencil icon appears, it means you can change the visibility mode. If there is no such icon, then you cannot hide the file in this way.
Click on the pencil and set the parameters for each entry separately. We are interested in the “Who can watch this video” section. You can completely block access or leave it, for example, only to friends or individual users.
Select the appropriate item from the list and click “Save Changes”. Repeat this with materials that you want to keep out of sight of curious people.
Adding files to a private album
In the “My Videos” section, you can not only download, view and delete videos, but also add them to folders for more convenient storage. I'll create an album, call it "New" and leave access only to myself.
Now I will place the videos that cannot be customized in this folder.
At the same time, I will remove them from the added entries.
After this, you need to refresh the tab in the browser. Changes do not always take effect immediately.
Please note that added videos and the album now have a closed lock icon - they are hidden from prying eyes.
VKontakte allows you to broadcast music in communities and temporarily ban unwanted people
The VKontakte team presented a monthly review of innovations and updates launched for network users in March of this year. In particular, custom tabs were introduced in the news feed, comments under photos and videos were improved, and the ability to set up a blacklist in communities was added.
However, a real boom in communities was created by an innovation that allows you to broadcast music directly to the status, as is done in profiles. Hundreds, or even thousands of administrators are playing DJ right now and watching the popularity of their broadcast.
In order to put music into a community, just go to any playlist, start the music, hover your mouse over the broadcast icon and select the required community from the list that appears:
A special counter opposite the broadcast will help you see how many people are listening to music broadcast in the community. By clicking on it, you can see the full list of listeners. A similar counter appeared in user profiles.
Another noticeable and long-awaited innovation was the introduction of a temporary ban. Temporary bans allow you to block a user for a while, i.e. he will not be automatically kicked out of the community, he will be able to continue reading news and receiving updates in his feed, but will not be able to comment on anything, write on the group wall or add content.
The administrator can specify one of four reasons for the ban, which the user will see when entering the community. Spam, insults to participants, obscene language, off-topic messages, or other things. You can also leave an additional explanatory comment and choose who will see it - only community administrators or a banned user. By default, each ban is given for a week without specifying a reason. When blacklisting a user, using the “Settings” button, you can specify any ban parameters you wish.
Another notable innovation is the ability to move content attached to a post. When creating a post, you can attach photos, videos, audio and any other content in any order, and then freely change their places:
A search for messages based on a single dialogue has also appeared. Moreover, the ability to go directly to the message you are looking for, below and above which the correspondence will be located, has been added, which is very convenient:
Well, the most unexpected news, in our opinion, is that you can now register on VKontakte using Facebook. Naturally, to do this you need to be from outside the CIS and have an account on FB. The system will immediately find the user’s friends, avatar, and even display the correct small copy of the photo.
The full list of VKontakte innovations for March can be found here
Download the files to your computer and then upload them to VK
This option will especially appeal to those who already use programs for downloading music. For example, VKMusic or SaveFrom.net allow you to extract not only audio, but also video materials from VK. When the recordings are saved on your computer, you can upload them again to your page on the social network. Now they will appear in the “Downloaded” tab, and they can be edited as described in the first method.
How to watch private videos
Unfortunately, this is not possible if you are a regular user. You need to become a trusted subscriber or just wait for this video to be published publicly. You can also ask the user to send you this video; most likely, he will not agree, but there is a chance.
You won't be able to download the video either. If you did become a trusted subscriber and were able to watch a private video, the “Download” button will still be unavailable. Unfortunately, this application has such restrictions on downloading videos.
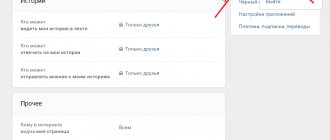
Closing your profile from strangers
Previously, some videos could be hidden in the privacy settings. Currently there is no such function, but you can completely close your account from strangers. Then only friends will be able to see the video and other materials.
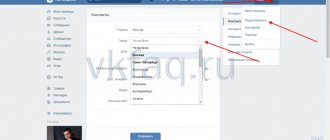
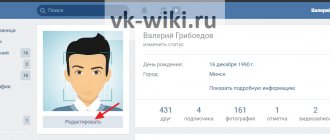
We go to the menu, which is hidden under your small photo in the right corner of the screen. Select “Settings”, “Privacy”. We go down and select the profile type.
To find out how “strangers” now see the page, click on the corresponding link at the very bottom of the window.
As you can see, most of the information is not available for viewing, including videos.
How to Disable Notifications about VKontakte Broadcasts
Following Instagram and Facebook, our beloved VK also introduced the ability to create broadcasts by users. Everything would be fine, we ourselves published how to make a live broadcast on VKontakte, but day after day, various kinds of notifications about the start of broadcasts are annoying, and there is a desire to turn off the notifications.
Quick navigation:
How to turn off notifications about VKontakte broadcasts.
You can turn off all notifications about broadcasts, friends and communities to which you are subscribed. This is very easy to do, go to your page and go to settings -> notifications , or you can directly follow this link: vk.com/settings?act=notify.
This is the settings page for alerts, here you can turn them off, not only turn off alerts, but also for other events. Personally, nothing else bothers me, it will be enough to just disable one item.
Uncheck the box and save the changes. Events such as the start of broadcasts from friends and communities will no longer bother you.
It’s another matter if these notifications about broadcasts do not make you very angry, on the contrary, you would like to see them in your home. But some of them are especially intrusive; there is an option to disable such alerts for a specific person or community.
How to turn off notifications from a specific person or group.
There is also a way out: go to the page of a user or community from whom you would not like to see notifications. Click on the three dots under your avatar and select “Do not report broadcasts”
Similar to the example with the group, we do it on the personal page of the person from whom we do not need notifications about the broadcasts he has launched. Click the ellipsis under the person’s avatar and select “Do not report broadcasts”
Why are these alerts so annoying?
The broadcast service is relatively new; attracting people to broadcasts launched by people in any other way, such as notification, is problematic. We are already accustomed to the fact that there is a re-scope; social networks offer us too many monotonous ideas. VKontakte is, first of all, a tool for communication, listening to videos, and last but not least, it is interesting to watch broadcasts or stories that are sometimes of very dubious meaning.
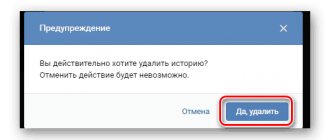
By the way, if we figured out how to turn off notifications so that they don’t bother us, then it wouldn’t hurt to find out how to remove stories out of sight - how to remove VKontakte stories.
kak-vk.ru
How to hide a video in the VK mobile application
You can also hide video files from visitors on your phone. The principle is the same as on a computer – only the social network interface changes.
Using privacy settings
To do this, you need to go to the menu by clicking on the icon in the form of 3 stripes at the bottom of the screen. Then we go to the section we need.
Next to each entry there are 3 dots, under which a drop-down menu is hidden. We click on them. If the action list contains the word "Edit", you can hide this video.
Click on it and select the visibility option that suits us. Click on the “bird” at the top to save the changes. We do this with all the videos that we want to hide.
Closed album
In the video section there is an “Albums” tab. We go there and click on the plus sign in the corner of the screen.
We set the visibility features of the new folder. Now we move into it the materials that we could not configure.
To do this, click on the 3 dots again and select “Add to Album”.
We repeat this action as many times as necessary. You can limit the visibility of all materials or only those that you fundamentally do not want to show to strangers.
Album privacy during creation
How to hide videos in VK? In 2021, users have the opportunity to create entire albums with privacy settings. By adding videos to the appropriate storage, a person can easily open and make certain files inaccessible.
You can close VK videos through an album at the stage of its creation. In the repository editor log there is a line “Who can view...”. All the user needs to do is click on the hyperlink next to the inscription and select the desired option. For example, “Only Me.” All that remains is to save the changes and add videos to the storage.