Live broadcasts are a brand, of course, not of this year, but it still works great. In this article we will list ways to broadcast on the Internet, what services you can use, and why live broadcasts should be used in your business.
1) Conducting live broadcasts within one social network separately via a mobile phone
There are a lot of video instructions on how to start an online broadcast on Facebook, VKontakte, Instagram, YouTube. Streaming platforms (stream - live broadcasting) of social networks are constantly improving - and this is becoming easier to do, and there are fewer and fewer problems and errors.
Start with this method.
Pros: - very simple
— free Cons: — only one social network
2) Launch live broadcasts to many platforms simultaneously independently
If you want to broadcast the image of your computer monitor , for example, for video lessons, and to several social networks at once, you can figure out one of two programs.
We use amateur programs:
OBS
Xsplit
Pros:
- free or cheap
Minuses:
- more suitable for broadcasting a computer screen (for example, for gamers) - you need to spend effort to figure it out
Learn more about video marketing services for business:
3) Automated live broadcasting to multiple social networks for beginners
So that you can start a live broadcast on several social networks as quickly and without problems as possible , special paid, but very convenient live broadcasting services have appeared.
Services:
on-air.pro
switchboard
restream.io
You can signal the service from a computer, from a webcam, from a mobile phone, from a copter, from an external camera. The service makes sure that the broadcast goes on in all your groups and accounts
Cons: - paid programs
Pros: - very easy
4) Live broadcast to many platforms simultaneously independently with graphics and several cameras
If you want to work more professionally, broadcast from several cameras, add a screensaver, speaker banners, banners of sponsors and partners, then you will have to deal with more complex programs.
In addition, you need to learn how to transmit a signal to a computer from an external camera (if necessary)
Programs: Vmix, Livestream, OBS, Ustream
Pros: - cheaper in the long run, - you can add graphics, - you can edit live video from several cameras
Minuses:
— we need a person who knows the program and who will be the on-air editing director,
— programs from $700,
- you need a powerful computer
Order a live broadcast
5) Live broadcasts with a remote editing director
In on-air you can work according to the following scheme: You are given a special camera ($400), which automatically transmits a signal to the base to a service employee. We immediately add pop-ups, screensavers, titles, design, screensavers, partner banners according to the planned algorithm. The advantage is that you don’t need to do anything, just set technical specifications for the remote editing director. There may be several such cameras for shooting.
Pros: - just place the camera and turn it on - you don’t need a lot of bulky equipment - you can overlay graphics
Minuses:
- worth the money
Preparation
Before you start any live broadcast, there are a few things you should take care of, namely:
- Which microphone should I use for Youtube?
- Which video camera should I use for Youtube?
- Which phone is better to use for Youtube?
These are perhaps some of the most basic questions that any aspiring blogger should pay close attention to. Why is this so? It’s simple, if your video has poor sound or picture, then most of the users will pass by your channel.
Gadgets
The minimum required equipment is a telephone with fast Internet. We’ll say right away: if you use only the phone, the product will score a C, or maybe a B. You'll have to put up with random voices, clattering keys, fan noise, and other extraneous sounds.
Microphone . The microphone is the first thing you need to take care of. As practice shows, viewers are ready to forgive a long video and an uneven picture, but sound with interference is already too much.
You don’t have to buy expensive microphones; at first, a microphone in your headphones will suffice. We use regular Apple headphones - they have good results, and the recording quality, level and clarity are quite high, regardless of the shooting conditions.
I checked several headsets that I purchased at a regular electronics store, and I didn’t find any patterns in price-quality-brand. I had headphones for 2000 rubles with a terrible microphone and headphones for 400 rubles that recorded even better than Apple headphones.
Philips headphones showed good results
The headset is useful for joint broadcasts via Instagram or Skype. There will be no echo, only clear sound.
The disadvantage of the headset is that it breaks down quickly. You have to take care of them and barely breathe on them, or you have to put up with them and buy new ones every 3-4 months.
You can use better microphones. If you plan to conduct not only home broadcasts, but also broadcast from cafes, a car, from the street or anywhere else, a buttonhole would be a good option. The choice of buttonholes is huge. We use Boya BY-M1; we talked more about this lavalier and other equipment in the article “How we make video content.”
If you plan to shoot streams or studio broadcasts: interviews, webinars with broadcasts, “talking heads” - you can consider more professional microphones that are mounted on special tripods and equipped with pop filters.
Many streamers praise:
— Blue Microphones Spark Digital — Blue Microphones Yeti Pro — SAMSON Meteor Mic
For SMMplanner and Pepper.Ninja live broadcasts, which we conduct from the SMMplanner office, we use SAMSON.
The arrow points to a pop filter - a piece of cloth that removes random unwanted sounds like smacking or clicking teeth. The microphone is on a special tripod, so it does not pick up the sound of a keyboard, the impact of a glass of water on a table, etc.
Connection . The worst thing about live broadcasting is that the Internet may suddenly drop. Therefore, you need insurance.
- Another physical Internet - fast unlimited tariffs from mobile operators;
- Backup home operator;
- Spare router;
- If you have a modern ultrabook or Macbook that does not have an RJ-45 connector, a USB adapter will help.
For “corded” Internet, you need an RJ-45 connector; if you don’t have one, an adapter will come in handy.
The router can reduce the transmission speed - for example, on my laptop the Wi-Fi broadcast speed is 10-15% lower than with the adapter.
The quality of the picture depends on the speed and ping of the Internet. The higher the quality, the clearer the picture and the less lag. Whether the picture will be smooth or choppy, like a slide show, primarily depends on the speed of the Internet. Although this needs to be checked individually, a lot depends on the device.
Light . If you plan to show more than just your screen, you'll have to think about adding additional lighting to the area you're filming. This is also important for webinars, where the presenter’s face is in a small square. Otherwise, not the presenter’s face will be visible, but a dark square.
For good light, unfortunately, it is not enough to turn on a table lamp - the final picture may turn out to be too hard or too flat. It's better to experiment with additional lighting. You may have 2-3 lamps that illuminate you from the sides and behind. Try using lights that will highlight the background.
The light is too hard, so the presenter has become deathly pale, an additional light source is definitely needed
How to start broadcasting on YouTube
Live streaming on YouTube has become very popular lately. At the same time, the main devices from which such broadcasts are made are: either a computer / laptop, or a telephone. Accordingly, below I will give detailed instructions for each of these devices.
I would like to say right away that if you are making a broadcast for the first time, be sure to create the first limited test broadcast. Because sometimes you need to install additional drivers to work with YouTube. I myself once encountered such a problem, and I strongly recommend doing a test in order to avoid overlaps on the air.
On the computer
In order to make a live broadcast on your computer in the main YouTube menu, you need to find the video camera icon, click on it and select “Start broadcast” in the drop-down menu.
Next, if you try to start an online broadcast for the first time , you will receive a message saying that 24 hours must pass for this feature . After the specified time, your profile will be activated.
The next time you go to the “Start broadcasting” section, you will see a menu for creating your first live broadcast. But before that, YouTube will ask you for access to the microphone and video camera on your computer through your browser. If the request to open access is not displayed, clear your browser cache and try again to go to the broadcast creation menu.
In the broadcast creation window, you minimally need to fill in the following fields: name, access level, whether children can watch and then click on the “Next” button.
After this, the preview settings window will open to you. There will be a preview icon on the left side of it, which you can replace with your own. In order to change the picture, simply hover your mouse over it and select “Upload your icon” in the menu that appears.
Next, an explorer window opens in front of you, in which you need to find the preview image (see FAQ) and click on “Open”.
After that, you return to the preview window and simply click “Start Live” to start the broadcast.
P/S: It’s worth saying that until you click to start broadcasting, broadcasting on the channel will not occur, viewers will simply be shown the preview that you just installed.
After the launch, you will go live on YouTube, and users will see you
Once you decide to end your live broadcast, simply click on the “End Broadcast” button
The next moment, a pop-up window appears in front of you, in which you need to once again confirm the completion of your broadcast by clicking on the “Finish” button.
After this, statistics open in front of you, indicating all user activity during the broadcast. Look at the statistics and click on the “Close” button.
That's it, now after these steps your broadcasting on YouTube is completely finished.
On the phone
To create a live broadcast from your phone, YouTube has one limitation, namely, you cannot do live broadcasts from your phone if you have less than 1000 subscribers on your channel . Once you cross this threshold, you need to find the video camera icon in the YouTube application and click on it.
The next moment, a menu appears at the bottom of the screen in which you need to find the “Ether” section and click on it.
Next, you will need to give the YouTube app access to your microphone, video, and location. In order to do this, click on “Open access”, after which you will see three pop-up windows in turn, in each of which you need to click on the “Allow” button.
When you first create a broadcast, you will also be prompted to enable auto-checking of comments. Personally, I don’t configure them, so in this window I’ll click on the “Not now” button.
After this, a window for creating a live broadcast will open, in which you will need to fill out the following as a minimum: title, access level, whether children can watch and then click on the “Next” button.
The next step takes you to the preview window. In it, to download a photo, simply click on the icons at the top of the screen and download a preview (see FAQ) from your phone’s gallery. After loading the picture, to start broadcasting, simply click on the “Start broadcast” button.
Next, a message will appear in which you will be told that the broadcast can be broadcast both vertically and horizontally. At the very bottom of this message, simply click on “Start Broadcast”.
After all these steps, your live broadcast on YouTube will be successfully launched.
After you have decided that it is time to end the broadcast, find the cross-shaped icon in the upper right corner of your phone screen and click on it.
The next moment you will see a pop-up window confirming the completion of the broadcast, click “OK” in it.
Next, you will see the statistics of your broadcast, get acquainted with it and click “Ok”.
That's it, now after these steps your broadcasting on YouTube is completely finished.
Broadcast to VK via computer or laptop
Live broadcast is the same as video recording. It is created in the video section and displayed there. After the live broadcast ends, the video will be saved on the page or in the group and can be viewed.
You can inform your friends and subscribers about the start of the broadcast through notifications . Also, while viewing the news, they will see a window with a video in which your broadcast will be played with the sound turned off, and, if desired, they will be able to watch it.
Streamers can make money from live broadcasts . If the person watching you wants, he can click on the “Support” button under the player and transfer you a certain amount. Gifts sent by users are also taken into account: half the cost of the gift sent goes to the social network, half to you. VKontakte also has a program called “Video Content Distribution”. It will be available if you have more than 250 thousand subscribers. You send a request to Support, and before your videos, users will watch advertising videos.
In live broadcasts you can share interesting news and your emotions about what is happening in your life. You can send a mass message to all subscribers, for example, to congratulate you on the holidays. You can do a live broadcast similar to a program - joke, tell something funny. You can play the game live and show the stages of completing levels. Tell us how to do makeup beautifully, draw a quick picture, pack a suitcase for a trip, and so on. In general, what you will broadcast depends only on your imagination.
How to create a broadcast on VK from a PC
You can create a broadcast either from your page or in a group, but you must be its owner or one of the administrators.
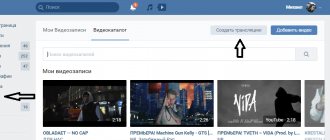
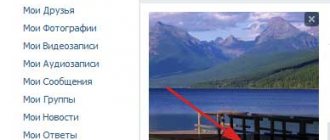
If you want to go live from the page, then log into your account and go to the “Video” section in the menu on the left. Then click on the “Create broadcast” button.
To make a live broadcast in a group, for example, you want to hold a prize draw live or talk about the news, also go to your group’s main page and open the videos. Then click on the “Create broadcast” button.
A window will appear indicating that this function is in testing mode. Click “Try” in it.
Next, upload the cover for the broadcast: click on “+” in the window and select the appropriate image from your computer. For correct display, the image aspect ratio should be 16:9 and the size 1920:1080.
Come up with a name for the broadcast and a description for it. Then select the appropriate category. When you select “Computer Games,” another field will appear in which you need to specify the name of the game.
The next step is setting up the video encoder. Expand the appropriate item.
Here you will see two fields “URL” and “KEY” - this is the link and the stream key. These values must be inserted into the video encoder to be able to conduct live broadcasts.
If someone else finds out your “URL” and “KEY” values, then he will be able to broadcast from your page or group. Therefore, the warning: “Do not share the link and key with anyone!” very handy. If someone knows them, then click “generate new settings”.
Now let's understand the video encoder. If you have one installed on your computer or laptop, then use it: insert the link and key into the settings. If you don’t have anything like that, then in the broadcast creation window, in the “Video encoder setup” section, click on the “more details” link.
There is no need to close this window; we will return to it a little later.
Setting up the OBS video encoder for broadcasting to VK
Clicking on “more details” will open a new tab in the browser with the information “Setting up a video encoder”.
Scroll down the page. There you can see “Recommended video encoders”. Select one of them and click on it.
A page with information about setting up the selected video encoder will now open in a new tab. I'll tell you about installing and configuring the Open Broadcaster Software , since I chose it in the previous step.
On the page that opens, find a line like “Download...” and follow the link provided.
How to download and install OBS for Windows
By clicking on the link, the official page of the OBS video encoder will open, from where you can download it. Select the operating system that is installed on your computer: Windows, iOS or Linux, to do this you need to click on the logo.
You can install OBS on Windows 7, 8, 8.1 and 10. To download the installation file, click “Download Installer”.
In the next window, click the “Save File” button.
Go to the "Downloads" folder on your computer and run the file you just downloaded.
The OBS Studio Installation Wizard will launch. Click on the "Next" button.
For example, I lack a component for the video encoder to work correctly. Therefore, I click on the “Yes” button to download and install it on my computer. Next I will tell you how to install the missing component.
If such a window does not appear, skip a few steps and continue installing OBS.
So, we clicked “Yes” and the official Microsoft website page opened on the Internet, from where we will download the required component.
I'm missing "Visual C+ Redistributable Packages for Visual Studio 2013". Click on the "Download" button.
In the next window, check the boxes next to the files you want to download. Be sure to select the "vcredist_x86.exe" or "vcredist_x64.exe" file. Here everything depends on the bit depth of your OS: if it’s 32-bit, then x86, if 64-bit, then x64. Just in case, I also downloaded “vcredist_arm.exe”, but it was not useful to me.
When selected, click “Next”.
Confirm saving the files.
Open the downloads folder on your computer again, but now run the downloaded “vcredist” file that matches the bitness of your OS.
In the Microsoft Visual C++ component installation window, click “Install”, and when the process is completed, click “Close”.
After this, you can try installing OBS Studio again. Launch the installation file from the downloads folder and click “Next” in the first window of the Installation Wizard.
There is nothing further complicated. Accept the terms of the license agreement and confirm the selection of the folder in which the video encoder will be installed.
In the step shown in the screenshot below, check the “Browser plugin” box and click “Install”.
When OBS Studio is installed on your computer, a window like this will appear. In it, leave a checkmark in the “Launch OBS Studio” field so that the video encoder starts, and click “Finish”.
This completes the OBS installation.
How to set up OBS for streaming
Now let's move on to setting up the Open Broadcaster Software video encoder so that you can conduct live broadcasts from Vkontakte.
In the main program window, click “File” in the top menu and select “Settings” from the list.
On the left, go to the “Broadcasting” tab. In the “Broadcast Type” field, select “Custom Broadcast Server”. Then there are the “URL” and “Stream Key” fields. Here you need to insert the link and stream key that were in the VKontakte broadcast creation window - “URL” and “KEY”.
Go to the Output tab. Here, set the Video Bitrate value. It depends on the selected broadcast quality:
| Quality | Bitrate |
| 1280x720 (30 fps) | 1 500–4 000 |
| 1280x720 (60 fps) | 2 250–6 000 |
| 1920x1080 (30 fps) | 3 000–6 000 |
| 1920x1080 (60fps) | 4 500–9 000 |
The “Encoder” field should be “Software (x264)”. “Audio bitrate” – “128”. Then check the “Enable advanced encoder settings” box and see that “veryfast” is selected.
On the “Audio” tab, in the “Sampling frequency” field, select “44.1khz”. In the “Desktop Audio Device” field, select the device that will play sound. If you have only one on your computer, then set it to “Default”. In the “Mic/Auxiliary Audio Device” field, select a microphone. If there is only one, set it to “Default”.
Video tab. “Basic extension” is an extension of your monitor. “Output extension” corresponds to the stream extension that will be uploaded to the VKontakte server. Choose it the same as the basic one. If you set it lower, then you can reduce the consumption of traffic used.
In the "Scaling Filter" field, set "Bicubic (Fine Scaling, 16 samples)" and "General FPS Values" to the frame rate, or 30, or 60.
When you are done with the OBS video encoder settings, click “Apply” and “OK” at the bottom.
Why is there a black screen in OBS Studio?
Now we need to figure out the image that should be live. If you do not make the following settings, then during a live broadcast on VKontakte, your subscribers, and you yourself, will see black screens.
There are special areas for this in the Scenes and Sources program. What are they needed for? So that the image is shown during the live broadcast.
You can make several scenes and select a separate source for each. For example, for the first “Scene” we select “Source” – “Screen Capture” - the entire computer desktop will be shown live. “Scene 2”, “Source” – “Video capture device”, the live broadcast will be an image from a camera connected to a computer or laptop.
During the broadcast, you can switch between created scenes. First you showed yourself through a video camera - selecting “Scene 2”, then switched to “Scene 1” and show your computer desktop.
Add “Scenes” by clicking on “+” in this area. You can give them any name. Then select the desired scene and add a “Source” by clicking on the “+” in the appropriate area and selecting the appropriate option from the list.
“Screen capture” – the entire desktop; “Window capture” – you can select a specific window; “Game Capture” – select the game window; “Video capture device” – an image from a camera connected to the computer.
When you select “Source”, windows will open in which you can make the necessary settings.
This is what I said in the example. Two scenes: the first corresponds to capturing the entire desktop, the second – an image from the camera. Live I can switch between them in the video encoder window.
FAQ
In this section I tried to answer the most common questions that newbies have.
1. Where can I get a preview of the broadcast?
You can get a preview for a live broadcast for YouTube by taking it: either from the Internet, or by doing it yourself (Popov’s Adobe Photoshop courses can help with this), or by ordering it on special freelance exchanges Kwork, Workzilla and 5 bucks
2. Are there any other programs for creating live broadcasts on YouTube ?
Yes, I have. For example, the OBS program, or some other analogue. If you are interested in her review, you can leave your comment below under this article, and our team will definitely write it.
3. Are there any ways to make money on YouTube ?
Yes, you can make money, for example, from donations and advertising on the channel.
How to start a live broadcast from a PC
After the user has installed the Instagram application on the computer and logged into his account, he has a question regarding how to watch the broadcast through the computer.
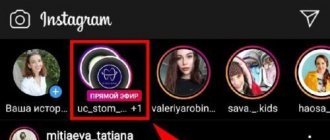
To do this, you need to click on the icon with a magnifying glass. It is located at the bottom of the working window. Using this action, you will be taken to the “history” section. The user's followers are displayed here. If one of them is broadcasting live, a “Live” icon will appear next to that person’s profile picture.
To watch a live broadcast on Instagram from a computer, click on the nickname of this user. Also, when watching a video, you can send messages to chat and like.
Attention! When broadcasting live on Instagram, you can hide it from a number of users. To do this, unwanted users are selected in the settings and their viewing is limited by pressing the button with a cross next to the user’s avatar. For a blocked user, the broadcast will end. Also, until unlocked, he will not be able to view stories. Through the settings, you can disable chat in the broadcast and hide the story from some users.
Result:
Live video broadcasting on YouTube is one of the main types of communication between bloggers and subscribers. Of course, some authors choose not to use it, but in our opinion, they are missing out on great opportunities.
P/S: If you want to support the stable operation of the blog, make us a small donation (click)