How to take a screenshot in VK on a computer?
Below are the two most effective methods.
- Using the Print Screen key.
Users do the following:
- Open a page with data that needs to be saved as a screenshot.
- Click on the Print Screen button (it is located in the upper right part of the keyboard).
- Open a “Dialogue” with the person for whom the image is intended.
- Insert a picture into the field intended for entering a message by simultaneously pressing the Ctrl + V key combination.
- Send the file.
The disadvantages of this method include the fact that it saves a screenshot from the entire PC monitor screen. To level it out, you may need to crop the image.
- Using the standard “Scissors” utility.
You need to do the following:
- Open a page in VK, a screenshot of which must be taken on a computer.
- Launch the application (located in the Start menu).
- Use the “Create” function.
- By holding down the left mouse button, select the area of the screen from which you want to take a screenshot.
- Save the resulting graphic file to the desired folder.
The advantage of this method is that there is no need to crop the image.
Using the above methods, the user can easily take a screenshot of VKontakte from a computer.
We are trying to create, edit and send a screenshot to VK using the SnagIt program
Another program that I actively use at work. It has a built-in editor that automatically launches after taking a screenshot. And among the design elements there are very important things - step numbers, arrows, notes, etc.
In addition, SnagIt can not only take screenshots on the fly, but also record short videos. You can see an example on our website - each article has short video tips.
Below I am posting a link to the installation file of the trial version of the program. You can always buy the full version on the developer's website. For our purposes, the free version will suffice.
Install the program. After this, the PrtScr key will automatically launch the SnagIt screen grabber.
So, let's try to take a screenshot of my VK page, which will show the steps that need to be taken to get to the profile settings.
Let's go to VKontakte and go to my page. Open the menu in the upper right corner and hover your mouse over the “Settings” item. This is the picture we need to photograph.
Click PrtScr and the screen capture form appears. Similar to LightShot, click and hold the cursor and move it to highlight the desired area. When we're done, we release. The area will be frozen and a menu will appear where you need to click on the “Record Images” button.
Our screen will automatically be loaded into the SnagIt editor. Let's formalize it by specifying the two necessary steps:
- Opening the menu;
- Selecting the “Settings” item.
Among the editor tools, select “Arrow”. In the right menu block you can select design options. Now, using the mouse, place two arrows on the image.
Then select the Sequence tool and mark the order of the steps by placing two markers. Now all that remains is to save the created screenshot.
Now let's imagine that we made a screenshot with instructions for opening settings for our friend. Now is the time to send him the image.
Go to the desired dialog, click on the “Paper Clip” icon, and select the “Photo” item. Now we upload the screenshot to VK by clicking on the “Upload photo” link and selecting the file on our computer. The picture is attached to the message - you can send it.
By the way, if you send erroneous data to your interlocutor, you can always delete the sent message. But there is only 24 hours for this.
Taking a photo using a special program
The Internet is replete with applications specifically designed for taking screenshots from your PC screen. One of the most popular utilities is Screenshot Creator.
Working with the program is quite simple. To do this you will need:
- Launch the utility when the need arises to take a screenshot.
- Enter the combination Ctrl + PrtSc.
- Use the mouse cursor to select the area to take a screenshot.
- Click on the Enter key.
- Once these manipulations are completed, save the image in the required format, for example: *.jpeg.
The application supports a number of other functions. To see all the available ways to take screenshots, you will need to open the settings menu.
Screenshot program
It is much faster and more convenient to take screenshots in a special program. Screenshot Creator is just such software, and it weighs only 494 KB. We offer a small guide for downloading and installation:
- Go to the link https://www.softportal.com/software-5454-screenshot-creator.html
- Save the installation file on your computer and click the “Download” tab.
- Unpack the rar archive and install the program in the standard way.
Now you can proceed directly to creating a screenshot. The program can take pictures of the entire screen, only certain areas or the active window. In order to familiarize yourself with the working keyboard shortcuts, you need to go to the settings menu. This can be done by right-clicking on the icon of the running program (located near the clock).
We recommend: How to tag a person in a photo on VKontakte
If you don’t want to keep all the settings in your head, you can do this:
- Simultaneously press the Ctrl+PrtSc keys.
- Use the mouse to select the part of the screen you are interested in.
- Press the Enter key.
- In the dialog box, set the saved image format: *.jpeg.
Now the screenshot will be sent to the clipboard, from where it can be pasted into any place convenient for the user.
How to take a screenshot on Mac OS
The OS supports two modes for taking screenshots:
- Take an image of the entire screen using the keyboard shortcut Shift-Command (⌘)-3. The finished file will be saved on your desktop in PNG format.
- Take a screenshot of a specific part of the screen using the keyboard shortcut Shift-Command-4. The cursor will appear as a crosshair. It should be moved to the starting point and, while holding Option, Shift or Spacebar, select the desired part of the screen. The photo can also be found on your desktop.
To save screenshots to the memory buffer, the combination Control-Shift-Command-3 is suitable.
Briefly, what are screenshots and why are they needed?
Hello, friends! What are screenshots? These are unique images that were taken using a program for creating screenshots from a computer (phone) screen. Screenshots are needed mainly for websites (blogs) or simply for sending messages to users on VK, by mail, and so on. Let's give a few examples.
For example, you have your own blog and write articles on it. You need to show certain actions that are difficult to describe in text. It is much easier to take a screenshot and show the order of actions with arrows.
Or you communicate with users on VK and want to send him a screenshot of your screen. Screenshot is the fastest way to send photos. You can take a screenshot of a photo and simply send a link to your colleague. How to insert a screen into a VK dialogue - we will do this in the next part of the article.
Screenshot in VK on the phone
Many users of the social network VKontakte work with the service on their mobile phones. Therefore, there is an increased relevance of taking screenshots on such a gadget. Under these conditions, it is necessary to understand that the methods for manipulating screenshots on different OSes are different. You can make a graphic file based on a specific situation.
Photos from Android
Smartphones based on Android OS have the ability to create screenshots by simultaneously pressing the desired combination.
- Simultaneously hold down the Home and Power keys.
- Volume adjustment button (“Down”) + “Power”.
- Press the Home and Back buttons simultaneously.
The specific method depends on the smartphone model.
To create a screenshot from VK on a smartphone, you can set the necessary settings and take an image of the screen using a command built into the phone settings (for example, moving the edge of your palm across the entire surface of the screen).
Windows Snapshots
Previously, it was not possible to take a screenshot on VKontakte on Windows Phone due to the complete absence of such a function. With the advent of the 8 and 8.1 series, the technical ability to take pictures became available to users.
The methods below do not work on earlier versions.
For Windows Phone 8:
- Press and hold the Windows and Power buttons at the same time.
- A characteristic click will indicate the completion of the operation.
You can find the file by following the path: “Photos” – “Albums” – “Screenshots”.
For Windows Phone 8.1:
- Combination – “Power on” + volume up button.
- A beep will sound indicating that the screenshot has been successfully taken.
Searching for images is similar to that described above.
Taking pictures on your Android phone
If you access your VKontakte profile from a phone or tablet, then you can take a screenshot as follows. Open the page you want to photograph on your device screen.
Then everything depends on the model of your phone or tablet. You can make a screenshot in several ways:
- hold down the power and volume buttons (volume down),
- or hold down the power and home button,
- or hold down the power button and minimize all windows.
For example, I have a “Screenshot” button in the notification area. By clicking on it, you get a photo of the current screen.
After this, the photo will be saved on the device. I now have a folder in my “Galleries” called “Screenshots”.
Keyboard shortcuts
When working with screenshots on a laptop, you will need to know a number of combinations for more successful and convenient manipulation of the resulting graphic files. Below are the main combinations:
- Print Screen – screenshot of the entire screen.
- Ctrl + V – paste an object into the corresponding field.
- Ctrl + C – copy the file to the clipboard.
- Ctrl + A – selects all pictures in the target folder.
A more complete list of useful combinations can be found on the official website of the OS used.
Bottom line
I don’t see the point in writing five more ways to send your screenshot to VK via a computer, since these three are enough for you. Personally, I liked the second method the most, with simple copy and paste, as it is the fastest and most convenient. But it is possible that you will not agree with me, so I would like to find out from you which method you liked best.
Well, with this I say goodbye to you. I hope that my article was interesting to you. Do you want to keep up to date with everything new and interesting on the blog? Be sure to subscribe to my notifications and posts on social networks. I'll be waiting for you again. Good luck to you. Bye bye!
Best regards, Dmitry Kostin
Editing a photo, sending
Correction of the resulting screenshot is possible using special applications, for example, Paint. This graphic editor and its interface are logical and intuitive. Among the main available functions:
- Sketching a separate area of the image.
- Crop and rotate pictures.
- Underlining, highlighting the necessary places in the photo.
- Changing the file size.
- Completion of directional arrows and other graphic elements.
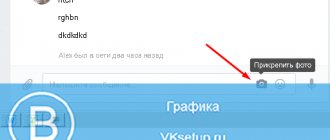
To send a screenshot to a specific person on VK, you will need to do the following:
- Copy an object to the clipboard.
- Open your page and dialogue with the recipient.
- Insert an image into the message field.
- Wait until the image is completely uploaded.
- Send a message by clicking on the appropriate button.
The function of creating screenshots in VK is available on most modern devices. However, the way they work can vary significantly depending on: the software used, the installed OS, and the specific version of the operating system. More detailed methods for taking screenshots can be found on the official website of the manufacturer of the laptop, PC, tablet, smartphone, etc. or the software manufacturer.
How to send a photo from your phone to Android
Now let’s figure out how to send a screenshot you just took on VK to another user from a phone or tablet.
Find a conversation with the person you want and click on it.
Next, to the left of the message entry field, click on the paper clip to attach files.
The following window will open. At the top, make sure the “Photo/Video” icon is active. Just below, the “Photo” tab should be selected. Find the screenshot in the list of photos and click on it. If you have several, select them immediately. After that, click on the “Attach” button.
The photo will be attached to the message. Click on the arrow at the bottom right to send a photo.
I think everything worked out for you. Now you can either describe your problem to the support service more precisely by attaching a file with screenshots in a message, or show another user what you see on the VKontakte page on your device.
How to save and send a screenshot
Let's look at five ways to save screenshots and send them over the Internet.
Method 1: Online services
The easiest and fastest way if you have access to the Internet:
- Take a screenshot of PrtScr or the program window Alt+ PrtScr ;
- Go to the website https://pastenow.ru/ ;
- Just press the key combination Ctrl+ V ;
- Copy the link that appears on the site above your screenshot;
- Paste the link into a message (in comments on a website, in an email, on Skype, etc.).
PasteNow website for creating screenshots online
If suddenly the specified site does not work, use the alternative: https://snag.gy/
The most intriguing question is: how long will a screenshot be stored on the site? If no one looks at the screenshot, it will be deleted after 1-6 months (depending on the site), but if someone periodically looks at your screenshot, the file will not be deleted.
Advantages of this method: a minimum of actions on your part, it is easy to share a link to a screenshot (for example, through social networks); the file can be shown to any number of people.
Disadvantages of this method: Internet access is required; the file is stored on the server for a limited time; To save it to your computer, you need an additional action (right-click – “Save image”).
Method 2: Paint
The most accessible way to save a screenshot:
- Take a screenshot of PrtScr or the program window Alt+ PrtScr ;
- Open Paint (Start – Programs – Accessories – Paint);
- Paste a previously taken screenshot from the clipboard (the “Paste” button or the Ctrl+V combination);
- Save to your hard drive in JPG or PNG format;
- You can send the photo by attaching it to an email or transfer it on a medium (for example, on a flash drive). You can also post the resulting photo on the Yandex.Photos service (you will need to register with Yandex).
Paint will help you edit and save a screenshot
Advantages of this method: This method does not require the installation of additional programs (Paint is available in any version of Windows); Internet access is not required; you can edit the image; You can choose a convenient file format.
Disadvantage of this method: You need to perform more actions than in the first method; To publish in comments on the site, you will have to place a screenshot somewhere, which adds a few more steps.
Method 3: Scissors
Starting with Windows Vista, there is a built-in program for taking screenshots:
- Open the Scissors (Start - Programs - Accessories - Scissors);
- Click the “Create” button (you can choose the option to create a screenshot);
- You can make notes on the screenshot;
- Save to your hard drive in JPG or PNG format;
- You can send the photo by email.
The Scissors program is made specifically for screenshots
Advantages of the method: This method does not require the installation of additional programs and Internet access; you can choose the option to create a screenshot (entire screen/window/rectangle/free-form); It is possible to select a convenient file format when saving.
Disadvantage of this method: You need to perform more actions than in the first method; To publish in comments on the site, you will have to place a screenshot somewhere, which adds a few more steps; There are fewer editing options than in the second method.
Method 4: Cloud storage
If you use Yandex.Disk or Dropbox, this method will be the easiest:
For Yandex.Disk:
- Press Ctrl+Shift+2 (the program itself will take a screenshot, send it to cloud storage and copy the link to it);
- Paste the link into a message (in comments on a website, in an email, on Skype, etc.).
One of the ways to take a screenshot in Yandex.Disk
For Dropbox:
- Take a screenshot of PrtScr or the program window Alt+ PrtScr ;
- Click on the program icon in the notification area;
- Copy the link to the screenshot by clicking on the corresponding button;
- Paste the link into a message (in comments on a website, in an email, on Skype, etc.).
Dropbox makes it easy to share a screenshot link
Advantages of the method: The fastest method; the picture is automatically saved both on your computer and on a server on the Internet; all screenshots are stored in one folder; The image is stored for as long as you wish; access to the image can be closed at any time; In Yandex.Disk you can edit the photo.
Disadvantage of this method: You need to install a cloud storage client on your computer; the client must be running at all times.
Method 5: Using special programs
Specialized programs usually have more functionality than all of the methods listed above. The operating algorithm is different.
Examples of such programs:
- FastStone Image Viewer
- Lightshot
- Screen Capture
- Clip2Net
- PicPick
- UVScreenCamera
Using FastStone Image Viewer as an example
- Open FastStone Image Viewer;
- Click in the program menu: “File – Screen Capture” and select the most appropriate option for creating a screenshot;
- Save to your hard drive in JPG or PNG format;
- You can send the photo by attaching it to an email or transfer it on a medium (for example, on a flash drive).
Screen capture in FastStone Image Viewer
Advantages of this method: You can choose a convenient file format; many additional functions; automatic saving to the desired folder; Wide range of image editing capabilities.
Disadvantage of this method: You need to install the program in advance; preliminary configuration of the program is required; In some programs, the screenshot is stored only on your computer; to publish it in comments on the site, you will have to place the screenshot somewhere.
Standard method
So, first, a little theory. A screenshot is an image of a user's screen. In the picture it looks exactly the same as you see it on your monitor. As already noted, such a snapshot can be used to demonstrate the operation of an application or for educational purposes. I also need to add that it makes no difference how to take a screenshot: in VK or on any other site. The technology used to photograph the screen as the user sees it is the same for all cases.
So, our computers are designed in such a way that each of them has a “standard” way to take a picture of the screen. To do this, you just need to find the “PrintScreen” button on your keyboard (on a Lenovo laptop it’s called, for example, “PrtScr”) and press it. After doing this, a full-size screenshot was sent to your computer. Next, our task is to see it, to receive it in a material understanding.
For this purpose, open any (the most common are Photoshop and Paint, you can choose one of them). Next, click “Create New” and “Paste” (or press the hot keys Ctrl + V). Your photo will appear on the screen instead of a white canvas. Then you can edit it in a way that is more convenient.
Thanks to this instruction, you know how to take a screenshot of the “VK” dialogue in the standard way. Next, we’ll look at how to send screenshots to your friends, and also how this operation can be carried out using a specialized program that makes working with desktop photos much more convenient.