How to Sync Android Contacts with Google
Contacts synchronization is a built-in feature that allows you to restore and use data after a factory reset, as well as synchronize contacts with an Android smartphone.
How to use this feature to sync with your Google Account
?
- You need to open the settings on your smartphone
- find the “Accounts” section
- select Google
- go to synchronization settings and click on the mailbox
- a page with data for synchronization will become available
- select “Contacts” and synchronization with your account will begin.
Sync contacts from other sources with Android. You can add contacts from Facebook, Odnoklassniki, VKontakte, Skype, Twitter to your smartphone's contact list.
Account settings display applications installed on your Android device. You should select “Synchronize contacts” and the data will be added to the smartphone’s phone book. To avoid “clutter” in your contact book, you need to set visible entries in your phone settings (for example, phone book + Skype).
Viber
Let's look at everything in order:
- First you need to go to the Viber application and click in the center on the “Contacts” tab.
- Select the desired person from the list and click on “Free message”. Write a letter with any content and send it. This is necessary in order to maintain correspondence with this user.
- Then you need to remove this subscriber from the phone book. The scheme is the same: go to the menu, then to the contact list, find the person’s number and click on the “Menu” button on the phone. Click on the “Delete” action. Now the contact has been deleted from the phone, but the information with all the data remains in the correspondence created in Viber.
- Then go back to this application, open the correspondence and scroll to the right. After this, information about the participants in the conversation will be displayed.
- Click on the user you are interested in and add him to the telephone directory by clicking on the first button at the top right. The subscriber will then appear in the account on Android. The person's phone number and the photo used in their profile will be added to the phone directory.
How to change a contact on Android
To change a contact on Android you need to:
- go to the phone book
- find the desired contact and select it
- a list of information for this contact will open
- to change the data you need to press the button, which will bring up the menu for working with the contact
- After changing the information, click “Save”
- contact saved.
Method 2: through the gallery
When using method 2, you can set a photo to a contact using the gallery. To do this, the user of the Honor device will only need to open the “Gallery” and find the photo they like there. The following steps are not difficult at all. After the photo is selected and opened on the screen, you need to click on the 3 vertical dots at the bottom of the screen on the right side, the following menu will open:
Here you need to select “Install as”. The following will be displayed:
The user needs to select “Contact Photo” if he decides to set images to any contact in Honor. Then a list of the phone book will be displayed, where you need to find a contact, then select it by clicking on the name. Image editing will open, where, as in the first method, you can also adjust the desired size:
When you have finished resizing the photo and cropping it, you need to click the checkmark at the top of the screen. The selected photo will be added to the contact.
Share link:
How to delete contacts from Android
- To delete contacts from Android, tap the icon on the screen
- A list of phone book contacts will be displayed, select the desired contact, press
- "Delete"
- "OK".
- To delete several contacts, you need to click in the contact list
- "Delete contacts."
How to delete duplicate contacts android
- To delete duplicate contacts on an Android smartphone, go to https://google.com/contacts
- In the top menu, click “More”
- Select "Find and merge similar contacts"
- A list of duplicate contacts will appear (for contacts that do not need to be merged, uncheck the box)
- At the top of the contact list, click “Merge”
- Synchronize contacts on your smartphone.
Setting a photo to full screen
As you can see, the caller's photo only takes up a small area, but there are ways to stretch it to fill the entire screen. To do this, you will have to install special software on your smartphone, which we discussed in a separate article on our website.
Read more: Setting the caller's photo to full screen
We are glad that we were able to help you solve the problem. Add the Lumpics.ru website to your bookmarks and we will be useful to you. Thank the author and share the article on social networks.
Describe what didn't work for you. Our specialists will try to answer as quickly as possible.
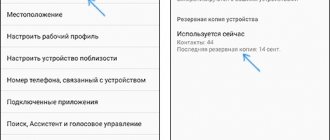
How to backup Android contacts
Backup is a backup of data on Android devices. How to backup contacts on Android and restore them later? There are several ways:
Back up data using synchronization with your Google account.
Personal contacts and email correspondence of the user are synchronized with a personal account on Google – gmail. Setting:
- go to the main menu of the smartphone
- select "Settings"
- select "Accounts and synchronization"
- select your gmail email address (which you want to sync) and the desired contacts (phone contacts and mail).
You can enable automatic synchronization in the background or do it manually.
Backup to SD or SIM cards.
- go to the smartphone menu
- select "Contacts"
- select "More"
- select “Import/Export”
- select the copy path to SD or SIM cards.
Backup using Moborobo program
- open the program
- select "Data"
- tick the required contacts
- select "Backup"
- specify the backup path
- select "Restore".
Installing an avatar from a computer
If your main gadget for social. network is a PC or laptop, use the following instructions:
- Log into an account that doesn't have a profile photo.
- You will see a square with a picture of a camera. Click on it. You can also click on the inscription “Put a photo”.
- As a result, a small window will open in which you can choose two options for installing a photo card: Upload an existing photo from your computer. Click the file select button.
- Find the required image on your PC and click “Open”.
- If you currently look good and are ready for a mini photo shoot, click on the blue inscription “take an instant photo.”
Congratulations! You've done it and can now see what the photo looks like on your page.
To set a picture or photo from an album as your Avatar, follow these steps:
- Go to the album and select the desired image.
- Hover your cursor over the “More” caption under the photo.
- In the list that pops up, click “Set as profile photo.”
- Select the area that will be shown on your page. This is done in the same way as when loading a new picture from a computer.
- Select an area for the thumbnail and save the result.
How to transfer contacts to Android
1. Transferring data via the Google Contacts website from vCard or CSV files. Android synchronizes all contacts with Google servers (the company that develops this operating system), which are also stored in your Google account at https://accounts.google.com/ServiceLogin?passive=1209600&continue=https://contacts.google .com/&followup=https://contacts.google.com/ .
You need to create your account. All contacts are in Google Mail. Should do:
- log into your mail account
- Click the arrow next to Gmail
- Select “Contacts” from the drop-down menu.
Data is exported from the old device in csv format (Microsoft Outlook and Outlook Express) and vCard format.
This method is very functional, since you can edit contacts from a computer, without the participation of an Android device. When you automatically synchronize data on your smartphone or tablet, all contacts are automatically transferred to your Google account, where they are stored.
To transfer data from your account to Android you need:
- click "Advanced"
- Above the list of contacts, select “Export”
- save contacts in a convenient format
- transfer to the memory of your smartphone.
2. Transfer data to Android devices using an SD memory card. Each vCard file stores one contact, which is very convenient for transferring from one device to another. The SD card easily imports contacts in vCard format to Android smartphones. On the memory card you need:
- create a folder "Contacts"
- copy all contacts in vCard format to the created folder
- go to the Contacts application
- select “Import/Export”
- Click the “Import from SD card” function
- all data will be transferred to the smartphone, you can also make a backup copy on a flash drive.
3. Transfer contacts using Bluetooth. Wireless Bluetooth is available in almost all mobile devices; it is very convenient to transfer contacts to Android devices through it. Need to:
- activate bluetooth on phones
- establish a connection
- enter a password if necessary
- on your old phone, in the “Contacts” menu, find the “Select all” item and select the “Via Bluetooth” option
- transfer phone contacts to a new phone.
4. Data transfer using MOBILedit!PC Suite. For the convenience of importing/exporting contacts, Android OS developers have created various applications, the most functional of which is the MOBILedit!PC Suite program. The program has a huge database of phone models, the ability to import and edit data.
You should install applications from Google Market on your computer:
- connect your old phone to it via USB
- synchronize phone and computer
- in the program on the “Navigation” panel there will be a list of information on the phone
- select “Phonebook”
- click “Export”
- save the phone book in the required format disable
- old phone
- connect a smartphone with Android OS
- Click “Import” at the top of the window
- specify the contacts folder
- transfer to a new device.
How to Transfer Contacts from Android to Android
Transferring contacts from Android to Android should not deter anyone from buying a new device. There are 2 simple ways. The first one is without an Internet connection:
- go to the Contacts application
- select “Export/Import” from the menu
- select and write to storage media (sim, SD, USB). In the new smartphone, the Contacts application
- "Export Import"
- "Import from media."
That's all! The second method, already known, is using a Google account (requirement: Internet and your account).
How to transfer contacts from iPhone to Android
Changing an iPhone to Android is not only a transition to a different brand, but also a new operating system. This can lead to incompatible formats and phone book contacts, which greatly complicates data transfer.
All methods for transferring contacts from iPhone to Android can be seen in the video
How to transfer contacts from computer to Android
You can “pick up” or transfer contacts from your computer to Android through your Google account, using the export of files in cfv format.
How to transfer contacts from Nokia to Android
The easiest and fastest way to transfer contacts from Nokia to Android is to export contact data from Nokia PC Suite and import it into a Google account.
You need to connect your phone using Nokia PC Suite to your computer:
- launch Nokia Communication Center
- select “Contacts”, and then highlight the ones you need
- select “File – Export” to csv.
- save to computer
- go to Google Contacts
- select import file and upload.
On a smartphone:
- go to “Settings”
- "Data Synchronization"
- import contacts to Android.
How to transfer contacts from Simbian to Android
To transfer contacts from Simbian to Android, you can use Google Contacts. But there is another easy way.
On Simbian:
- find "Contacts"
- "Select all"
- “Copy” to “Memory card”
- vCard contacts will appear in the folder on the card e:/others/contacts.
On Android:
- go to “Contacts”
- "Menu"
- "Import Export"
- “Import from SD card”
- "All vCard files"
- Click "OK".
How to Transfer Contacts from Bada to Android
The easiest way to transfer contacts from Bada to Android is to dump them onto an empty SIM card and copy from it to the memory of a new smartphone. The disadvantage of this method: the SIM card does not support all phone book options (long names, several phone numbers in one contact). The second method, already known, is through a Google account. If in the future you leave auto-sync and Google display on your Android smartphone, then when you save a new contact, the phone will ask: phone, sim or Google. This is convenient because the data can be immediately saved in your account and edited from your computer. And, the third way, transfer the necessary contacts (in vcf. format) using an external SD memory card.
Article in English
Why is the contact photo not displayed when calling?
There are several reasons why a contact photo is not installed or is not displayed when calling. The most common of them is due to the fact that the number is stored not in the phone, but on the SIM card. To transfer a specific profile to your smartphone’s memory, do the following:
- Open your phone book.
- Go to the options menu. This is done differently depending on the smartphone model. But often, to open a special section, you need to press the touch key in the form of three stripes.
- Next, click on “ Import and Export ” or “ Copy ”.
- Select " Import from SIM card ". If you have two SIM cards, select the one with the desired number.
- Then mark the contacts to import and confirm the transfer.
Also, the image may not be displayed during system failures, then a simple reboot of the device will help.