Have you ever wondered how to create a cover for a group in VK online? Perhaps you want to do this, but think you need to be a graphic design superstar to create great images?
Did you know that you don’t need to gnaw on the granite of design science to create stunning images for your blogs, social network communities, landing pages, and so on?
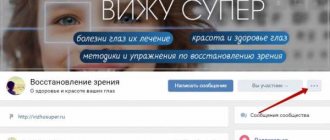
When you finish reading this article, you can quickly, in just seven minutes, create something like this cover for the VKontakte community:
This cover was created specifically for the example for this lesson. And I’m sure that everything will turn out much better and more attractive for you!
So let's start from the beginning...
(Video instructions are at the end of the article)
Filling Photos with Clipping Mask
We are left with empty layout forms, meaning graphics and pictures that users will upload. But it’s much better to demonstrate them in action. How to do this in the simplest way? Let me think, I would open all the photos that I use on the site, then find their size, reduce it, crop it, bringing it to the same size. Oh yes, there are also different layout templates, there are photos for photographs, there are icons for the Participants section, there is a large avatar, there are icons in posts. All different sizes. Isn’t it easier to open the desired graphics and then with one click make it fit into these created forms? Of course it's easier. Open the necessary photos and drag them onto the work area. In the Layers panel, place each photo above its own rectangle.
ways to create a Clipping Mask . Select the photo layer and select Layer > Create Clippig Mask or press Alt+Ctrl+G . Easier ways - select the photo layer in the layers panel, right-click on it and select Create Clippig Mask . A faster and more elegant way is to hover your mouse between the two layers in the Layers panel and press Alt . The pointer will turn into a figure eight. Click and this will also create a Clippig Mask .
The point of Clippig Mask is that the image above is embedded into the object below. Accordingly, the photo can be of any size, but the object below crops off unnecessary edges. If the photo is too large, simply reduce it using Edit > Free Transgorm , which is called on the fly. If you haven't heard of this, read my article Free Transform in Photoshop
How to put a cover in a VK group
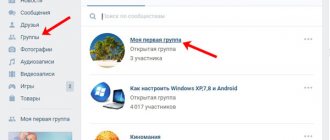
Now let's look at how to put a cover in a VK group. Everything is very simple here, do everything step by step, as in the photo below
How to put a cover in a VK group
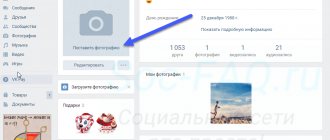
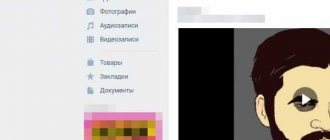
In the group itself, go to “management”
Next in “community cover” – “management”
Click “add cover” and specify the file path on your computer
Ready option
Ready. I'm quite happy with everything. In a similar way, you can make a cover and avatar for the group.
Creating site elements
It is not difficult to notice that all elements of the VKontakte are extremely simple and repetitive. This is the art of creating something pleasing to the eye, simple and unobtrusive. VKontakte elements are ideal for vectors in Photoshop and styles. To draw VKontakte elements, we use vector primitives of Photoshop, more about which you can read in my article Vector primitives in Photoshop.
We'll need the Layers panel, which can be opened in Windows > Layers . We will need to skillfully move elements. For this, the Move Tool , about which you can read more in my article Working with the Move Tool. And I would say that the Move Tool , since most of the time you will be pushing the layout elements into the right places and adjusting the distance between them. So, let's select the first Rounded Rectangle Tool and draw the site header. In the tool settings, set the roundness to no more than 5px and don’t forget about Snap to Pixels , with this checkbox the vector will be tied to pixel sizes, which is very important when creating graphics for the Web .
The VKontakte hat is rounded only on one side and this is how I cut the edges. I will select the Rectangle Tool , in the tool settings select Subtract from Shape area (-). With this setting, the tool will cut off parts of the drawn vector, rather than create new ones. Read more in my articles about Add, Subtract and Intersect settings. With the Subtract , select the vector mask in the layers and simply cut off the unnecessary part of the rectangle. Why is this beneficial? Firstly, you still have control over the mask as you create a complex figure. If you need rounded edges on the back of the shape, you can always get them by removing the second rectangle.
Styling website objects in Photoshop
Having recreated the layout, we move on to the design. You have already seen the process of creating a header, menu, and styles. I will not bring anything new in this part of the lesson; we will again color vector stripes and create new styles. First of all, color the stripes light blue - #d9e0e7 To do this, click on the fill icon and select the desired color in the form that appears.
Select the first block of Photos and double-click on the rectangle layer. A dialog menu for Styles will appear, which can also be called up in the main menu - Layer > Layer Style . In Layer Style, select Color Overlay , fill the object with light blue color #e1e7ed . Now let's look at the top and bottom stripes. We will create the top strip using Drop Shadow . Color - #d3dae0 Tilt angle -90 , that is, the shadow will be directed from top to bottom. And of course, we don’t need a shadow, in the full sense, but only 1px stripe, so kill all the parameters responsible for the size and shading of the shadow Spread and Size . Let's leave only 1 for Distance , that is, the shadow protrudes by 1 pixel.
Similarly for the bottom stripe, we will create it using the inner shadow Inner Shadow . Shadow color #d3dae0 , tilt angle -90 Global Lights checkbox , as I wrote above, uncheck everywhere. Same thing with other settings. And of course we save the style using New Style .
Let's create our own style for the search form. It is located in the VKontakte Walls section and is a white field with 1px border. Select this element, go to Layer Styles effect Stroke . First of all, let's create the border color - #c0cad5 . In the Position settings , select Inside . This is important, the stripe inward creates sharp edges, the stripe outward creates rounded edges. This is how Photoshop works. Border size is 1 px . Let's keep the style again.
Now we have the following situation. There are still undesigned objects in the layout, but why not repeat the already created style for each square? Photoshop has 100,500 possibilities for copying styles from one object to another, including unsaved styles. This topic is more likely for an article about working with styles. I’ll just tell you about one of them for which we specifically saved all the styles. Open the Styles panel via Windos > Style . If you did everything correctly, you will see an empty field and styles saved for the VKontakte site. Select the desired layer from the layers panel and click on the desired style. To cancel a style, click on the white icon with a red line.
Fonts for the VKontakte website in Photoshop
Having dealt with the design of objects, let's move on to fonts. The remaining fonts are not particularly difficult. Select the Type Tool and create a side menu with the following settings. Font size 11pt , line spacing 21pt , color #416288 , regular Arial Similar settings are used for the menu on the right side of the site.
For blocks of text, use Paragraphs. To create a paragraph, click with the Type Tool on the work area and, without releasing the mouse, drag the pointer, creating an area for printing. This way you won’t have to transfer the text “by eye”. In this case, we can take advantage of the settings from the Paragrapg from Windows> Paragraph , where you can adjust positioning, distance between paragraphs, red lines, indents and much more.
I used the same technique to create Feed posts.