How to turn off the sound of VKontakte messages
The VKontakte social network allows millions of people from all over the globe to communicate and interact with each other.
However, sometimes communication can become boring or distract from important matters. In the case of inappropriate people, it is enough to blacklist them, but what if you need to distance yourself from your friend (especially if he is one of those who likes to send almost one word at a time instead of detailed and thoughtful messages)? In this article you will learn how to turn off sound notifications about messages that you receive on VKontakte and become a little less dependent on Internet communication.
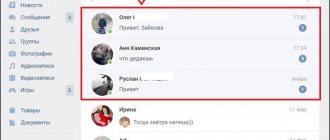
There are several ways to mute VKontakte messages on your computer. If you want to turn off sound from a specific user, go to “messages”, find a dialogue with him, go to it, move the cursor to the three dots at the top and click on the “mute notifications” button:
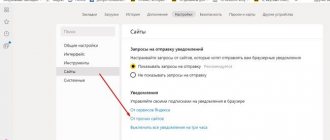
However, this will only mute one user. If you want to remove notifications from everyone altogether, you can do this in two ways. Or go to the page settings (they are located in the context menu under the avatar at the top right) to the “notifications” section and uncheck the corresponding box:
Or go to the dialogs and click on the “disable sound notifications” button:
However, please note that in this case, sound notifications will be turned off for all events on the site, and not just for messages. To return them, click on this button again or go to settings and check the box here:
All this concerned the computer, but how to turn off the sound of VKontakte messages on your phone? At the moment, it is unfortunately impossible to do this on the special mobile version of m.vk.com. This can only be done in official mobile applications for Android, iOS and Windows Phone operating systems. It all depends on your smartphone, however, as before, it all comes down to a few checkboxes in the settings.
How to mute VKontakte sound in a conversation?
This question should be especially relevant, because at conferences people write a lot and often, and not all of these messages are addressed specifically to you. This is also easy to do: to do this, go to the desired conversation and turn off notifications in the same way that you turn them off for a person.
That's all. Now that you have mastered these simple settings, no persistent interlocutor will be able to bother you and distract you from important matters.
How to mute messages on Android phone?
In the VKontakte mobile application, incoming messages can also be signaled with sound. It's easy to turn off the sound.
Launch the VK mobile application. Select the "Settings" section.
Next, select the “Notifications” section.
Under Sound, select Silent.
Here you can set vibration for a new message or flickering of the indicator, if any.
The Narrator application is intended primarily for visually impaired users - it allows you not only to voice the actions performed by the user, but also to read texts from the device screen. If the app was enabled by someone else on your device but not turned off, we'll show you how to disable it.
The first thing you need to do is call up the “Windows Settings” section. To do this, open the Start menu and click on the gear icon.
If something goes wrong, press the Win+i keys on your keyboard.
If everything is done correctly, the section will be opened. Here find the “Special Features” subsection and click on it.
Select “Narrator” from the menu.
Set the switch to the “Off” position, as shown in the screenshot.
Narrator will be disabled.
How to delete all correspondence
If you need to clear the entire history (for example, if you want to delete fake messages), then either manually delete all the dialogues, as in the screenshot above, or use a special bot for VK, which will do everything automatically. For example, Sobot.
Download and install the program on your PC, add an account.
Enter your VKontakte profile information. If you are not using a proxy, drag the slider to the “On” position.
The “Clear dialogs” functionality we need is hidden in the “Functions” tab. Move the slider to the “On” position and click “Continue”.
The bot will clear all dialogs. In this case, the information will remain with the interlocutors.
How to disable and remove Narrator in Windows 10 in a couple of clicks
Sometimes you want to know how to turn off Narrator in Windows 10. By default, this feature is disabled, but for some reason it may turn on. The voice assistant provides information about open windows, as well as hints about the icons the cursor is hovering over. This feature is useful in rare situations, so many users, having seen Windows 10 Narrator, do not know how to use it.
The voice assistant is useful for users with low vision. It can be an addition to graphical utilities, such as a magnifying glass, or can handle tasks on its own. In other situations, you should know how to disable Narrator in Windows 10.
There are several ways to enable Narrator on Windows 10:
- Using the keyboard shortcut “Win+Ctrl+Enter”. This key combination turns the speaker on and off. Also, in the settings you can turn off this combination, but that will come later;
- Run window. To do this, press the key combination Win+R. A corresponding window will open where you should enter narrator without quotes. Then press Enter on the keyboard or “OK” in the window.
- Search function. By clicking on the magnifying glass icon, you must enter “narrator” or “narrator”. The corresponding application will appear on the screen. By launching it, the desired function will be activated.
- Command line. Right-click on the Start icon and select Launch Command Prompt. In it you need to enter “narrator” and press Enter. You can use Windows PowerShell instead of the command line.
- Start menu. Open Start, then All Apps and Accessories. Possibilities". The required application will be in this folder - launch it. You can also enable the utility through “Start”, “Settings”, “Special Features”, where the required tab is located.
- Control Panel. In the elements of this window you should find “Ease of Access Center”. Once you open it, a window will appear where you can enable the desired function. There are also other options for users with low vision.
These are fairly easy and quick ways to enable Narrator in Windows 10. This feature is in demand by users with poor vision. With its help you can significantly simplify the use of your computer if there is such a need.
How to turn off the voice assistant
For some reason, this function may turn on when it is not needed. In this case, you can easily disable Narrator on Windows 10. If you need to disable it for one session, you can resort to any of 3 methods:
- Use the shortcut keys Caps Lock+Esc to close Narrator in Windows 10.
- In the bottom panel, right-click on the application icon and select “Close Window”.
Using these methods, you can disable the voice narrator on Windows 10 one-time. If it starts automatically, then in this way you can deactivate the voice assistant during each session. However, it is not always convenient to remove Windows 10 Narrator after launch.
If this function is not needed and starts every time you turn on the computer, then you should deactivate automatic startup. To permanently disable Narrator in Windows 10, you must:
- Open the Windows Settings window. To do this, press the Win+I key combination, select options in the Start context menu or using the icon in the notification area.
- In the new window you need to select "Accessibility".
- Select the appropriate tab. In it, you can either disable this function one-time or remove automatic activation when the device starts.
In this window, you can remove the screen reader in Windows 10, as well as control the voice assistant function. Thus, you can change the tone of the sound, reading speed, assign the sound of entered characters and other parameters that will make using the application more convenient.
Removing automatic startup is the easiest way to turn off Narrator in Windows 10. Third-party software can also help in this matter. If necessary, you can easily return this setting or activate the voice assistant for one session.
Turn off notification sounds through the Windows 10 Control Panel
Notifications refer to system sounds. Therefore, they can be disabled through the Control Panel. To do this, just follow these steps:
- Right-click on the Start icon and select Control Panel.
- A new window will open. Set the viewing mode to “Large” or “Small icons”. We look for the “Sound” section in the list.
- Let's open this section. A new window will appear. Go to the “Sounds” tab and in the “Program events” section we find “Notifications”. Set this parameter to no sounds.
- Once you save your apology, notifications will appear silently.
IMPORTANT! System notifications will be disabled. Messages from programs will still occur. Their disabling must be set in the settings of the software itself.
Turn off notification sounds through the Settings section
Using this method, you can remove notifications for individual desktop programs and applications from the Windows Store. To do this, do the following:
- Click “Start”, “Settings”. Select the “System” section.
- In the menu on the left, select “Notifications and actions”.
- Scroll the slider down to the list of programs for which notifications are allowed. Pay attention to the light letters under each software. If you click on them, a settings window will open where you can turn off sound notifications.
If you want to prevent sounds from playing for most applications and services, you should turn off the sound for the Security and Service Center.
To learn how to turn off sounds in Windows 10 notifications, watch the video:
Disable notifications in conversations
So, now in VKontakte it is possible to turn off pop-up visual and audio notifications in chats where a large number of network users are sitting. To remove alerts, you need to click on the “Actions” button in the dialog. In the menu you will see the “Turn off notifications” function. Hover your mouse over this item and left-click on it. You can see new messages in the chat itself. Today you will learn not only how to remove notifications ,
but also how to turn them back on.
A chat in which you have disabled notifications for new messages will be marked with an icon with a crossed out speaker. You can see this icon when you scroll through the list of all dialogues, and also, if you enter this chat, you will see an icon next to the name of the conversation. As you can see, it's even easier than .
Ways to disable Windows sound effects
Disable all sound effects
- Find the Dynamics icon in the notification area, among other trays in the system.
- Right-click on it and select “Sounds”.
- You can also do this through “Start→Control Panel→Hardware and Sound→Sound.”
- Go to the “Sounds” tab.
- Click on the "Sound Scheme" drop-down menu.
- Select "Mute".
- To turn off sounds when Windows starts, uncheck the “Play Windows startup ringtone” option.
- To disable sounds for specific occasions, such as Alerts, Battery Alarm, Critical Error, Message Notification, etc., select a sound effect from the list, then click the drop-down menu and select “None.”
- And finally, click “Ok” to confirm the changes and close the window.
Changing sound effects
If you prefer to listen to the standard Windows sound scheme for some reason, then you may be advised to modify these sounds. To change notification sounds, alerts and other important events in the Windows operating system, you will need to do the following:
- Open the sound scheme settings window for your OS again. Go to the “Sounds” tab.
- Select the system event in the list whose sound you want to change, and then click on the “Check” button to hear the melody itself.
- To use your audio files, click on the “Browse...” button and select the file you need. Note: The audio file must be in .wav format.
- To save the file as a sound effect, click “Save As...” and enter its name.
- Once the new sound effect is saved, select the desired system event and select the sound you just created.
How to set up SMS or e-mail notifications on VKontakte.
When any changes occur in your VKontakte account: for example, you received a personal message, someone wrote something important on the wall, etc. you need to be aware of these changes. But, you can’t sit on VKontakte all day to track all this.
How to solve this problem?
You need to set up notifications. On VKontakte, notifications by e-mail and also by e-mail are possible.
Here's a little instruction on how to do this:
By the way, if you are interested in learning how you can effectively and quickly attract clients from VKontakte, here is a link to a free book on this topic.
Let's continue.
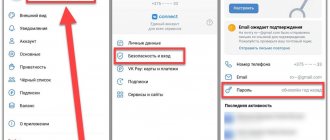
Stage 1. Go to the “My Settings” section inside your account.
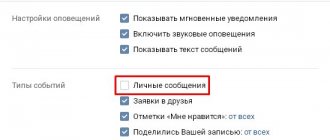
Stage 2. Go to the “Alerts” tab.
In order to receive notifications via SMS, check the appropriate box.
In order to receive notifications by e-mail, in the “E-mail Alerts” section, mark the events that need to be notified.
Actually, that's all. The procedure is quite simple. Always stay up to date with the latest changes in your VKontakte account.
By the way, do you want to find out if there is any point in some element on your website using the “goals” of Yandex Metrics and Google Analytics?
Remove what doesn't work, add what does and double your revenue.
Course on setting up Yandex Metrica goals..
Course on setting up Google Analytics goals..
webgyry.info