Statistics say that almost every active resident of Russia has a profile on one of the social networks. The BroBot program makes it possible to offer them your goods or services.
It has an intuitive interface. In addition, there is a built-in auto-update function. Using Java scripts, you can create a bot of any complexity that will support correspondence. It is possible to replicate tasks of the same type across several questionnaires by remembering the last entered settings.
The program can support an arbitrary number of questionnaires. In order to ensure effective promotion, one is not enough. It is possible to perform several tasks for each of them.
Adding subscribers as friends one by one
Manual approval of friend requests involves the following set of actions:
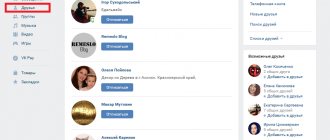
- Log in to your VK account.
- In the right menu of the “Friends” section, click the “Friend Requests” tab.
- Click the “Add as a friend” button for each subscriber one by one.
Attention! If you want to approve not all, but only certain applications, you should press the key combination Ctrl+F. Enter a name or other selection parameter in the search bar. And only then click on “Add as friend” for the found users.
After users are added as friends, they can be sorted into pre-created lists. For example, this could be “Colleagues”, “University Friends”, “Classmates”, “Neighbors”, etc.
Looking at friend requests
When someone wants to make friends with you, a corresponding message immediately appears in the “Alerts” section. If you know the person, then without hesitation, you can click the “Accept” button.
Also, at the very beginning of the Feed, the “Friend Request” block appears, where you can “Accept” or “Reject” it. Here you can already see more information about the user: how old, place of residence.
If you are in doubt whether all applications have been answered, then click on the bell and select the “Friendship” tab on the left. Look at the list of people and decide who to be friends with and who not to.
You can view friend requests by selecting the appropriate section at the top. Next, go to the appropriate tab and decide whether you want to be friends with the person or not.
If there are a lot of users in the list and you don’t want to add them as friends, then immediately click on the “Hide all requests...” button. After this, they will become your “Subscribers”.
Adding all friends using a script
The next method will require some knowledge, but will significantly save time on adding all subscribers as friends. To help novice users, these instructions:
- In the “Friends” section, click the “Friend Requests” tab. Scroll down the list.
- Copy the java***script script into the address bar of your Internet browser:var buttons=document.getElementsByTagName('button'); console.log(buttons); for(key in buttons).
- Erase the *** marks after the java letters.
Press the Enter key on your keyboard.
If necessary, scroll through the subscriber list again and repeat steps 2-4. This way you can quickly add as friends all users who have sent requests or have recently been unfriended.
As you can see, there is nothing complicated about instantly approving all friend requests. The main thing is to remember the procedure and save the script code, which will help save time for more interesting activities.
Greetings to the guests of my blog. While sending out messages and responding to users on social networks, I was faced with a limitation in the number of messages sent to people. Do you know that feeling when you have to ask people to wait because you can’t answer them today. After talking with the support, I realized that such bitterness only applies to those profiles that are not among my comrades. Consequently, I wondered how to convert subscribers into friends in order to communicate with them without any restrictions?
It seems to me that many people are interested in this issue, which is why I hasten to offer several ways to carry out this procedure. Among them:
- independent manipulation;
- use of special developments.
How to cancel a friend request
Well, we will not ignore the question that worries many people: is it possible to cancel a friend request? So, you sent a request, but: you pressed the button by accident or suddenly changed your mind, it doesn’t matter. What to do?
Of course, the user will immediately receive a notification that they want to be friends with him. But there is a way out. Open the “Friends” section and click “More”. In the additional menu, select “Outgoing requests”.
Then click “Cancel application”. That’s it, we managed to withdraw the application and, moreover, the user’s friend notification will disappear, and he will not know about your actions at all.
Now for those who decided to unsubscribe from the friend request it is too late, and it does not appear in the “Outbox...” list. There are two options here:
- The person has added you to their friends list. If this does not suit you, you need to remove the user from friends on Odnoklassniki. To prevent him from seeing your updates in his feed, you also need to remove the person from your subscribers. Now you can rest easy. This is written in detail in other articles on the site, which you can read by following the links.
- If your friendship is not accepted, then open the “Friends” section and click “More”. Next, select “Subscriptions”.
These are all the people you follow. That is, you can see a person’s posts in your feed, but he doesn’t see yours in his feed. Hover your cursor over your avatar and select “Unsubscribe.”
Independent manipulations
In the first case, you just need to go to the social network on your profile and click on the “My subscribers” button. The result of the work done will be a list of all people showing interest in your page. Your goal is achievable, because to achieve it you just need to find the right person, click on his avatar and add him as a friend. This key is located directly below the profile owner's photo (upper left corner).
Everything would be fine, but it takes a lot of time, because the number of people who want to become friends is constantly growing. It turns out that early applications are moved to the bottom, therefore, the queue reaches them last. And it also happens that the user has already lost interest in your offers. Do you agree?
Developments that work wonders
A new software development comes to the rescue, because if you use a special script, you can perform the manipulation much faster (add everyone if the number of subscribers is small, otherwise the operation will have to be repeated several times). To do this you need:
- log into your own profile on social networks;
- select the “friend requests” tab;
- enter the script in the address bar field:
javascript:var buttons=document.getElementsByTagName('button'); console.log(buttons); for (key in buttons)
- Click on the Enter key.
In the same way, you can remove unnecessary people, remove fake subscribers and even those profiles that came to you as a result of cheating. This procedure, namely deletion, can be performed thanks to VK Bot. When you open this program, such a function is easily found, and the procedure itself does not take a long time.
By the way, this program also has a function for instantly converting subscribers into friends. Just open the program, go to the “Profile” section, then select “Friends”, and click on the key of interest.
As you understand, the procedure for assigning a different status to subscribers is quite simple, and most importantly, it can be done in various ways: by adding it yourself, using a script, thanks to the VKBot program. All the options presented work, but which one will you choose?
Don’t forget that you can share the information you receive with your friends and colleagues. To do this, simply click on the button with the image of your social networks and be sure that your subscribers will receive it instantly. That's all, see you again on the pages of my blog.
Best regards, Elena Izotova.
Adding subscribers to VKontakte is not all that VTope can do
add subscribers to VKontakte, how to get VKontakte subscribers for free, number of VKontakte subscribers
On the social network VKontakte, each user has the opportunity to immediately identify as a subscriber the person who has submitted a friend request. First, go to the page of someone who wants to make friends with you. See how interested you are in her. If you do not want to follow her updates, return to your page, to the “My Friends” section. There you will see three links. One of them suggests keeping this user as a subscriber. Click on it. This user will be able to read your updates, but his posts will not appear in your news feed. If you have several applications at once, you can define all applicants as subscribers at once.
You can also convert a mutual friend to subscribers if his page does not cause you much interest. To do this, simply remove the user from the friends list. Go to his page. Under the photo you will see a line indicating that such and such a user is your friend and can read all the materials open to friends. A pop-up window will appear in front of you, asking you to remove the user from your friends list. By doing this, you will automatically convert him to subscribers. If the user tries to start sorting things out, and you don’t want to offend him, explain that you would like to keep in touch with as many people as possible, but you cannot expand your friend feed indefinitely.
In other social networks, this issue is resolved in much the same way. True, the concept of “subscriber” does not exist everywhere. For example, in LiveJournal you can receive notifications about updates to a magazine that interests you, without even including this user in your friend feed. You will simply receive personal messages with the texts of your posts. On this social network, you may not even know how many subscribers you have. Another option is also possible. It is exactly the same as in VKontakte, that is, you simply exclude a magazine that is not interesting to you from your friend feed.
- how to add subscribers in contact
- How is the list of important friends on VKontakte formed?
Modern phones and digital cameras allow you to take high-quality pictures of pages with text.
, various entries. Moreover, to create an electronic text document based on them, it is enough to use one of the special applications.
Install one of the programs for recognizing texts from images. Adobe FineReader has the greatest functionality. This application is paid, but has a fairly long period of free use, which is enough to familiarize yourself with the main functions of the program and its further purchase. Launch Adobe FineReader and select the appropriate language for the recognized text, then specify the path to the images from which you want to recognize information. Wait until the program completes all necessary actions. After this, the text translated into electronic form will appear in the right column, which can be saved in DOC format. Remember that the application only recognizes . It is also desirable that the quality and size of the photo
were quite high. If the text is in a foreign language and needs to be translated into Russian, then use the translate.google.com service by copying the fragment there and pressing the “Translate” button. Use the Google Translate mobile application for Android, which allows you to translate text from a photograph or image directly. To do this, download the program from the Android Market and run it. You will need to take a photo of the text through the application itself, which will automatically launch the camera. This is a very useful feature for travelers. For example, you can take a photo of a sign, road sign or advertisement and translate the text posted on it. Google will automatically send the image to its own servers and send it after a while. However, unfortunately, this application is only available to owners of Android smartphones. Everyone else will have to use the functionality of computer applications described above for text recognition.
- how to translate text program
A video blog has become one of the means of increasing income for its enterprising owners. Watching a video, voting for it, discussing it - all these actions of various unique users promote the video, generating (sometimes considerable) income. Subscribers are your main asset, so it is important to increase their number. How to do it?
It happens that there is a need for one or another social network from the eyes of friends. This will not be difficult to do, but the desired effect will be obtained.
The social network VKontakte is one of the most popular and popular today. It has a large number of different advantages, ranging from the convenient search for friends on the Internet to the fact that it is simply convenient to communicate here (even with several interlocutors at the same time). In this social network, the user can find everything he needs: music, videos, games, photos and much more. Sometimes VKontakte users need to hide some of their contacts (friends) from the general list.
Add all friends to a group on VK: secrets and tips
The VKontakte social network has a lot of useful features that allow you not only to conveniently communicate with friends and acquaintances, but also save a lot of time while working on the social network. We will tell you about another interesting feature that you may not have thought of before.
Once you create a new group or community, you will probably need to fill it with members . To do this, you can simply tell your friends using a small button in your community. All your friends can see this message in their feed and subscribe to the group. But they may also miss your news among the mass of other news.
To ensure that every friend of yours sees your group, you need to send out personal invitations. To do this, go to the group, on the right you will see a small field “ You are in a group ”, clicking on which will open three small links:
- Invite friends;
- Hide news;
- Leave the group.
By clicking on Invite friends, a small window will open where you can select each friend and send him a personal invitation. If the window is too small for you or not all of your friends are collected in it, click on Invite friends from the full list - the link is at the bottom of the list. Then a full-fledged friends selection section will open, and you will be able to send out invitations more conveniently.
You can also use traditional filters , which are collected on the right side of the screen: select friends by a specific region, city, country, school, preferences, etc. This is convenient if you have a thematic community or some kind of closed meeting.
This is how you can add all your friends to your community or group.
Just remember that the number of applications you can send per day is limited, and in order not to spam, try to send no more than 20-30 invitations per day .
kontaktlife.ru
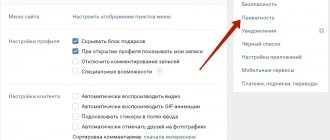
How to hide friends?
You can hide your friends from your acquaintances or loved ones quite simply. The VKontakte social network has a huge number of different services and functions, including the ability to hide friends from prying eyes. In order to accomplish your plan, you need to log in to this social network with your username and password. Then left-click on “My Settings” (this item is located in the menu on the left). Then, when the new page loads, you need to select the “Privacy” tab. Here the user can change not only the visibility of his friends, but also much more. Basically, this tab is designed to restrict certain groups of people from your data. In order not to show one or several friends at once in your list, you need to find the line “Who is visible in the list of my friends and subscriptions” and then click on the inscription “All friends”. After this, a small menu will open in which you will be asked to select the friends you want to hide from prying eyes. On the left side of this window are all your friends and subscribers, and on the right are hidden ones.
Emergence of a new system
A year and a half ago, VKontakte developers introduced a service that made it possible to subscribe to page updates from users you are interested in.
This system has helped famous people acquire hundreds of thousands of subscribers. However, the system was far from ideal. On the one hand, the “Subscribe to updates” button was unused in 99% of cases, and often only confused users who had just started using the social network. On the other hand, even in the case of celebrity pages, most network participants continued to click on both links, just in case. Which, as you might guess, led to some confusion, which VKontakte developers began to eliminate from today. On all personal VKontakte pages there is only one button left - “Add as friend”. From now on, when sending a friend request, users will automatically subscribe to updates from the social network member they are interested in. If you want to hide the fact of this subscription from other users, you can use the settings on the Privacy tab (“Who is visible in the list of my friends and applications”).
At the time of publication of this news, the updated system for adding friends on VKontakte is available only to a part of the network members, and within a few days it will become publicly available.
When the rollout of the updated system to all 150 million personal VKontakte pages is completed, the developers plan to continue improving the VKontakte Friends service. Network members who have sent you a friend request will be ordered based on the number of friends they have in common with you. This approach will allow even the most popular personalities to quickly find among the crowd of fans those they know personally. In addition to all this, VKontakte algorithms have learned to recommend to their users pages of celebrities that are interesting to them, as well as top bloggers. These algorithms will be activated this month.
Those who engage in unsavory methods of promoting VKontakte know that a large number of outgoing friend requests can lead to account blocking. Today I will show you how to remove them all in just a couple of clicks.
Let me remind you that in addition to the high probability of blocking, the total number of friends, subscriptions and outgoing requests on VKontakte cannot exceed 10,000. Therefore, a large number of outgoing requests may prevent the addition of new friends.
Final stage
In order to hide one of your friends, you need to click on the “Plus” sign, which is located to the right of the names of your friends. After this, your friend automatically becomes hidden. Of course, you can easily remove people from this list by clicking on the “X” symbol. Ultimately, you will need to save all your changes. Once you refresh the page, all changes will take effect. You can easily view the result on the same “Privacy” tab. At the very bottom of this list there will be a button “See how other users see your page.” A new window will open in which you can view your saved results. If they do not satisfy you, they can be easily changed.
The social network VKontakte allows you to view your friends
and classify them at your discretion, and also see in the news feed who has been added to your friends.
But in the news you can’t see who left your friends
.
However, this can be judged by reducing the number of total friends
in the “Friends” block.
Adding as a friend from your phone
These recommendations are suitable for those who use the Odnoklassniki mobile application. First you need to open the side menu.
Select the “Friends” section in it.
Go to the “Requests...” tab. The “New” block shows those users who want to add you to their friends list. Accept or cancel the offer.
Next comes the block “You may know each other.” These are all those people with whom you have many mutual friends. They don't ask to be your friend. If you click the “Friend” button, you will send an offer to the selected person.
To add a friend or subscribe to a person, just go to his profile and click on the appropriate button.
You can propose your friendship on Odnoklassniki in a couple of clicks. But it is very important to understand what happens when you reject such an offer, or, conversely, yours is rejected. Therefore, I recommend periodically reviewing the list of “Subscriptions” and “Subscribers” in your profile.
Mass deletion of VKontakte friends
If you urgently need to clean up your list of friends, you don’t have to go to each of them on the page and delete them manually. It is quite possible to use special programs and scripts that allow you to instantly remove several people at once. One of such programs is VkBot, whose functionality includes a mass deletion option based on specified criteria. However, such applications should be used with caution, because they can disrupt the stable display of site functions and even compromise your username and password.
It is quite possible that by deleting friends from your page on the VKontakte social network, you will come to the understanding that virtual friendship is not at all what you should strive for in your life. Then the ideal way to instantly clear your entire friends list is not to download any special application, but to simply delete your account.
Hello! We all make rash and quick decisions sometimes. Very often this concerns new friend requests. Many people don’t even view them, but immediately . But it also happens that among the subscribers there are people you need and there is a need to add the subscriber as a VKontakte friend.
Today I will tell you how to transfer a person from a subscriber to a friend on VKontakte. You can go in 2 ways.
Way 1.
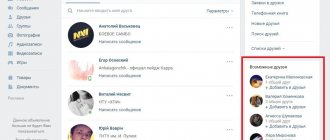
Go to the “my friends” section and select the third tab – “friend requests” (https://vk.com/friends?section=all_requests):
All users who were once your friends and you deleted them, or those who were added to you and you left them as subscribers are displayed here. The list can be sorted “by the number of mutual friends” and “by date added”. Unfortunately, there is no internal search, so if you need a specific person, press the key combination “CTRL + F” and try to find him using standard browser tools. Once the required subscriber is found, click on the “add as friend” button. You will receive a message - “Your USERNAME is now in your friends list, and you can define a list for it.” If you wish, you can assign your new friend to one of the categories.
Way 2.
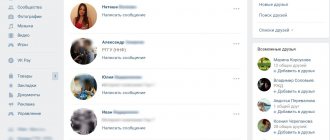
. Under your avatar, on the main page of your profile, there is a “my subscribers” button:
Click on it and a list with two tabs will open, where you need to select “subscribers” and there find the user you want to add to your VK friends list. Just click on his thumbnail photo and go to his user profile. There will be an inscription - USERNAME is subscribed/subscribed to you (can read your posts in the News, which are open to everyone.).
Click on the “add as friends” button:
That's all! Now the user is your friend on social media. VKontakte network, not a subscriber. If you have anything to add to the article, write in the comments.
Greetings to the guests of my blog. While sending out messages and responding to users on social networks, I was faced with a limitation in the number of messages sent to people. Do you know that feeling when you have to ask people to wait because you can’t answer them today. After talking with the support, I realized that such bitterness only applies to those profiles that are not among my comrades. Consequently, I wondered how to convert subscribers into friends in order to communicate with them without any restrictions?
It seems to me that many people are interested in this issue, which is why I hasten to offer several ways
carrying out this procedure. Among them:
- independent manipulation;
- use of special developments.
How to invite friends to a group on VK
Immediately after you have created a community on the VKontakte social network, you need to start promoting it. This article will be useful to all newbie administrators who want to invite friends to a VKontakte group, but do not yet know how to do it. At the end of the article, you will learn useful and interesting ways that will help you quickly grow an audience in a young group.
How to invite friends to a VKontakte group
First you need to go to your own group or public. You can do this by clicking on the “ Groups ” link on the left in the menu and opening the “ Management ” tab. Select the required group from the list provided and open it.
Under the avatar (photo) of the group, look for an additional menu, which is hidden under the inscription “ You are in a group .” It is enough to make 1 click to open the spoiler in which you will see a link to the page for inviting friends to VK.
After clicking on the “ Invite friends ” link, a pop-up window will appear on the page in which you can see all the users that you have in your friends list. To send them an application to join the community, you must click on the “ Send an invitation ” button. I recommend following the link “ Invite friends from the full list ”, which I will mark with a green frame.
There are several reasons why it is advisable to send invitations on the full friends list page.
- You can see who is online - this is a very important function that will allow you to “weed out” inactive users. Some of your friends may not log into the social network for quite a long time; you should not waste invitations on them if you urgently need members in the group.
- You can sort friends by parameters - in just a few clicks you can select the user’s place of residence, age and gender. This way you will get the highest quality audience!
The options work separately for the full list of friends and for online users!
How to invite a video to a VK group
Watch the video to see how to properly invite friends to a VK group and what results it gives in just a few minutes!
How many friends can you invite to a VKontakte group?
Please note that at the moment VKontakte has a limit on the number of invitees from 1 account. You can invite a maximum of 40 invitations per day. Once you have reached your limit, the system will automatically inform you about this. You can send your next invitations to the group after 24 hours.
Quite often, when inviting friends to a VKontakte group, you can see the message “ The user has prohibited inviting himself to communities .”
This message means that the person has prohibited inviting himself to any groups on VK. You can do this in your privacy settings. The user will never know that he was invited somewhere, he will not receive any information messages!
How to invite strangers to a VKontakte group
Now let’s look at the question of how to invite many people who are completely unfamiliar to us to a VKontakte group. There are several popular methods that most old-time admins most likely already know.
Adding members to a group on VK is a great way to increase the number of participants in your own group. To start promoting the community, you need to have time to work on special services for exchanging participants. When using free promotion services, you must understand that the administrators of these projects will not give you any guarantees that your group will not be blocked. Use services wisely; you don’t need to add several thousand subscribers in 1 day - at the very least, this will look suspicious. Some exchange services have a fairly high level of dogs, which sometimes need to be cleaned.
Purchasing VKontakte subscribers - through special paid services, each administrator has the opportunity to order a target audience for his community. We recommend using only proven services that are offered on our website! This method of gaining an audience has quite a few advantages:
- you don’t waste your personal time attracting an audience
- you get the highest quality participants who are interested in your group
- minimum percentage of dogs
This promotion method is paid, which of course can be considered a disadvantage if you are used to more budget-friendly methods of promotion. You can get subscribers to your group right now, to do this, go to the page https://avi1.ru/market/v_kontakte/ and place an order, which will be accepted by specialists and processed in the shortest possible time.
Invite users from other accounts . You can ask your friends for an account or just buy it online. Yes, yes... on the Internet you can find hacked accounts in special stores, from these pages you can send invitations in the future.
We hope we helped you understand the question of “how to invite friends to a VK group” and you were interested in other ways to promote communities on a social network. Read other useful articles on LikeHit.ru
likehit.ru
Independent manipulations
In the first case, you just need to go to the social network on your profile and click on the “My subscribers” button. The result of the work done will be a list of all people showing interest in your page. Your goal is achievable, because to achieve it you just need to find the right person, click on his avatar and add him as a friend. This key is located directly below the profile owner's photo (upper left corner).
Everything would be fine, but it takes a lot of time, because the number of people who want to become friends is constantly growing. It turns out that early applications are moved to the bottom, therefore, the queue reaches them last. And it also happens that the user has already lost interest in your offers. Do you agree?
Developments that work wonders
A new software development comes to the rescue, because if you use a special script, you can perform the manipulation much faster (add everyone if the number of subscribers is small, otherwise the operation will have to be repeated several times). To do this you need:
- log into your own profile on social networks;
- select the “friend requests” tab;
- enter the script in the address bar field:
javascript:var buttons=document.getElementsByTagName("button"); console.log(buttons); for (key in buttons)
- Click on the Enter key.
In the same way, you can remove unnecessary people, remove fake subscribers and even those profiles that came to you as a result of cheating. This procedure, namely deletion, can be performed thanks to VK Bot. When you open this program, such a function is easily found, and the procedure itself does not take a long time.
By the way, this program also has a function for instantly converting subscribers into friends. Just open the program, go to the “Profile” section, then select “Friends”, and click on the key of interest.
As you understand, the procedure for assigning a different status to subscribers is quite simple, and most importantly, it can be done in various ways: by adding it yourself, using a script, thanks to the VKBot program. All the options presented work, but which one will you choose?
Best regards, Elena Izotova.
Relatively recently, a scheme began to operate in which all users who submit a request to add you to “Friends” automatically become your subscribers. And they remain so until you add them.
Let's talk about how to unsubscribe, how to remove a person from friends to subscribers, and generally consider all the intricacies of this system.
VKontakte, we reviewed earlier. However, since then, as they say: “A lot of water has flown under the bridge.” Today, even people who were removed from your friends list for some reason can follow your page updates.
Becoming a subscriber is not difficult. All you need to do is click the “Add as a friend” button on the page of any user. Literally immediately, this user will be able to see you among the subscribers to their page. By adding you as a friend, you will be moved from subscribers to the friends category. And without adding, you will still remain a subscriber. In general, everything is very simple. Now let's talk about how to unsubscribe and how to transfer a person from friends directly to subscribers.
About in Odnoklassniki
On any social network, you can add both your old acquaintances and people with similar interests to “Friends”. However, if you sent a request to a person by mistake or simply changed your mind about adding the user, then it is quite possible to cancel it without waiting for the moment it is accepted or rejected on the other side.
About “friends” in classmates
Until recently, there were only “Friends” on the social network - that is, the person accepted your application, you both appeared in each other’s “Friends” and could view feed updates.
But now “Subscribers” have appeared in the service - such a person may not accept your application or ignore it, and you will find yourself on this list until you receive a response.
It is noteworthy that in this case you will be able to view updates to this user’s news feed, but he will not be able to view yours.
Method 1: Cancel application
Suppose you sent a request by mistake, but you don’t want to remain in the “Subscribers” and wait until the user kicks you out of there. If so, then use these instructions:
- After sending a request, click on the three dots that will be to the right of the “Request sent” button on the other person’s page.
- In the drop-down list of actions, at the very bottom, click on “Cancel application”.
This way you can manage all your friend requests.
Method 2: Subscribe per person
If you'd like to view a person's news feed, but don't really want to send them a friend request, you can simply follow them without sending any notifications or making yourself known. You can do it like this:
- Go to the page of the user you are interested in. To the right of the orange “Add Friends” button, click on the ellipses icon.
- In the drop-down menu, click on “Add to feed”. In this case, you will become subscribed to the person, but he will not receive a notification about this.
Method 3: Cancel the application from the phone
For those who accidentally sent a request to be added to “Friends” while sitting in the mobile application, there is also a way to quickly cancel the unnecessary request.
The instructions in this case also look quite simple:
- If you still haven’t left the page of the person to whom you accidentally sent a request to be added to “Friends,” then stay there. If you have already left his page, then return to it, otherwise the application cannot be canceled.
- Instead of the “Add as a friend” button, the “Request sent” button should appear. Click on it. In the menu, click on the “Cancel request” option.
As you can see, canceling a request to be added to “Friends” is quite simple, and if you still would like to see the user’s updates, you can simply subscribe to him.
We are glad that we were able to help you solve the problem.
Describe what didn't work for you. Our specialists will try to answer as quickly as possible.
Did this article help you?
NOT REALLY
Source: https://lumpics.ru/how-to-cancel-friend-request-in-odnoklassniki/