Installing the “Write to Us” widget
In order to get the widget code, you need to follow this link:
There are just a few options to configure. Button text, size and link to the page from which the dialog will appear.
To install on the site, copy the first script between the head tags. And the div and the second squeak are in the place where the widget itself will be displayed.
How to connect?
The sequence of actions is quite simple and does not require special skills. To connect the VKontakte community message widget, you need to open the page with the settings data: https://vk.com/dev/CommunityMessages, correctly indicate the link to the required group, copy the generated code and place it on your website.
If you want this application to appear immediately after opening a page of your internet site, then be sure to approve the “Expand immediately” feature.
With this simple sequence of actions, you get the opportunity to immediately know that someone has written to you.
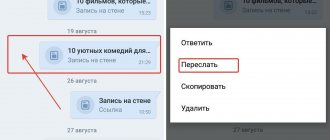
Community Posts Widget
A more interesting option, in my opinion, is the “Community Messages” widget. This is a kind of online consultant. There is a button on your website that, when clicked, opens a window with a dialogue with the familiar VKontakte interface. At the same time, you can not only write text, but also attach a document or photo.
To add such a widget to your site, you must have a community created and “Community Messages” and “Message Widget” enabled in it. This is where the main settings are made.
- " Welcome
" is an automatic message that will be sent to the user when he opens the conversation. - “ Brief information
” is the text/greeting message that the user will see. You need to try to formulate it in such a way as to encourage a visitor to your site to write to you. - “ Offline status
” will be shown to the user if you have not responded to him within 30 minutes. - “ Allowed domains
” are the domains on which the widget will be shown.
Pros of the widget
- Increases confidence;
- After leaving the site, the user can continue the dialogue in his messages; he does not have to wait for a response on the site;
- Clients do not need to register anywhere else or enter their data to ask a question;
- Through the widget you can send attachments, pictures, videos, in general, everything you need;
- Site administrators receive the user’s contacts and can add him to the retargeting database to show him advertising
Widget “Comments”.
Go to your VKontakte , find the “For Developers” link at the bottom left and click on it. Next, click “Show all”. Select the “Comments” widget.
Visitors will see a comment box below the article. In the “Site/application” column, select - connect a new site. Write the name of the site, the site address - with http:, the main domain of the site - without http, select the topic of the site, click “save”. Choose a width that fits on the page (if anything can be changed and “adjusted” later). Copy the code. This code will consist of two parts.
The first part is set in header.php before the closing tag
there is no need to copy this.
VK.init ({apiId: 5815542, onlyWidgets: true});
It is located in WordPress Appearance - editor - header.php
Place it right in front (I already put it - see it above). Click "update file".
Second part of the code
it is not necessary.
VK.Widgets.Comments("vk_comments", {limit: 10, width: "665", attach: "*"});
Placed in the body of the page (your article, post) - below the page (in text mode). Don't forget to click "Update".
We update the site page and see what it will look like. If the widget is wider and does not fit, return to the “widget designer” and reduce the width.
As you enter text and submit comments, they will be reflected below. Also on the commentator’s page on social networks.
How to use the VKontakte greeting widget
General advice: don't write vaguely. While I was writing the post, I managed to forget which community I took this example from.
Vague characteristics like “a lot of interesting posts” and “a lot of cool pictures” in the widget text didn’t help me remember. It’s better to write something specific and specific to your community. At least there is a call to action “Subscribe” - that’s a good move.
Now I’ll tell you what you can do using the VKontakte greeting widget.
Newsletter
With the help of a widget, it has become much easier to convince your audience to subscribe to your community newsletter or simply to your community. About how my colleague Seryozha has already told.
FAQ
You can also use the VKontakte welcome widget to direct users to the FAQ page so that you don’t have to explain the same thing to newcomers a thousand times in messages and comments. Here's how hand-twisting fans did it:
With the help of the VKontakte welcome widget, owners of a strange hobby have made life much easier for new recruits: now, in order to find all the necessary lessons in the correct chronological order, visitors simply press a button and get the result.
Nice bonuses
Another current way to use personal widgets is to issue promotional codes for a discount.
In this widget, the admins of the group that sells perfume used a rather rare variable - a number. See where it says 45? The number is linked to the store's CRM system. With each bottle sold during the promotion, the number will decrease.
Of course, it would be clearer for you and me if instead of “only 45 flavors” it was written “45 flavors left.” Take note of this countdown method.
Contest
In addition, the VKontakte greeting widget helps increase the activity of community members. This is especially useful if you are running a creative competition. Here's an example from anime fans:
Just don’t take their example of writing numerals.
How to install a greeting widget in the VKontakte group
To install the welcome widget, go to the VKontakte application directory and click on the “Add” button opposite the Spycat application we need.
Important:
In the visibility settings, check the “Only for administrators” checkbox so that regular visitors do not see the “Open application” button next to the community cover. And in the “Application widget visibility” settings, on the contrary, set “All users”.
While you're creating the widget, you can limit visibility to administrators only. The main thing is not to forget to open the widget for everyone later.
Luckily, Spycat has prepared a handy cheat sheet:
In the texts for the VKontakte greeting widget, you can use several variables:
- first and last name: {Firstname} and {Lastname} respectively;
- city of residence: {City};
- the last profession listed in the profile: {Career}.
Please note that each text field is limited to 100 characters, and the button label is limited to 50. Therefore, you won’t be able to play Leo Tolstoy.
"Like" widget
Who we recommend:
all sites.
What gives:
assessing the success of the material; increasing social coverage; you can research the audience; track comments on the wall of users who shared the material.
Become a Project Manager and manage a development team!
This is an IT profession that you can enter without a technical education.
Here you:
- Get all the hard and soft skills according to the PM competency matrix;
- Master development methodologies and frameworks (PRINCE2, PMBOK, Agile, SAFe);
- And also learn the necessary foundation in mathematics, statistics and programming for project management.
Interesting? Then take the Project Manager course in IT from Product LIVE.
Widget “Authorization via VKontakte”
Who we recommend it to:
all sites that have personal accounts.
What gives:
more registrations (potential leads), more active audience; social data; visitors do not leave the site when faced with a complex registration form. The user's friends are displayed in the authorization block, which means he is more likely to stay with you.
In 2021, Janrain surveyed 600 of its customers. The result is this picture:
Remember yourself. You want to read an article, buy something in an online store, speak out on a forum, but you stumble over the message “only after registration.” In most cases, you will abandon your idea or find an alternative.
Using authorization via VKontakte, you can enter the site in a few clicks: just log in through your account. And at the next stage (if desired) indicate the missing data.
"Class Button" widget.
This button allows visitors to mark interesting articles, posts, publications.
In the button designer, you can select its size, shape, remove or leave the counter, and change the text on the button. By selecting all this immediately below, you will see the result and receive the widget code.
The code is inserted into the body of the page, where you want to see the button. Refresh the page and see the result.
Polls widget.
Go to your VKontakte , find the link “For Developers” at the bottom left and click on it. Next, click “Show all”. Select the “Polls” widget.
Do you want to know readers’ opinions about an article, a recording, or the completeness of the topic? Put "Poll". Fill in all the fields: site name, site address, main domain, subject, click “save”. Enter the survey topic, you can add or remove the number (options) of answers. Click get code.
The code consists of two parts. Installed as in the “Comments” Widget section. One part is in header.php, the second is in the body of the page under the text.
We refresh the site page and see the widget.
When voting (visitors click on answers), their number will be reflected, visitors will also be able to click the “Tell Friends” button and friends will know about the vote.
Recommendations widget
Who is it suitable for:
businesses that engage in content marketing, blog authors.
What gives:
SEO effect, increasing browsing depth and time spent on the site; improving usability; increase in involvement.
This simple tool allows you to keep the user on the site by recommending a couple more interesting materials. The most popular articles are dynamically loaded into the block, their rating is determined based on the collected likes.
How to do this?
3. Go to the “My Settings” page.
4. Scroll down the page and in the footer of the site we find a menu with a link to “developers”. Follow this link.
6. Let's go to this section, where the list of widgets for the site will be listed.
Let's start in order.
The Comments widget allows you to customize a comment block for articles on your site.
Go to the page of this widget.
And fill in all the fields: indicate the name, address, main domain and subject of the site. In the “Number of comments” list, select the required number of comments that will be displayed on the page, the rest will be hidden under the “Previous comments” button, which can also be read by clicking on this button.
Opposite the “Media” item, uncheck the box if you want only text in the comments. If you want to give free rein to users, you can leave the checkbox or configure this function at your discretion.
For example, allow the user, in addition to text, to attach photographs, videos and links to their comments, but prohibit drawing graffiti and adding audio recordings.
In the “Width” field, you must specify the width of the “Comments” block. In order for the comment block to be aesthetically displayed on your website, it is advisable to specify a width equal to the width of the area allocated for content.
For example, if the width of the content area is 600 pixels, then we specify the same width for the “Commerce” block. It doesn’t matter if you don’t guess the width initially, then you can correct it manually in the code.
Now you can receive comments on your articles, with the guarantee that they will be real people. This widget also has the ability to moderate (deleting messages, adding individual users to the blacklist, assigning moderators).
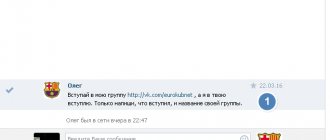
“Wall Post” widget – what is it for? I'll try to explain with an example.
Let's say you post news on your blog about the dismissal of Pavel Durov from VKontakte, and would like to quote his opinion on this matter. You just need to find the desired post on the social network. Copy its URL.
Go to the “Wall Post” widget page.
You may ask, why such complexity, if the HTML has a special “Quote” tag for this? I answer: the function of this widget is the reliability of the information. Your readers will be assured of the information, so to speak. from first-hand accounts and there is no “gag” in it.
“Communities” widget - if you have created a group of the same name or a public VKontakte page for your website, then you can install this widget on your website to attract subscribers on your website.
In the “View” item, select what will be displayed in the widget.
Participants: photos of subscribers and their number.
Title Only: The widget will display your community's logo and name.
Unlike “Comments,” the “Communities” widget allows you to customize the block design to match the color scheme of your site, as well as specify not only the width, but also the height of the element.
After all the settings, you also copy the “Embed Code” and add it to the designated area on the site.
Using the “Like” widget, users will be able to not only like your articles, but also publish a link to them on their wall, which will also help attract additional traffic to your site.
Here, just like for comments, we indicate the name of the site, its address, main domain and subject. Next, click the “Save” button.
Now you need to customize the appearance of the button. It's up to you here. Next, select the height of the button - for all button options the proposed values are the same: 18, 20, 22 or 24 pixels. Also, if you have chosen the button option “Button with a miniature counter” or “Button with a text counter”, then in the “Button name” item you can select the text that will be displayed on the button. There are only two options: “I like” or “This is interesting.”
All! Copy the code and add it to the site pages.
The next widget “Recommendations” will not work without installing the previous one (“I like”), as it displays the most popular articles on your web resource according to readers. Using this widget, you can make it easier for the user to find the most interesting posts on your blog.
With the first settings of this widget, I think everything is already clear to you, so I’ll start with the “Number of records”. Here you choose the number of popular pages to display. There may be 3, 5 or 10.
In the “Sampling period” drop-down list, select the most optimal time interval. I think here you need to take into account the frequency of publishing new posts on your blog and the number of visitors to your blog. The higher the first and second indicators, the shorter the period should be.
In the “Formulation” item, select the most acceptable phrase (“Like” or “Interesting”) and copy the “Insert Code” again.
Polls widget. This is perhaps the most interesting widget. With its help, you can organize a survey on your website on any topic and with any number of answer options.
For example, you changed the design of your blog and want to know what your readers think. Go to the “Polls” section of the widget. Fill out the form (you, of course, add a description for your site):
Now we formulate the survey. In the “Survey Subject” field, write the question that concerns you. Next, fill out the “Answer Options”. By default there are two. To add more options, you need to click on the “add” link, after which another text entry field will appear.
When the survey questionnaire is formulated, indicate the width of the block with the survey and click the “Get code” button.
A pop-up window will appear from which you can copy the Embed Code.
After inserting the code on the site, your readers will see this survey form:
Do you want links to your articles to become immortal? Then the “Publishing links” widget will come to your aid, allowing VK users to publish links to an article directly on the wall. And as you know, all information published on the wall is necessarily translated into the news feed.
The settings for this widget are simple: you choose the style of the button (with straight or rounded edges, just an icon or a button with text, with or without a publication counter), you can change the text on it (for example, replace the default word “Save” with “Tell Friends” ) and logo variant.
The last one on this list is the “Follow User” widget. Allows your readers to become subscribers of your community or you personally with one click. You need to provide a link to the community page and select the button type. And paste the copied code onto your website.
I think this widget can also be used if, for example, other people write articles on your blog (like Alexander Borisov), where at the end of the article you indicate the link-name of the author to his website. What if there is no website? Then you can use this widget and send everyone who wants to meet the author to his page on the social network.
That's all! Good luck with your experiments!
We've released a new book, Social Media Content Marketing: How to Get Inside Your Followers' Heads and Make Them Fall in Love with Your Brand.
A message widget is a small program that is designed to communicate with site users.
More videos on our channel - learn internet marketing with SEMANTICA
Today, the most popular widgets are VKontakte, but other companies also produce them. Their essence is that the user gets the opportunity to correspond with a company employee or community on a social network. The widget can look like a button, or it can look like a window inviting a dialogue.
“Allow community to write” widget
Who we recommend:
businesses that engage in content marketing, blog authors.
What gives:
increase in conversions to join the group; increasing touch points with the business.
Another widget that can become a point of contact on an external site is “Allow the community to write.” Using it, you can deliver your news directly to the subscriber's personal messages. As a result, users who subscribe to news in private messages will always be in your information field. Potentially, the tool can compete with traditional mailing lists.
Just like the ethical newsletter, it is easy to unsubscribe from the “personal” newsletter.
Finally, the advantages of widgets from the point of view of site owners and visitors:
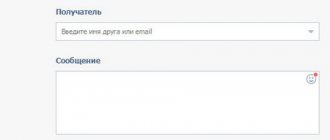
Community Messages widget settings in VK
Community Messages widget settings
link to the page
Select your group from the list on behalf of which you will respond.
If everything is empty, check which account you are currently logged into in contact. If you have several of them, then your other account may be the group administrator.
Location
This refers to the location of the widget on the site.
There are options:
- In the lower right corner
- In the lower left corner
It all depends on what kind of website template you have. Consider the location of other blocks so that the widget does not overlap them.
Expand via
There are options:
- do not disclose;
- straightaway;
- after 5 seconds (minimum value);
- …
- after 120 seconds (maximum value).
Here you need to keep in mind whether the appearance of the widget will annoy your audience.
On the one hand, if you do not disclose it, then it certainly will not cause negativity, but it will be noticed less. If you open it right away, it can block the information the user needs, distract him and irritate him, but then the likelihood that he will notice the widget and ask a question if one appears increases.
This is what the widget looks like when closed:
Widget closed
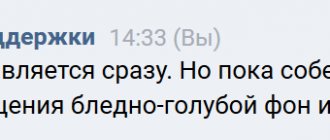
And here it is in the open:
Widget in open form
Open with sound
It is better not to check this box, especially if your widget opens on its own, because it will make a squeaking sound. If the user has the sound turned up to full volume, he may be very surprised. In general, this function causes negativity.
New message sound
If you check this box, the widget will make a sound when it receives a message from you.
You can check this box if you are not the first to write a welcome message and this setting should not cause negativity, because the user himself contacted you and most likely your answer is important to him and he is waiting for it.
If you are the first to write, then it’s better not to include it.
Tooltip text
This is the text next to the closed widget. It tells the user what this circle is for. The standard text offered by the widget is: “Have a question?”
Use standard text, or write your own.
Embed code
After you fill out all the fields and copy the widget code to the site.
Depending on what cms your site uses, the options may be different.
How message widgets work
Such programs are easy to use and significantly improve the service functions of the site. At its core, a message widget for a website is a more modern version of the well-known life chats. The difference is in broader functionality, and in the case of a social network, also in the ability to obtain certain information about the user or respond to his request after some time.
Thanks to such programs, the user does not have to waste time on registration, does not leave his data, and generally does not do anything that scares away cautious or lazy clients. Different message widgets have their own set of functions. For example, the Callibri widget allows you to communicate with members of all social networks and popular instant messengers, including Telegram, and also shows users the location of the company’s office and allows you to collect personal data from clients in full compliance with the law. Social media widgets are usually free, but most others are paid.
Widget "Publish links".
Go to your VKontakte , find the link “For Developers” at the bottom left and click on it. Next, click “Show all”. Select the “Publish Links” widget.
Choose a button shape and copy the code. The code consists of two parts and is installed as in the “Comments” Widget section. One part is in header.php, the second is in the body of the page under the text.
"Read" widget.
Insert the address of your Twitter . Copy the code. and paste it into the body of the page (in which you want to see the widget).
The widget will look like this.
You can uncheck the “Show username” checkbox.
The button will look prettier.