Image size for VK | picture format
For beautiful and correct design of posts and entries, your page and group in VK, it is important to know the format of the pictures: their resolution and size. Improper design of pictures can significantly reduce the attractiveness of a page or article. For example, an image that is too small will be overstretched and highly grainy, or will not be displayed at all, while an image that is too large may not be cropped correctly or scaled disproportionately. In this article we will look at the image sizes for VKontakte, which are used for each element of graphic design.
How to add a photo to VK from a computer
2 ways: through uploading to the wall, through the VKontakte Photos menu.
1) Add to VKontakte wall
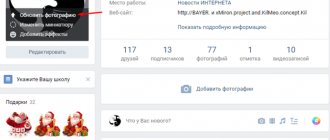
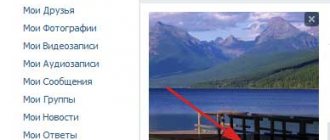
Click the camera icon on your page.
In the new window, click Upload photo or Take photo if you want to take a photo with a web camera.
Instead of uploading, you can drag the photo onto the wall, it will upload automatically.
Ready for publication, all you have to do is click the Send button:
When you press the lock, the recording will be visible only to friends.
After publication, you can no longer open it to everyone; you will have to publish the post again without a lock. An interesting observation : images with an active lock are not saved in albums, they are displayed only on the wall.
Before publishing, you can write a comment in the What's new line. Attach the file by clicking More. If you need to add more than two VKontakte photos, select them on your computer while holding left ctrl. Or immediately move it to the loading field of a social network.
Images uploaded to the wall go into the Photos album on my wall. The name and settings cannot be changed, but you can transfer images to new albums with the specified settings. When you remove photos from the wall, they remain in the album.
2) Upload through the Photos section
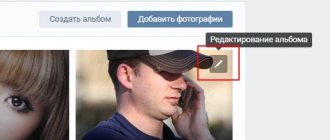
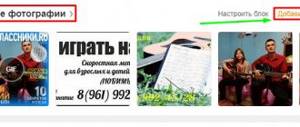
The method allows you to immediately upload to a specified album or create it on the fly, without publishing pictures on the page. Go to Photos, click Add, select from your computer through Windows Explorer.
Or drag and drop pictures into the browser:
If you don't select an album, it will load into Photos on my wall. After which you can move it to another album, write a comment, post it on the wall.
If you need to upload to a specific photo album, go there first, then upload the image .
How it works How to properly upload photos to social networks
Text
Rodion Danilov
Selecting photos for social networks is an important matter, although many people underestimate it. They are the ones who represent you online, and it is by looking at them that most people make their very first impression of you. We looked at how you can optimize photos on Facebook, Twitter and VKontakte.
1Facebook
When you upload profile photos to Facebook, they are cropped to a square, so it's best to use an image that already has the correct aspect ratio. The photo is displayed on the page with dimensions of 160x160 pixels, but you must upload an image of at least 180x180 pixels. Therefore, open the photo in the editor available to you and set the dimensions to 180x180 pixels.
The dimensions of the photo on the cover of a Facebook page are 851x315 pixels, while the minimum required size for it is 399x150 pixels. It is worth considering that such a small picture will stretch and look terrible, so choose an appropriate photo and crop it correctly.
If you are planning to make both images - the profile photo and the cover - represent a single whole, keep in mind that the profile photo is 23 pixels to the right of the left edge of the cover and 210 pixels below the top edge of the cover.
There are many web services that allow you to make original covers for your Facebook page.
Pic Scatter allows you to create a collage of photos to use as a cover. You can generate it randomly or select a specific album.
Profile Picture Maker's Timeline Cover Banner is a pretty handy tool for creating a custom cover with lots of editing features.
ace It Pages - a free service that allows you to upload your own pictures, “play with fonts” and even add links to other social networks to the cover.
Facebook supports uploading JPG, GIF and PNG formats. JPEG is typically used when uploading images with mixed tones (photos and drawings), while PNG is better suited for graphics, text compositions and logos. However, Facebook converts all uploaded images to JPG.
To make photos load faster on the page, the developers of the social network recommend using JPG files in the sRGB color space. The recommended dimensions for photos uploaded to the album are 600x400 pixels. When resizing in a photo editor, set the resolution (DPI) to 72.
2Twitter
Twitter displays profile photos very small, so it's important to choose an image that looks good in a thumbnail size. Twitter crops your photo into a square, so it's best to scale it properly before uploading. While the maximum file size for an avatar on Twitter is 2 MB, the profile will display an image measuring 73x73 pixels, and even smaller in tweets - 48x48 pixels.
If users follow the link to your profile and then click on your avatar, it will appear larger, so don't skimp on image size.
The image used as a cover image on Twitter has a recommended scale of 1200x600 pixels, and the file size is limited to 5 megabytes. Keep in mind that your Twitter name, handle, bio, location, and URL will appear on top of your cover photo, so choose an image that will clearly show the text.
To create the perfect cover photo to match your profile photo, you can use a special web tool like this one.
3"VKontakte"
The VKontakte profile picture should have a maximum size of 200 pixels in width by 500 in height (previously it was possible to upload an image up to 700 pixels in height) and a minimum of 200x200 pixels. When choosing a suitable photo, make sure that it looks good in the thumbnail that will be displayed next to the entries left on your behalf.
When uploading pictures to albums, you do not need to upload images of the original size and trust the algorithm to reduce them. It is best to save a photo with a maximum of 1000 pixels in width (for horizontal ones) or 700 pixels in height (for vertical ones). At the same time, they will be displayed quite large on monitors 1280x1024 and higher with optimal sharpness, which can also be adjusted. True, on 1024x768 monitors such pictures will be smaller and lose clarity.
“We upload photos not with 100% quality, but with compression. Whatever coefficient we use, artifacts can always be found in photographs,” writes VKontakte technical support. For optimal clarity, social network experts recommend increasing sharpness after resizing the image, and not before.
To upload large pictures that would be displayed in the entire window on any monitor, before uploading it is worth slightly increasing their sharpness in the photo editor, which partly compensates for blurring when scaling the image. The largest uploaded photo can be 2560x2048 pixels.
When saving in JPG format, the current color rendering profile is added. And when scaling the image, this profile is replaced with standard sRGB, without any conversion. Therefore, before uploading to a social network, it is better to save the image in sRGB. To do this, open the image in Photoshop, select “Save for WEB” (Alt+Shift+Ctrl+S), in the quality settings window that appears, be sure to
Add from phone (android, iphone, tablet)
Two ways: from the main account page, through the Photos menu.
1) On the home page, click Photos.
Select a file on your phone, click Attach at the bottom of the screen, and in the pop-up window select where: Publish on wall, Add to album.
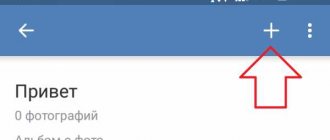
2) Go to Photos, Albums tab. Go to the album where you are uploading, click the plus sign at the top:
Select Upload from phone gallery or Camera snapshot.
How to post a photo from your phone
Modern smartphones have good cameras. People take high-quality photos with them and want to immediately show the result to all their friends on VK. This can be done as simply as in the web version of VK for a mobile phone and in official applications for Android, iPhone (and other iOS devices). You need to perform the following operations:
- While in the section selection menu, click on Photos and go to the album where you want to add new materials.
- Click on the button in the form of a plus sign.
- You'll be prompted to post a photo from your device's gallery or take a snapshot with the built-in camera. Select the appropriate option (upload a photo from your phone’s memory or take a photo right on the spot) and the new photo will appear in this album.
Similarly, you can add photos to the wall, posts and personal messages. There you will find a button in the form of a pin Attach, when you click on it you should select the Photo option.
On mobile devices on which VK applications are installed, the function of sending photos to a social network is available directly in the gallery and in the menu for a new camera shot.
Add a photo to VKontakte retroactively
When adding materials, VKontakte displays the date and time of loading.
It cannot be changed, neither by the past number nor by any other method. Don't be discouraged - use social engineering. The first thing that comes to mind is to upload a VKontakte photo to a closed album, wait the necessary time, and open access. Friends will see the new album and photos from the past date. If this method is not suitable, apply the required date in Photoshop before uploading, as if you had placed the camera when taking the photo. Make the number immediately catch your eye and grab your attention (orange shades, white font color). Or set the required date in the camera and take a photo. Experiment.
What is needed? What kind of photo should it be?
You need to take a fairly high-quality photo that shows your face next to the screen and the application on the screen that you are filling out, or your face and a piece of paper with a code in your hand (depending on what exactly VK asks for). The support service will compare your face with the face in the photos on the page you want to restore (if there are at least one photo on the page!), and make sure that it is the real owner of the page, and not an attacker, who is asking for restoration. And an application on the background or a code on paper is needed so that an attacker cannot take any photo of you and send it on your behalf. Now you understand that such requirements are necessary for the security of your own page.
How to transfer photos from album to album
You cannot transfer images from albums:
- Photos on my wall
- Photos from my page
- Photos with me
There are no restrictions for others. Open a photo, click More. Select Transfer to album, specify which one.
VK transfers one image at a time, but what if there are 10, 20, 300 of them? Special VKontakte applications come to the rescue, one of them is Photo Transfer vk.com/app3231070.
A nice bonus: the application works with pictures from Photos on my wall, upload and transfer any drawings there. If you search, you will find photo applications for transferring to contacts from Instagram.
“Contact ruins photos!” or How to compress photos into contacts without losing quality.
“Contact ruins photos!” or How to compress photos into contacts without losing quality.
How many times have I heard this phrase from photographers and not only - “Contact ruins photos! Look at the print, not the screen!” There is, of course, meaning in this statement, but it’s also not worth saying so categorically.
So, the task: How to compress photos to contact without losing quality?
There are 2 main mistakes that people make:
1) Upload photos that are too large and let the contact algorithm reduce them. 2) Use a color space other than sRGB
Let’s analyze the algorithm for compressing photos in Photoshop “to contact”, in which we will take into account both of these factors.
————————————————————
The optimal size at the moment, which is comfortable for a person to look at, and which does not suffer so much from pinching, is 1000 points on the long side. Clamping is carried out in 2 stages.
Select Image, Image Size
We set one and a half sizes from the one we want to get, and select the Bicubic reduction algorithm, sharper. This will sharpen the picture, but it will be excessive.
We get rid of “oversharpening” in the second step - we set the final size, in this case it is 1000 points, and select the Bicubic reduction algorithm, for smooth gradients.
The next step is to save the photo to disk.
Select File-Save for Web and Devices or press the key combination Ctrl+Alt+Shift+S
We select the JPEG file format, quality within 75-85. Be sure to check the Convert to sRGB checkbox.
This must be done so that if you work, for example, in the Adobe RGB color space, and ordinary people have not even heard such a word, then in this case they will see exactly the same picture on their screen as you do.
All. Upload to contact. Leave the “Enhance photo clarity” checkbox.
What to do if photos do not load
Reasons for unsuccessful downloading: outdated browser, viruses, too large or small resolution, inappropriate format, album overcrowding.
- The minimum uploaded image size is 200x200.
- The maximum size is the sum of the length and width of no more than 14 thousand pixels (for example, 7000x7000).
- Max quantity in one album is 10 thousand.
- Formats: jpg, png, gif.
The limit on the number of images also applies to the album with saved images. Once you reach the limit, move the part to another album.
Add a photo to VKontakte without losing quality
Have you noticed that colorful images change quality after being uploaded to VK? The culprit is compression during loading. You cannot eliminate the feature, but you can minimize the loss of color and work around the problem. To do this, the resolution of the uploaded photo should not exceed more than 1000 pixels (each side). Also try increasing the sharpness before loading. VK recommends not to click Add new photos, but to drag the photo directly from the computer folder.
Additional recommendation for advanced users: the VK downloader does not like the Adobe RGB color profile. We recommend converting for the Web before uploading. In Photoshop, select Save for WEB (Alt+Shift+Ctrl+S), then edit the quality settings. Check the Convert to sRGB checkbox.
If you want to transfer images to a friend without publishing them online, upload them in the Documents section at https://vk.com/docs and send them as a document via personal message.
How to reduce a photo without losing quality for VKontakte?
VKontakte fits the uploaded photo in size 2560x2048. If the photo is smaller, then he does not touch it; if it is larger, he reduces it himself. Accordingly, reduce the photo in any editor so that it is smaller than this size. For example, fit it into a 1920x1920 square. Use the bicubic algorithm or sinc. To further protect yourself from overcompressing your photo, set the JPEG quality to 92-95% (10 in PhotoShop).
Any photo editor will do, in which you need to reduce the image size to the desired value, and when saving, select max. quality
Reduce photo sizes. Let's say not 5 megapixels but 0.3 .. And the resolution is 600 by 800. But this is not a guarantee that in order to save space, contacts will compress the photos... If they weigh more than a megabyte
Try it in Photoshop. Everything is very simple there: Edit / image size / set the desired size and click file / save as / select the image format / ok, in the drop-down window select the best quality and the whole photo is ready without loss of quality.
They themselves said: VKontakte spoils the quality of the pictures. No matter how you reduce it, it will still ruin it.
touch.otvet.mail.ru
Editing photos in VK
Divided into two types:
- Photo editor : color changes, rotation, cropping.
- Effects, adding elements: text, comic patterns.
To open the photo editor or effects, open the photo, click More.
The result will be like this:
There are no photo editors in the mobile version and the VK mobile application, or they are limited. Use the phone's built-in editors.
Why doesn't VKontakte accept photos?
VKontakte checks the quality of your photo and does not approve your application if the photo is not of sufficient quality. Or the application is simply not sent if the photo is bad. The problem can be solved. You just need to understand that taking a good photo is your personal concern. You must solve your problem yourself. You will have to take the photo again and send it again. If your application for reinstatement is rejected, you will have to submit it again.
Advice: do not argue with the support team about the quality of your photo. It is not for you to decide which quality is sufficient and which is not. You yourself find yourself in such a situation that you have to send a photo to restore access to the page, so follow the requirements.
Now specific solutions for different situations:
The photo in the background of the application is too dark
Photo too dark
VK writes: “The photo against the background of the application is too dark, try taking the photo in a well-lit room, use a flash or reduce the brightness of the screen.” How to fix?
- Make the light in the room brighter, turn on another light source, shine the light on your face (table lamp, floor lamp, etc.) and take the photo again.
- If you take pictures in the evening, try to do it better in the morning or during the day when the room is light.
- Try making the screen darker (turn down the brightness).
- You cannot take pictures in front of a window or in front of a lamp. Light sources should be behind the camera or to the side, but not in the frame.
- If your phone automatically adjusts the brightness so that the screen is very light but your face is very dark, try adjusting the brightness. You can tap on a dark place on the screen - for example, a face, a wall, a shadow - to adjust the brightness balance.
- Try turning on the flash on your phone (camera). But if it is reflected on the screen, it will be worse.
- If you have a tablet, try opening an application on it and going outside with it during the day to take a photo.
The main secret: make the room as bright as possible. Take photos during the day. Add even more light. Turn on the chandelier. Bring lamps and point them at yourself. But there should be no light sources in the frame (except for the screen with the application).
Image quality is too low
VK writes: “You are trying to upload an image of too low quality. Please attach a higher resolution photo." What to do? There is a requirement: the photo must be at least 1300 pixels (dots) horizontally. It is not at all necessary to look for another phone with a better camera or camera. Most modern phones can take such a photo without problems. When shooting, we recommend using a horizontal photo format (landscape orientation), where the long side is horizontal.
It may be a matter of camera settings if for some reason it takes low-resolution photos. You have the latest iPhone, the photos are excellent, why aren’t they happy with VK, stupid? Or maybe you once selected low quality in the camera settings, like on the cheapest phone. If you look at photos only on a small screen, then there is no difference for you. Set your camera to the highest quality setting or ask someone to sort it out. In addition, even an expensive phone sometimes finds it difficult to take a good photo that shows both your face and the glowing screen. If all else fails, ask a friend who understands technology to take a photo of you.
How to find out the size of a photo on a computer?
- Open the folder where the photo is stored.
- Click on the photo with the left mouse button once (select this photo).
- The size will be shown at the bottom of the window. For example, 960x720 is not enough, but 1300x1000 is already enough.
Advice: if all else fails, invite one of your friends over to help you take a photo. It's actually not difficult. A good photo can be taken with almost any phone in sufficient lighting.
Photo is blurry (out of focus)
If the photo is not sharp enough (the face or screen with the application is unclear, out of focus or blurred), then it will not be accepted. On your phone, you can focus the image by pressing your finger on the screen where you want to focus - on the face or on the screen. The distance from the head to the screen should be small. On the camera, focus is achieved when you press the shutter button not all the way (halfway). And if the focusing is not automatic, but manual, then you need to turn the ring on the lens.
And if the photo is blurry and you can’t take a clear one, it means the room is too dark. Make sure the lighting is good.
Photo is grainy, low quality
Most often, the photo turns out grainy when there is not enough light. To fix this, use the same tips that we have already given: make the light in the room brighter, bring another lamp, shine the light on your face. If you are taking photos in the dark, wait until the morning or afternoon, when the room will be lighter.
The photo is mirrored upside down
If you take a photo with the front camera of your phone (selfie camera), the image may turn out to be mirrored horizontally. Either disable this feature or use the phone's main camera.
The photo does not load or is not sent, an error appears
This means that you have problems with your browser (the program through which you access the VKontakte website) or computer, Internet connection, and the like. Try clearing temporary files (cache and cookies) or installing another browser and sending an application with a photo through it. If nothing works, the photo file is not added, find another computer (laptop) or invite a computer technician.
If you're trying to upload a photo for your application from your phone, don't try. Many people have problems with this. For example, you click on the “Select file” button and nothing happens. There is only one solution to the problem: find a computer or laptop and create an application from it, through the full version of the VKontakte website.
There are no photos of me on the page I want to restore
Then there is no point in sending your photo in the background of the application - your application will be rejected. Why? Explanation here: The application to restore the VKontakte page was rejected. What to do? The only exception is if the photos on the page were deleted by the person who hacked it (read there).
Think: maybe the first recovery method is more realistic for you?