In one of my previous publications, I mentioned one of the software ways to connect RSS on VKontakte to automatically publish news from an RSS site. The method discussed there uses the VKontakte API, which is being improved all the time, may not work due to certain reasons, etc. Thus, the method indicated and described there is not universal, cumbersome and not understandable to everyone.
After the publication was published, I received a lot of feedback and questions. In particular, I mentioned in the article that there is a simple and legal method to connect RSS to a VKontakte group (write a request to VKontakte technical support), but many of the readers did not fully understand all the nuances. Actually, I would like to talk about these nuances in more detail in this article, so as not to answer everyone who is interested separately.
Ability to import RSS into VKontakte groups
Many social networks support importing data from RSS into groups. This is a very convenient moment for small and medium-sized companies (or just websites) that want to notify their users in social groups (if they have been created) about news on the main site. This process can be automated using RSS: the site administration added new material to the site, its announcement is immediately published in groups on social networks and interested visitors follow these links. Unfortunately, VKontakte (we are talking about a popular Russian-language social network) does not provide (at least officially) such an opportunity for group administrators.
Meanwhile, many manage to automate this process in various ways. This takes time and money, the method works either temporarily or intermittently... in a word, there is no universal solution to connect RSS. Or does it exist? There is an undescribed method that works smoothly but has limitations on connectivity. How to use it?
What is RSS and why is it needed?
RSS is a family of XML formats designed to describe news feeds, article announcements, blog changes, and the like. Using RSS formats, you can collect, process and present information to the user in a form convenient for him. For this purpose, special aggregator programs are used, and it is also possible to import them into services for subsequent display - for example, Yandex Turbo pages.
The most commonly used RSS versions (formats) are:
- RSS 0.9x - with its help structurally simple information is published.
- RSS 2.x - used for publishing general purpose data.
- RSS 0.9 and 1.0 are formats based on RDF and XML standards.
In the recent past, RSS feeds were used exclusively to collect updates on websites - news, articles, and so on. They were collected using various aggregators a la Google Reader, Feedly, Yandex.Lenta, My Yahoo. Many of these services are no longer active. For many, this confirms that the days of RSS feeds as a constant source of content are over. Now this function is firmly entrenched in social networks, where you can at least leave comments on posts (and express support with likes) and do not require any additional configuration from the owners of news sources.
However, RSS is still a significant tool for the modern web, including social networks. For example, if a site has a group or public page on VKontakte, you can connect an RSS feed from the site to publish posts in the group. Another example would be publishing news on one site from the RSS feed of another. A typical case is creating news collections on educational or regional sites and displaying them in the right place on the page.
And, perhaps, the most relevant: RSS is used in search engine promotion of a website when working with Yandex services - Zen, Turbo pages.
Turbo technology has many advantages: you can organize a full-fledged online store with correct price display, shopping cart, chat, call button and other useful interactive elements. The Turbo Pages function is activated in the Yandex.Webmaster service: to do this, you need to enable content transmission via the RSS 2.0 channel.
As for Zen: when adding articles from a site to Yandex.Zen, you can avoid transferring unnecessary content and control the appearance of the article card, as well as increase the number of interested visitors by more accurately specifying the topic. It is RSS that today serves to receive dynamically updated information from a website in a convenient format.
Example of RSS markup for Turbo pages
Submit an application to connect RSS to the VKontakte group
You can connect RSS to the VKontakte group for auto-posting by submitting a request to technical support, to do this you need to go to: https://vk.com/support?act=new, write in the field something like “ connect RSS ” and click button “ None of these options are suitable .” In practice it looks something like this:
Then you will be asked to apologize that due to the large number of requests, you will have to wait several hours for an answer.
We agree and click the “ Ask a question ” button. In the input field that opens, write: “ Hello. I'm Vasya Pupkin. Is it possible to connect an RSS feed for group id123456 from our corporate website - https://sayt.ru? "And we send our question for consideration!
How to use RSS
It all depends on who you are - the site owner or the reader. In the first case, you will need to create a feed, and in the second, subscribe to it.
Connecting RSS to the site
Ways to connect RSS markup to your site are to manually generate a script, use an online RSS generator, or connect a special module in the CMS.
I advise you to use the Google FeedBurner service. It runs all RSS feeds through itself, corrects minor errors in them and adds various details such as a “buy” button. It also allows you to get statistics on your feed, both on a paid and free basis.
You just need to log in and log in with your Google account, enter the resource address in the appropriate field and click on the Next button.
Next, a page will open with a list of all available RSS feeds. Add the required one and copy the link (by the way, you can then paste it into some news aggregator). Then we activate all the service options and click on the Next button.
Other good RSS feed generators are Feed43, Feedity and Feedfry. In them, too, you only need to provide a link to your resource and give permission to create a feed.
Subscribe to RSS
The first way to subscribe to RSS is to click on the special icon or link to subscribe on the site page. Previously, it appeared in the browser next to the address bar.
Another way is to subscribe to an RSS mailing list. Some resources provide this option, but this option requires confirmation of subscription.
The third way is to use special aggregators. An excellent option is Inoreader with its information caching function. Due to this, you can watch saved news without an Internet connection. Another option is Microsoft's free Newsflow app, which has an unlimited number of sources you can subscribe to.
Requirements for connecting to RSS VKontakte
The method in question is undocumented, not described anywhere: how and who can connect an RSS feed to their group for auto-posting, meanwhile, relying on personal experience, I can point out some criteria that VKontakte technical support necessarily takes into account when considering Your application for connecting the RSS feed.
- Only the Creator of the group (not the administrator or editor, who are subsequently appointed by the Creator) can apply to connect an RSS feed to a group
- Submit an application to connect an RSS feed, provided that your group has more than 100 participants;
- Do not apply to connect an RSS feed for new groups that have no history and no active members (no likes or comments);
- It’s not necessary, but it’s very welcome if the site (from which you plan to take the RSS feed) has social networking buttons (such as “Share”) or a VKontakte group widget (can be done here: https://vk.com/dev/sites) . As VKontakte technical support itself explains, “with their help, site visitors will be able to find a VKontakte group, widgets more closely connect the site and the group, and add variety.”
Setting up Yoast SEO
Now let's go in detail and in order. And first we have General Settings
General settings
Console
Various messages will appear on the Console tab indicating problems that may occur. If everything is configured correctly, then usually there are no problems.
You can also find the settings wizard here.
Yoast SEO Settings. General - Settings Wizard
The Settings Wizard allows you to configure Yoast in visual mode. That is, everything that is written in this article, only more beautiful.
Possibilities
This is where the settings begin. Not everything on this tab needs to be included.
Yoast SEO Settings. General - Features Tab
I list and explain all the switches in order, from top to bottom.
Setting up Yoast. SEO Analysis and Readability Analysis
SEO analysis and Readability Analysis are usually turned on, but if you turn them off, these important tabs in the Yoast metabox will be cut off when editing an article.
And the whole point of using the Yoast SEO plugin will be lost.
The key content is the special functionality of Yoast. If the site has several articles on the same topic, it allows you to indicate the most important article. You can turn it off if you don't intend to use it.
Text link counter is a special functionality of the Yoast plugin. Allows you to analyze internal links and correctly configure internal linking. If you're not going to use it, turn it off
XML Sitemap - As of version 9, the Yoast plugin does not have a separate XML sitemap settings page. Now you can only turn off or turn on map creation. The presence of entities in the XML map is managed from the Display in search results section
Setting up Ryte - includes the ability to integrate into a special, imported service for monitoring the indexing of your website. It costs some crazy money and does not work with our search engines. You can and should turn it off. And you can also monitor it through Metrica.
Menu in the admin panel - duplication of various information in the top bar.
I usually turn off this functionality, but if it’s convenient for you, you can leave it on.
If there are a lot of authors on the site, then this switch can be turned on so as not to give them unnecessary freedom. Otherwise, you can and should turn it off.
Webmaster Tools
Setting up Yoast. Webmaster Tools
This tab is intended for conveniently adding a site to the webmaster accounts of various search engines. Receive the data and add it to the required fields. The video above explains this in detail.
Display in search results
Variables
To customize header templates, use the variables hidden under the Need help?
Setting up Yoast. Variables
Variables are a special designation for the desired data. Yoast will substitute the required data if the required variable is specified in the appropriate fields.
Full list of variables from the Yoast plugin
Note! Some variables only work on certain pages. %%date%% — Date of the post/page %%title%% — Title of the post/page %%parent_title%% — Title of the parent page %%sitename%% — Site name %%sitedesc%% — Slogan or description of the site %%excerpt %% — Post/page quote (if absent, generated automatically) %%excerpt_only%% — Post/page quote (without automatic generation) %%tag%% — Current tag/tags %%category%% — Post categories (separated by commas) %%primary_category%% — Main category of the post/page %%category_description%% — Description of the category %%tag_description%% — Description of the tag %%term_description%% — Description of the term %%term_title%% — Title of the term %%searchphrase%% — Current search phrase %%sep%% - The separator is defined in your theme's wp_title() tag. %%pt_single%% — Replaced single label message type %%pt_plural%% — Plural record type %%modified%% — Record/page change time %%id%% — Record/page ID %%cf_%% — Value custom field from a record %%ct_%% — Value of custom taxonomies from a record (separated by commas) %%ct_desc_%% — Description of a custom taxonomy
Not all variables are shown, only the most popular ones. Everything else can be viewed on the developers' website.
Are common
In the new version of Yoast, almost all additional functionality is placed on this tab:
- Setting separators
- Setting up the home page
- Setting up micro markup
Separators
The first thing you can do in this tab is to specify the word separator in the snippet. Sometimes this is a very necessary thing.
A separator is an html icon that can appear in a snippet and looks like this
Setting up Yoast. Separator in snippet
The separator is also visible in the browser tab
Setting up Yoast. Browser separator
In the initial position there are not many types of separator, but if necessary, you can add your own.
Setting up Yoast. Custom delimiters
To add your icons, add this code to your functions.php file
/** * Adding new Yoast SEO separators * * @sourcecode https://wpruse.ru/plaginy/yoast-seo-settings/ * @author Artem Abramovich * @testedwith YoastSEO 11.6 * * @param array $separators * @return array */ function add_new_separator( $separators ) { $separators_new = ; $separators = array_merge( $separators, $separators_new ); return $separators; } add_filter( 'wpseo_separator_options', 'add_new_separator' );
HTML symbols can be found on any relevant website. For example . And a snippet with such a funny separator will look like this
Setting up Yoast. Additional separators in the snippet
Home page
There are two options for customizing headers for your home page.
Setting up Yoast. Setting the headers of the main static page
If you have a static home page and blog page installed, then the titles and descriptions are configured on the Yoast metabox pages themselves.
Setting up Yoast. Setting the headers of the main static page
The standard main page with a feed of posts is configured through this tab.
Setting up Yoast. Customizing the headers of the standard home page
Micro markup
This information is necessary for the correct formation of the basic micro-markup of the site. For me it looks like this
Setting up Yoast. Setting up micro markup for an individual
For a commercial site you need to do this
Setting up Yoast. Setting up markup for an organization
It is advisable to take the logo size at least 512×512 and in a square format.
Remember! Depending on what is specified on this tab (organization or individual), different values of the Accounts tab in the Social Networks section will be displayed.
Content Types
Setting up header templates is usually done individually for each site. But there is some general option
Posts
For regular records, only the title is usually left
Setting up Yoast. Setting Post Headers
Pages
For standard pages I already use a separator, I like it better. But you can leave only the title.
Setting up Yoast. Setting Page Titles
Goods
Products are a custom post type and header customization, most often done individually. The standard version looks something like this
Setting up Yoast. Setting product titles to content
Media
Or attachments (attachments), that is, all those files that are downloaded through the Multimedia Library. WordPress creates a separate page for each attachment. When indexed, these pages create duplicates in the search.
In new versions of Yoast, this setting is placed in a separate Media tab and is a single switch.
Setting up Yoast. Setting media titles to content
Taxonomies
This tab allows you to configure header templates for categories, tags, and other taxonomies.
For taxonomies everything is the same:
- we remove the word “Archive” in the headings, you can remove the separator and the name of the site (although I usually don’t remove it);
- disable indexing of unnecessary taxonomies, such as tags (individually for each site).
Categories
Setting up Yoast. Setting up headings and descriptions of categories
Tags
Depending on the structure of the site, it makes sense to disable tag indexing. Tags are disabled on this site.
Setting up Yoast. Setting tag titles and descriptions
Recording formats
Formats are like a “horse in a vacuum”. They exist, but no one uses them. Depending on the topic, they may not exist at all. If there are, then it’s easier to just turn them off.
Setting up Yoast. Setting Taxonomy Headings (Post Formats)
Product tags
Individually for each store and catalogue. If necessary, disable indexing.
Setting up Yoast. Setting titles and descriptions for product tags
Product categories
The same as for product tags.
Setting up Yoast. Setting up product category titles and descriptions
Product delivery classes
This taxonomy must be closed from indexing. This is an internal functionality of WooCommerce.
Setting up Yoast. Configuring shipping class titles and descriptions
Category URLs
With this switch you can remove the label (prefix) /category/ from the CNC standard categories. Below it is more clear in the screenshots what happens to the CNC when this option is switched.
Option disabled
There are category prefixes
Option enabled
There are no category prefixes
Archives
We disable archives of dates and authors to avoid creating duplicates. Although, if there are many real authors on the site, then the author archives do not have to be disabled, but then the authors’ data must be filled out.
We leave special pages as is, as a rule, this is enough.
Setting up Yoast. Setting up archive titles and descriptions for content
Bread crumbs
Breadcrumbs are an important navigation element, especially on commercial sites. It looks like a chain of links.
Yoast provides its own version of crumbs, very convenient and immediately with micro markup.
Setting up Yoast. Setting up bread crumbs
You can't just turn it on. You also need to display the function in the right place on the site
To display crumbs on all pages at once, the function can be added to the very bottom of the header.php file.
The crumb settings accept both HTML symbols and icons (see screenshot above).
If you are using a static home page and have a separate post page enabled, a Show blog page switch will appear. Each site is different, but on this site this switch is turned off.
Video on the topic
Problems with Yoast breadcrumbs
Usually no problems arise, but many, on the advice of SEO specialists, turn off the last bit on the posts so that there is no duplication of the post title. To do this, we push into functions.php
/** * Removing the last crumb for posts * * @sourcecode https://wpruse.ru/plaginy/yoast-seo-settings/ * @author Artem Abramovich * @testedwith YoastSEO 11.6 * * @param string $link_output * * @return string */ function remove_wpseo_breadcrumb_last( $link_output ) { if ( false !== strpos( $link_output, 'breadcrumb_last' ) ) { $link_output = "; } return $link_output; } add_filter( 'wpseo_breadcrumb_single_link', 'remove_wpseo_breadcrumb_last' );
Few people know, but Yoast has a cool functionality for replacing the last bit for each post.
Cool Yoast functionality to replace the last bit for each post
Thus, you can not delete the last crumb, but rewrite it as necessary and even add a relevant query there.
RSS
You don't need to change anything in this section. Although if you need to fine-tune the RSS feed, you can tinker.
Setting up Yoast. Setting up RSS feed
Search Console
Setting up Yoast. Search Console
This functionality made it possible to track indexing errors in Google via the API. But since Google stopped supporting this API, this settings section is no longer relevant. There is functionality, but it doesn't work.
Social media
A section designed to configure the correct display of the site on social networks and more.
Accounts
Here we indicate links to your profiles on social networks. These links are needed for micro markup, which is created in General Settings. Links to profiles from here will be added to the micro markup.
But this tab only works if Organization is enabled in General Settings. Otherwise it will just be a message
Setting up Yoast. Accounts for social networks
For organization, you can and should add links to profiles on social networks. And perhaps these links will be displayed by Google in search results.
Setting up Yoast. Links from this section will be added to the micro markup of the entire site. to contents
We enable Open Graph markup and specify the default image (it is better to take the image size at least 1200x630).
Setting up Yoast. Setting up Facebook
If everything is configured correctly, then when you click the share button or simply add a link to an article from Facebook and Vkontakte, an extended description of the article will appear.
Setting up Yoast. Facebook snippet when sharing an article to content
Here we indicate the possibility of sharing with large pictures
Setting up Yoast. Setting up Twitter
Pinterest somehow didn’t work on the Russian Internet, but it wouldn’t hurt to set it up.
Setting up Yoast. Setting up Pinterest
Possible problems
I met two of them
- The wrong picture is picked up. Solution: force the desired image via Yoast
- There is no picture at all. Solution: Check the image file name. It must be in Latin. Open Graph does not understand files in Cyrillic
We're done with social networks, let's move on...
XML sitemap
Newer versions of Yoast do not have a separate section for setting up an XML sitemap. It can only be turned on or off in the General section.
The presence/absence of content types in the map is regulated through the Display in search results section.
If indexing is enabled for a post type or taxonomy, then this entity will be in the map, otherwise not.
Problems with xml map
Yandex does not understand image tags
Yandex does not understand the image tags in this map and displays this as an error: Unknown tag image:image
Setting up Yoast. Unknown tag image:image
Images can be removed from the map.
Add to functions.php
/** * Removing images from the Yoast xml map * * @sourcecode https://wpruse.ru/plaginy/yoast-seo-settings/ * @author Artem Abramovich * @testedwith YoastSEO 11.6 */ add_filter( 'wpseo_xml_sitemap_img', ' __return_false' );
Now you should turn off the card and turn it on again. And don't forget to reset the cache if the caching plugin is running.
The map doesn't look right
Not like in the video and pictures. Most likely, the card is cached. Or the caching plugin is not working correctly.
- Clear cache
- disable the caching plugin,
- create the map again,
- now enable the caching plugin.
Should help...
After a few updates the error will go away.
Tools
This section contains convenient tools
Group editor
Allows you to bulk change titles and descriptions for articles without going into each article. Convenient thing
Import and export
Important tab. Required for moving from another plugin or quickly adding settings. This section is described at the very beginning of the article.
To move from another plugin, select the one you need in the list and click the Import button
Setting up Yoast. Moving from another plugin
File editor
Allows you to edit robots.txt and .htaccess files from the admin panel.
Attention! Incorrect editing of the .htaccess file can lead to dire consequences. You don't need to change anything in this file if you don't know what you're doing. And make backups.
For those who are curious, I give an example of my robots.txt file.
User-agent: * Disallow: /cgi-bin Disallow: /wp-admin Disallow: /trackback Disallow: */trackback Disallow: */*/trackback Disallow: */*/feed/*/ Disallow: */feed User- agent: Yandex Disallow: /cgi-bin Disallow: /wp-admin Disallow: /wp-includes Disallow: /wp-content/plugins Disallow: /wp-content/cache Disallow: /wp-content/themes Disallow: /trackback Disallow : */trackback Disallow: */*/trackback Disallow: */*/feed/*/ Disallow: */feed Disallow: /tag Host: https://wpruse.ru Sitemap: https://wpruse.ru/sitemap_index .xml to content
Connecting RSS feeds on VKontakte
After submitting the application, we wait for a response from the administration (usually within 24 hours). We will be answered: either “Yes” or “No” (usually with an explanation of the reasons for the refusal... “dead group”, “no activity”, “prohibited topic”, etc. If you were told that RSS was connected, then Let's proceed to its activation.
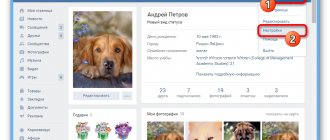
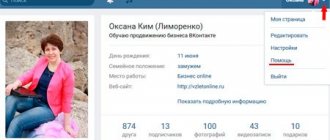
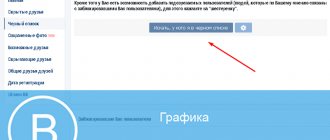
Import RSS will appear in your group’s settings - click “ Page Management ” (immediately below the logo), “ Information ” tab. In practice it looks like this:
In this field you need to enter the address of the RSS feed from which you plan to import announcements
Some notes after you have registered RSS and saved the settings:
- At the first launch, not all entries from the RSS feed may be imported;
- Subsequently, the last entry in the RSS feed will be automatically published on the group wall (usually within a few minutes after being added to the site);
- If there is a photo in the RSS feed announcement, it will also be uploaded to the announcement in the VKontakte group (so it’s worth taking care of the aesthetic appearance of the announcements)…
That's all for now! If you have any questions, I will be happy to answer them in the comments! Add and connect RSS on VKontakte - it’s always free traffic and a target audience!
RSS feed on the website: disadvantages
Using RSS for a website is also not without its disadvantages:
- Filters from search engines are possible. Information from RSS feeds is indexed faster than from primary sources. This is dangerous because search engines may perceive site data as non-unique and copied. To prevent this, you need to post annotations to articles in the feed and encourage users to go to the full-text source.
- Your materials easily and quickly become the prey of the owners of other resources even before they are indexed. Because of this, your site may lose ranking in search results. Largely because of this, most website owners began to abandon RSS feeds.
Next, we will talk about ways in which you can create and configure an RSS feed on your own website. However, you need to take into account that for each individual service - be it Yandex.Zen, Turbo pages or Yandex.News - you need its own, separate version of the channel, which differs from the standard one (for example, generated by CMS tools) in structure. For example, an RSS feed prepared for the Yandex.News service differs from a feed for Zen in a set of required attributes and other requirements for the size of illustrations.
Advantages and disadvantages of an RSS feed for a website
Pros of RSS for users
- quick information about new publications that interest the reader;
- content in its pure form, without additional widgets, advertising banners and other information unnecessary for the user;
- the ability to view new articles from all sites to which the reader is subscribed in one place;
- saving traffic and loading data faster than when visiting a website, which is important for mobile users.
Pros of RSS for website owners
- a loyal audience that will follow the publication of materials on the site;
- additional traffic when readers follow links in the RSS reader;
- RSS aggregators offer to share your favorite news with friends, this also helps to increase traffic and increase the popularity of the project.
Disadvantages of RSS for site owners
- RSS feeds are indexed faster than the site with the original publication. When the entire article is added to the feed, non-unique content can be subject to search engine filters;
- RSS feeds are written in XML, which is convenient for parsing. Unfortunately, this increases the chances that publications can be stolen. If a stolen article on a more trusted site is indexed earlier than on the original source site, your own project may also fall under filters for non-unique content. To avoid this situation, it is preferable to add incomplete article content to the feed, inviting the user to go to the site and continue reading;
- Often readers subscribe to too many RSS feeds and end up not having time to get acquainted with new publications.
What is an RSS feed?
An RSS feed is a file in XML or RSS format connected to a site. When new content is added to the site, this file is also updated. Then the information is transmitted to programs for reading RSS feeds or to email subscribers. Readers can familiarize themselves with the information received directly in RSS readers, or follow the link to the original article.
The abbreviation RSS stands for Really Simple Syndication, which means “simple access to information.” The XML file contains metadata that contains article titles, links to the full version, publication date, and description of the content. Information on each site material is grouped separately using XML tags.
It is possible to host any number of RSS feeds on one site, for example, separate feeds for each resource category:
To access feeds, readers will need an RSS aggregator - a program or mobile application for automatically collecting feed updates, for example, Newsflow:
After installing the program, users add the necessary RSS feeds and automatically receive articles published in them:
In the RSS reader, you can view the title of the article, its brief description and image, and also display a link to go to the site:
Automatic generation of built-in CMS tools and plugins
Ready-made solutions are the easiest and fastest option for getting a working RSS feed. As a rule, common CMSs already have built-in options for generating RSS feeds, and also have a set of add-ons (plugins, modules) designed to work with the corresponding services. Let's look at the available solutions for the 3 most popular CMSs according to CMS Magazine - WordPress, 1C-Bitrix, and Joomla.
WordPress
Built-in RSS feed
By default, CMS WordPress creates several RSS feeds for the site. Of these, 2 main ones are important (relative URLs are indicated) - the main page and the latest comments.
- Feed of recent posts /feed/.
- Feed of recent comments /comments/feed/.
You can configure what to show in the WordPress site feed in the admin panel on the “Writing” tab:
In the item “Display the latest... elements in RSS feeds” you need to specify the number, and in the item “Display for each article in the RSS feed” select what exactly you want to display - an announcement or the full content.
Plugins
- Yandex.Zen. It will automatically create a new RSS feed on your website for the Yandex.Zen service in full compliance with the technical requirements of Yandex.
- Yandex.Turbo. It works similarly to the previous one: creates a new RSS feed (or several feeds) for the Yandex.Turbo service according to Yandex requirements.
- FeedWordPress. This is a plugin for autofilling a blog with content from specified RSS feeds. In this case, articles or links to them are published both automatically and manually.
1C-Bitrix
Built-in RSS feed
According to the Bitrix documentation, there are 3 ways to export the contents of an information block in RSS format. This is convenient because in typical cases you don’t even need to write any additional code - just enable RSS export in the settings, and that’s it, you can use it. Let's consider one of the methods.
Before accessing information blocks from the outside, we allow the use of RSS in the information block settings (“Content” > “Info blocks” > “Info block types”):
Select the type of information blocks for which you need to configure RSS:
In the form for editing parameters, go to the “Advanced” tab:
Check the box for the “Use export to RSS” option and save the settings. Now we can access the RSS information block.
We make the request this way:
https://sitename.com/bitrix/rss.php?ID=1&LANG=ru&TYPE=content&LIMIT=10
To access the RSS file, you need to make a request to the /bitrix/rss.php script with the ID, LANG, TYPE and LIMIT parameters.
What do these parameters mean:
- ID is the ID of the information block or the symbolic code of the information block;
- LANG - information block website;
- TYPE — information block type;
- LIMIT - the number of elements that should be displayed.
This is a quick and uncomplicated method that can be suitable in most typical cases. If you need to redo the RSS output, you can use other methods from the 1C-Bitrix documentation.
Modules
- Yandex.Zen RSS – PRO. The module displays and allows you to manage the RSS feed for Yandex.Zen.
- “Module for creating RSS feeds in XML format”: module for 1C-Bitrix. This module will be useful in cases where you need to generate any RSS feeds in XML format in order to submit files to various services. The files generated by this module comply with the requirements of the RSS 2.0 specification.
- “RSS PRO – Flexibility and simplicity”: module for 1C-Bitrix. The module displays and allows flexible management of the RSS feed.
- Yandex Turbo pages PRO. A module for uploading information blocks and static pages in RSS 2.0 format. to create Turbo pages. The module has flexible settings, is not demanding on hosting, and allows you to upload any number of pages.
Joomla!
Built-in RSS feed
In Joomla version 3, the RSS feed is already generated by default. You just need to provide a link to it in a certain place on your site. But it is displayed only for certain categories, the display of which you can configure on the main page of the site.
To configure the admin panel, follow the path: Menu > Main Menu and open the “Home Page” heading. In the “Menu Item Type” line there should be a value of “Category Blog”, and in the “Category Selection” line you need to select a category or subcategory that will be broadcast on the main page and, accordingly, in the news feed. If you select “Featured materials”, then they will be broadcast in the news feed.
Modules
- ObRSS will help you create an unlimited number of RSS channels, which, in terms of interface capabilities, will not be inferior to the solutions of leading news portals, for example, CNN or BBC. The customizable JSON format allows you to create a universal data source that can be easily integrated when developing iOS or Android applications. In addition, you can create several parallel feeds, for example, for multilingual sites where content is published simultaneously in several languages or, conversely, combine several RSS feeds into one.
- RizVN FeedBurner is a simple module for implementing an RSS feed with basic functions. Despite the simplicity of the solution, the interface itself is impeccably designed, including the subscription form. All management and configuration is simple and performed through the administrator interface.