Any social network contains a large amount of personal information about the user, if he does not hide anything about himself and regularly fills in all the columns on his page. Contact is no exception. Personal information, photographs, friends lists and much more can tell a lot about the account owner and find out detailed information about him. But sometimes a person does not want all users of a social network to be aware of what is happening in his life, and at the same time there is a circle of people with whom he wants to share this information. Then the question arises: “how to restrict access to the page?” We will talk about how to do this in this article.
What materials can be blocked from viewing?
In the Contact settings, a separate tab is dedicated to privacy, which includes five sections, each of which contains its own subsections.
- My page. In this section, you can restrict other users’ access to personal information, the list of friends, groups, gifts, the list of audio recordings and photos.
- Entries on the page. This determines the availability of other people’s posts for viewing, the ability to leave your own on the account owner’s page, the visibility of comments left on posts and permission to add them.
- Contact me. Here we configure who can send private messages, call, challenge and invite to applications, and send invitations to groups.
- Stories. There are only two subsections in this section, namely: “Who can see my stories” and “Who can respond to my stories.”
- Other. The last section of the “Privacy” tab. Here we can configure the profile type, the visibility of the page on the Internet, and indicate which updates will be available to friends in the news feed. You can also select “all” or “none” next to the line “Companies can send me messages by phone number.”
Profile type "Closed". Settings
Most VKontakte users have an open profile. Many simply have no idea about the existence of a closed one. But if you go to it, users who are not on the friends list will have access to the bare minimum of information presented on the page. We'll talk about how to do this later.
From PC
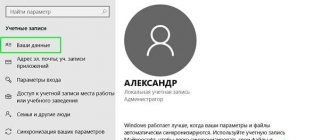
We go to our page in Contact. Click on the checkmark, which is located at the end of the top taskbar next to the avatar. From the pop-up list, select the “Settings” line.
In the window that opens, select the “Privacy” tab, which is located on the right side of the interface.
Scroll to the bottom of the page to the “Other” section.
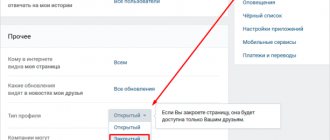
Select the line “Profile type”. Click on the word “Open”.
The menu opens. Select the line “Closed” and click on it.
A window appears in which you need to confirm your desire to switch to a private profile. Click on the “Yes, close” button.
We see that in the settings the type has changed to “Closed”.
From phone
Open the application on your mobile device. Click on the three horizontal lines that are in the lower right corner.
In the window that opens, click on the gear icon, which is located in the upper right corner.
On the new page, click on the “Privacy” line.
In the window that opens, scroll the page to the “Other” section.
Find the line “Private profile”. We press the switch.
A window appears in which, to confirm your choice, you must click on “Yes”.
We see that the switch opposite “Private profile” has become active. Profile is closed.
How to restrict access to your VKontakte page through settings
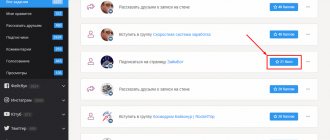
To allow you to exchange messages but keep as much information private as possible, you can configure your account privacy options in a specific way. You will be able to block your audio recordings, photos, some posts from the user, as well as the ability to comment on posts.
- Go to settings, and then to the “Privacy” tab.
- You will see all the options for opening and hiding information about your page. For example, next to the item “Who sees the basic information of my page,” click on the drop-down list and select the “Everything except..” option. Here you can select an ill-wisher and place him in the list of those who do not see this information.
- There is another option. Select the “Some friends” item, then the privacy settings will operate in such a way that the information will become visible only to a narrow circle of your friends, whom you choose yourself.
- Configure all items in the privacy menu in this way. Set everything to “Everything except” and add the enemy to the list.
- By lowering this page to the very bottom, you will see a link “See how other users see your page.” Click on it, you will see what the account looks like on behalf of any other user. Enter the name of the ill-wisher and you will see how he looks at your page. Return to this menu and finish setting up your account.
- This is how easy it is to protect yourself from prying eyes on the VKontakte social network.
Other privacy settings
In addition to the fact that you can simply close your profile from prying eyes, in this social network we can also tinker with other settings, setting the privacy of certain sections. Let's look at how to restrict access on VK to individual information presented on the page, how to do this from a smartphone or on a computer.
From PC
We go into our account. In the upper right corner, click on the check mark, which is located next to the avatar. In the pop-up menu, select the “Settings” line.
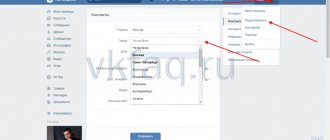
In the window that opens, select the “Privacy” tab, which is located on the right side of the interface.
At the very top of the screen we are given the “My Page” section. To configure the privacy of basic information, click on “All users” or another word opposite this line. Next, select one of the proposed options. You can open access to all users, or just friends; there is also an option – friends and friends of friends. You can only give access to yourself. In addition, you can manually select some friends or open access to everyone except specific individuals (this way you can limit access to a friend’s VK); there is also the option to select some lists. By choosing one of the proposed lines, you determine the level of your privacy, hiding basic information from other eyes.
Next, we can select a line where we can set the privacy of viewing photos that have been tagged by other users. Click on the word opposite this subsection and select one of the proposed options. We can also decide who will see the list of saved photos.
Next, you can set the availability of viewing the list of groups. While on this line, click on the previously set word and select from the proposed options.
While in this section, you can decide who can view audio recordings, the list of gifts, the location of photos, the visibility of people who are in the list of friends and subscriptions, and also who can see friends who are hidden.
Next, we can move on to the “Page Posts” section. Here you can configure the visibility of other people's posts left on the page, indicate who can leave posts, the visibility of comments left on posts, permission to comment on posts, who can tag the owner of the page in photos.
Next, go to the “Contact me” section. Here you can specify who can write messages, call, call in applications, invite to communities, to applications. You can also specify which friend requests you will receive notifications about.
From phone
Launch the application on your mobile phone. Click on the three horizontal lines that are located in the lower right corner.
In the window that opens, click on the gear sign, which is located in the upper right corner.
On the new page, click on the “Privacy” line.
In the new window we immediately go to the “My Page” section. To select who will see the basic information on it, press your finger on the line “All friends”.
A new page opens on which you can select the desired line by checking the box.
We set up the privacy of this section, select accessibility to pictures with a mark on them, a list of saved photos, visibility of the list of my groups, a list of audio recordings, a list of gifts.
Having dealt with the privacy of “My Page,” we move on to the “Posts on the Page” section. Here we set up the visibility of other people's posts, the ability to leave posts, view comments, tag photos, leave comments.
Let's move on to the "Contact me" section. We configure permission to send messages, make calls, etc. So, for example, to indicate who can invite to communities, click on the word that is located under this line.
A window opens in which we select “All users”, “All friends”, “Friends and friends of friends”, “No one” or “Some friends”.
Then you can go to the “Stories” section. Here you can choose who will see stories and respond to them.
Select the desired option from those offered.
Through the blacklist
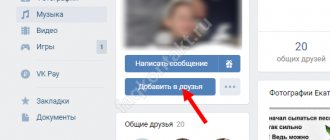
If there is a need to limit one person's access to your page, then the ideal option would be to add this person to the blacklist. We will talk further about how to do this by logging into Contact from a mobile phone or computer.
From PC
Let's go to our page. In the top taskbar, select the checkbox that is located at the end of the line. In the menu that opens, select “Settings”.
On the right side of the screen, select the “Black List” tab.
Click on the “Add to blacklist” button, which is located at the top of the screen.
If a person is on the list of your subscribers, find him from the open list and click on the “Block” button next to his name.
If there is no or no desire to engage in long searches, scroll through the entire list, go to this person’s page, copy its link and paste it into the appropriate line of the search window for candidates to be added to the blacklist.
After the link has been inserted, we see that the desired person has been found, click on the “Block” button.
In exactly the same way we can add groups to the blacklist. Copy the link to the page with the desired community and paste it into the appropriate field. When we see that the group has been identified, click on the “Block” button.
How to block a person on VKontakte
Svetlana Gaivoronskaya
November 22, 2021 at 2:13 pm
Good afternoon, dear guests and regular readers of our blog. Today the topic is not the most pleasant, but important and relevant - how to block a person on VKontakte.
There are circumstances on a social network when we want to distance ourselves from a former friend or an intrusive stranger and block access to information. And messages and comments on the posts continue to come. Sometimes you even have to receive insults and threats. Let's figure out how to competently avoid unwanted communication on VKontakte.
Black list
The easiest way to stop an uninvited guest from invading your territory is to put him on a blacklist (emergency). In this case, no changes will occur on the user page. The troublemaker will continue to log into VK and post materials, but will not be able to send messages or view information on your profile.