How to recover deleted music on VK - this question is especially relevant when the user does not remember the name of the artist and does not know the title of the song. That is, you won’t be able to find the lost track yourself and re-add it to the tracklist.
The task at hand is not as simple as it initially appears, since the social network is not interested in storing information that the client does not need and gets rid of it almost simultaneously with the account owner.
But the above does not mean that the situation is hopeless. Several ways to get out of this situation are provided. And the final result depends only on the activity and persistence of the user who decided to return lost files and audio recordings. The higher the desire to cope with the difficulties that arise, the more likely it is to achieve success.
To restore audio recordings in VK, you should take a closer look at the current situation. There are several options for the development of events:
- the deletion just happened;
- the song disappeared from the list several hours or days ago;
- the time after clearing the tracklist exceeds a week.
In the first case, you will need to click the plus located next to the composition. But this approach is only permissible in situations where the user changed his mind immediately after deletion and did not have time to refresh the page.
If the page is refreshed or closed, you won't be able to use Quick Restore. In such cases, all you have to do is contact support and report the incident. The faster the user makes contact with VK agents and sends a message, the higher the likelihood of a positive decision. It is important to emphasize that the text of the appeal must contain a detailed description of the current situation and an indication of the song that needs to be returned or the exact time of deletion. The more information the user provides, the more effective the assistance received will be.
In the third case, you just have to look for the song yourself. If its name is unknown, it is worth visiting specialized portals that help identify and find the track.
Recovery using a computer
Let us remind you that the easiest way to recover information on Android is by using a computer and scanning the system. In this case, we can assume that the hard drives of a smartphone or tablet are checked in the same way as a regular flash drive or USB drive.
In case of data loss from internal non-removable memory, you should:
- Using a special cable, which usually comes with the gadget, connect to the PC;
- Wait until the system automatically installs the necessary drivers (if this did not happen earlier during previous connections to the computer);
- Select “Connect to USB storage” on your smartphone (tablet):
Selecting to connect a mobile device to a PC
- Download, install and run the appropriate file recovery program.
Recuva program
One of the best options for system recovery on a PC is Recuva, a free program that works when you connect your smartphone to your computer.
You can download it on the official website: www.piriform.com/recuva.
It works as follows:
- After launch, a window opens with the types of files that require recovery;
- By selecting the data that the program will look for during scanning, you can enable additional in-depth analysis. In this case, Recuva will recover more information, although it will require several hours of searching;
- After the scan is completed, a list of files that can be recovered appears on the PC screen. After making sure that the information you need can be returned (it will be marked in green), mark it and continue the program;
- Transfer the recovered files back to your mobile device.
7-Data Android Recovery Program
A popular application that recovers lost and deleted files from smartphones and tablets is 7-Data Android Recovery. The purpose of the program is to work specifically with devices running Android OS.
In its functionality it resembles Recuva, but is capable of working with any type of internal memory. This means that you can recover information not only from an external or internal storage device, but even from the device’s RAM.
Recovering deleted information using 7-Data Android Recovery
After installing the program, a scan of the gadget starts, after which you will see the same list of recoverable files. At the same time, you can even see deleted photos in “preview” mode, returning only those that you really need.
After the program finishes, the data is returned to the device.
Recovering files from a mobile device
Sometimes there is no way to connect a gadget, and the files need to be restored, or at least an attempt to do so very urgently. In this case, it is worth downloading special applications that work from your phone.
True, some of them will require “superuser rights” or root access to start and restore - however, it is worth knowing that this automatically removes the factory warranty from your smartphone or tablet.
Basket
A simple way to get back deleted information on a smartphone is to use the “recycle bin”. Its operating principle is similar to a similar program for PC:
- The deleted data is placed in storage;
- If recovery is necessary, files can be returned to the same location;
- After some time (specified by the user), the information is deleted.
The program works without root and quite simply returns the files to their place. It is convenient to use, however, if the data has already disappeared, installing the “Recycle Bin” will not return it.
To prevent information loss, you should download the Dumpster – Recycle Bin application in advance and run it on your smartphone (tablet).
Recycle Bin Program
After installing the program, any file that is in the “recycle bin”, but has not yet been deleted from it, can be restored by simply going into the application and selecting the necessary data. But after deletion, you will have to restore it using other methods.
GT Recovery
Another program that works on gadgets of any brands that install Android on their products (that is, on almost any smartphone except Apple and Nokia) is GT Recovery.
It is provided free of charge by the manufacturer, and you can find the application in the Google Play store.
Using the program, files of any type are recovered - photos, videos or texts. Reviews about it indicate a high recovery rate, especially if little time has passed since removal or loss.
Some disadvantages include the need for root access, however:
- If you have instructions for your gadget or a small free program, it is quite possible to obtain superuser rights (for example, for Samsung you should use the Odin application);
- There are versions for which root is not required (GT Recovery no Root)
GT Recovery no Root program interface
Undeleter
Another reliable option for recovering files directly from your phone or tablet is the Undeleter application. It is downloaded from Google Play and exists in 2 versions: paid and free.
The free version allows you to recover deleted images, the paid version allows you to recover any data from both a flash card and internal memory. Managing recovery is quite simple:
- After selecting the desired folder, a scan is carried out and a list of files to be recovered is displayed;
- Having selected the necessary data, it is restored to the same place where it was before deletion.
Working with Undeleter on Android
The disadvantage of the program is that it requires root access to operate Undeleter. But you can install it, like the previous application, after the files have been deleted.
Titanium Backup
There is another way to solve the situation if the user has lost data and even deleted system files. To do this, download the free Titanium backup application.
It works in almost the same mode as the Recycle Bin, but has greater functionality, restoring:
- Photo and video;
- Programs (in 2 modes: only the files themselves, or a full return of all settings, including game saves);
- Contacts and SMS messages. However, to return phone numbers to your smartphone, you will have to write them down to the memory card in advance.
List of applications on Android in the Titanium Backup program
The recovery information is saved on the memory card in the TitaniumBackup folder.
Some of these “backups” can even be returned to a new phone - except for the operating system settings, as this can lead to software failures.
When viewing the list of applications and files, it will be indicated whether it is backed up or not.
Despite all the advantages of the program over the Recycle Bin, it, like most other data recovery applications, requires “superuser” rights.
And when compared with programs like GT Recovery and even with returning information from a computer, it is worth noting that it is impossible to get your files back if Titanium backup is not installed on the device in advance.
In addition, system recovery files take up a lot of memory space.
How to delete all VKontakte audio recordings at once
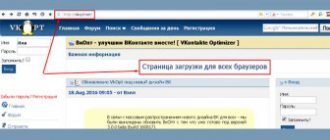
Sometimes a person decides to rebuild his favorite audio tracks, so there is a need to delete all VKontakte audio recordings at once. At the moment, after updating the design, this is not possible. Previously, the problem was solved using a third-party plugin called VkOpt, which made it possible to further customize the profile. Now its functionality after the update does not work fully.
It is better to download this plugin from the developers website. They report that work to restore the program’s functions continues, and soon an option will appear on how to delete VKontakte audio recordings in a list. Previously, this procedure was performed as follows:
- Download the application from the developers' website.
- Install the plugin in your browser. Now this procedure occurs automatically.
- Configure the necessary program functions.
- Go to the audio section.
- A new link called “Delete All” will appear in the right menu.
- Click it and the entries from the page will be deleted.
- You must refresh the page for the changes to appear.
Prevention
Once you have an idea of what to do if you accidentally deleted a file on your mobile device, you should prepare in advance for such situations.
That is, install an auxiliary program and, preferably, write several backup options onto the memory card - after all, at the moment when you need the data, you may not have access not only to the computer, but also to the Internet.
It’s also worth taking care of the safety of important information, from time to time transferring it to more reliable media (or at least to the same PC, from where it will be easier to return it).
It is also worth noting that for a more complete data recovery, regardless of how this is done, you should avoid writing to the memory of a smartphone or tablet and to a flash card before you get the desired file back.
Advice:
Sometimes it is even better to turn off Wi-Fi and the GSM module, due to which an SMS may be sent to the device or an application update may be installed.
How to recover deleted files on Android
Recovering deleted pictures, photos, and videos. Saving recovered files and the ability to send them by email.
It happens that files on a phone with the Android operating system are “randomly” deleted as a result of user actions or glitches of the phone itself, and there is no copy left on the computer. Files can be for various purposes: audio, documents, etc. And it’s a shame to lose them forever. What to do in this case? Read our article.
Additional Information
If the user cannot figure out how to restore music in VK after deletion, he should talk to the support agents of the social network and ask them why the audio recordings are not being returned.
You should not download and install special applications that allow you to return the track list. With their help, the account owner will not be able to listen to music back. He will get nothing but trouble:
- loss of finances if the program is paid;
- loss of personal data and account control;
- introducing viruses to your computer or smartphone.
Of course, some proposals do not promise such difficulties. But they are not capable of giving a positive result.
Deleted important documents, compressed archives or digital photos from a flash drive? Need to recover data after formatting a logical partition with NTFS or FAT? Accidentally formatted your hard drive or external drive?
How to recover deleted files on Android with EaseUS MobiSaver: step-by-step instructions
First of all, you will need a computer or laptop with Windows operating system (XP, Vista, 7, 8 and 10) on which you need to install EaseUS MobiSaver for Android Free
(link to free version).
As soon as you find out that important data that needs to be restored has been deleted on your smartphone/tablet, stop using it immediately to avoid “overwriting” files marked for permanent deletion with new ones. This will increase your chances of recovering information.
Recovering deleted data on Android in 4 simple steps:
Launch the EaseUS MobiSaver for Android Free program on your computer and connect your smartphone/tablet to it using a USB cable. It is better to use a standard “lace” from the manufacturer. After that, click on the “Next” button. The program will recognize and connect your Android device.
After connecting your Android smartphone/tablet to your computer, EaseUS MobiSaver for Android Free will recognize it and begin automatically scanning the device’s internal memory (microSD card) and analyzing file system markers. During the scanning process, the program displays in real time the files found that are suitable for recovery.
Important:
Before you start scanning, make sure that your smartphone battery is charged at least 20%, otherwise the device may be discharged before the process is completed.
Once the memory scanning process is completed, you can see the complete list of files on your Android device that are available for recovery. For convenience, files are sorted by type, a preview is available in the window on the right - just select the desired file in the list. Deleted SMS and contacts are marked in red. You can also enable the “Show deleted files only” option to save time and not have to manually sift through various application and OS service data deleted by the system itself.
Having selected the files to be restored, just click on the “Recover” button to transfer the saved data to your computer. Finally, simply specify the folder where the files will be transferred from Android.
If you decide to save deleted data in the memory (or on a microSD card) of an Android smartphone or tablet, then make sure that you find all the necessary files, otherwise the remaining ones on the smartphone may be overwritten and you will never be able to recover them.
Working with EaseUS MobiSaver for Android Free is even easier than it seems. This powerful data recovery tool supports almost all versions of the Android operating system, has a simple and intuitive interface, works with both built-in memory and microSD cards, and is finally available for free.
Other news
Are you randomly deleting an important photo, file, image, data and video? Sometimes it happens when you accidentally delete a photo from your phone and start looking for a good tool that can restore it for you, it can give you a headache. To solve this problem, all you have to do is download Recover Photo: Image, Video, Data and File for Android and scan all the internal and external memory of your phone. with this application you can recover deleted files and old photos by recovering sd card recently and from usb recovery and you can recover data from hard drive; with this data recovery tool and you will recover all photos deleted from Garbage and you will recover all deleted audios you don't need neither ROOT nor overwrite and you will recover data
Recover All Deleted Files: Photos Video and Audio can recover your deleted data, files and music from your internal phone database and restore them to the original photo stream without prior backup, no PC required and no ROOT required. If you accidentally deleted a music mp3 or even restored your to factory default, this application will help you recover your images effectively. With this application, you can repair the program, recover lost files, get data recovery and get free recovery.
Recover all deleted files, deleted or hidden photos for free. Deleted photo recovery app tries to recover all lost, deleted or hidden photos, images on your smartphone or memory card. Do you want to recover all photo and recover photos and recover images and recover all deleted files you should use this Recover All Deleted Files app
Recover my data, camera photos taken, and items are now available with this application, all you need is to download this amazing application on your mobile phone. This Recovery All File Pro app allows you to recover deleted photos now with this simple Recover All Deleted Photos can recover and recover lost photos and images from memory card or internal memory. You can use it and you need to find all files deleted by mistake and you will recover image, recover video and recover music ever deleted media by accident? This application tries to recover all lost or deleted photos on your device. Photo recovery, video recovery and deleted photo recovery.
This application will help you recover deleted photos and files from your phone storage or external storage and restore them to your gallery. with one click you will dig in the dumps and you will find that your data has been deleted.. dont be skeptical Your files are safe and you can get all files deleted from SD card or hard drive and recover on your phone.. All files recently deleted by mistake will be restored.
**** FUNCTIONS ****
✓ No ROOT ✓ Photo Recovery: - Recover deleted photos with one click of a button. ✓ Ultra-easy image data recovery! ✓ Recover deleted files from any volume level - internal storage, SD card ✓ Scan all memory including SD card and internal storage ✓ recover music and audio recently deleted
This instruction is about how to recover data on Android in cases where you accidentally formatted a memory card, deleted photos or other files from the internal memory, did or something else happened that makes you have to look for ways to get back lost files.
Since this guide to data recovery on Android devices was first published (now, in 2021, almost completely rewritten), some things have changed a lot and the main change is the way Android works with internal storage and how modern phones and tablets with Android connects to the computer.
If previously they were connected like a regular USB drive, which made it possible not to use any special tools, they would be suitable (by the way, now it is better to use them if the data has been deleted from the memory card on the phone, for example, recovery in the free Recuva program is suitable here) , then now most Android devices are connected as a media player via the MTP protocol and this cannot be changed (i.e. there are no ways to connect the device as USB Mass Storage).
In this regard, many methods of recovering data from Android that worked before are now ineffective. It has also become unlikely that data can be successfully recovered from a factory reset phone due to the way data is erased and, in some cases, encryption enabled by default.
The review includes tools (paid and free) that, theoretically, can still help you with recovering files and data from a phone or tablet connecting via MTP, and at the end of the article you will find some tips that may be useful, if none of the methods helped.
Data Recovery in Wondershare Dr.Fone for Android
The first of the recovery programs for Android, which is relatively successful in recovering files from some smartphones and tablets (but not all) is . The program is paid, but the free trial version allows you to see if it is even possible to recover something and will show a list of data, photos, contacts and messages to recover (provided it can identify your device).
The principle of operation of the program is as follows: you install it in Windows 10, 8 or Windows 7, connect your Android device to your computer and turn it on. After that Dr. Fone for Android tries to identify your phone or tablet and restores files on it, if successful, and upon completion, disables root. Unfortunately, this may not work for some devices.
GT Recovery for Android
The next, this time a free program that can be effective for modern Android devices is the GT Recovery application, which is installed on the phone itself and scans the internal memory of the phone or tablet.
I have not tested the application (due to difficulties with receiving it on the device), but reviews on the Play Market indicate that, when possible, GT Recovery for Android copes quite successfully with the recovery of photos, videos and other data, allowing you to return at least part of them.
An important condition for using the application (so that it can scan the internal memory for recovery) is availability, which you can get by finding the appropriate instructions for your Android device model or using a simple free program Kingo Root.
You can download GT Recovery for Android -> .
EASEUS Mobisaver for Android Free
EASEUS Mobisaver for Android Free is a free program for data recovery on Android phones and tablets, very similar to the first of the utilities discussed, but it allows you not only to look at what is available for recovery, but also to save these files.
However, unlike, Mobisaver for Android requires that you first get it on your device yourself (I indicated above how to do this). And only after this the program will be able to search for deleted files on your Android.
Download Easeus Mobisaver
for Android Free you can
If you are unable to recover data from Android
As noted above, the likelihood of successfully recovering data and files on an Android device from internal memory is lower than the same procedure for memory cards, flash drives and other drives (which are defined specifically as drives in Windows and other operating systems).
Therefore, it is quite possible that none of the proposed methods will help you. In this case, I recommend, if you have not already done so, to try the following:
- Go to photos.google.com
using your account credentials on your Android device. It may turn out that the photos you want to recover are synced with the account and you will find them safe and sound.
- contacts.google.com
in the same way - there is a chance that there you will find all your contacts from your phone (albeit mixed with those with whom you corresponded by e-mail).
I hope some of this is useful to you. Well, for the future, try to use synchronization of important data with Google storage or other cloud services, for example, OneDrive.
Note
:
Below we describe another program (formerly free), which, however, recovers files from Android only when they are connected as
USB Mass Storage , which is no longer relevant for most modern devices
.
Data recovery software 7-Data Android Recovery
When I last wrote about another program from the developer 7-Data, which allows you to recover files from a flash drive or hard drive, I noticed that on their website they have a version of the program designed to recover data from Android internal memory or inserted into phone (tablet) micro SD memory card. I immediately thought that this would be a good topic for one of the following articles.
You can download Android Recovery. At the same time, at the moment the program is completely free.
Installation does not take much time - just click “ Next
“And we agree with everything, the program does not install anything extraneous, so in this regard you can be calm. Russian language is supported.
Connecting an Android phone or tablet for the recovery procedure
After starting the program, you will see its main window, which schematically displays the necessary actions to get started:
- Enable in device
- Connect Android to computer using USB cable
To enable USB debugging on Android 4.2 and 4.3, go to Settings
- “
About phone
” (or “
About tablet
”), then click on the “
Build number
” field several times until you see the message “
You have become a developer
”.
After that, return to the main settings page, go to the “ For Developers
” item and enable USB debugging.
In order to enable USB debugging on Android 4.0 - 4.1, go to the settings of your Android device, where at the end of the list of settings you will find the item " Developer options"
" Go to this point and oh.
For Android 2.3 and earlier, go to settings
-
Applications
-
Development
and enable the desired option there.
After that, connect your Android device to the computer running Android Recovery. For some devices you will need to click the Enable USB storage
" on the screen.