Good afternoon my dear subscribers. I am glad that you liked the previous articles. There was good activity on them. Today's article is no less interesting. We will consider the topic “How to send a voice message in VK.”
Messenger developers are trying to facilitate communication in the virtual world. This is evidenced by the growing popularity of audio chats.
Since speaking information and sending it is much faster and easier. How to put letters into words using the keyboard.
In addition, they can be written down, even when typing text is not entirely convenient.
To begin with, I would like to advise you to read the article: how to insert a link into text in contact. The information from it will be useful to us today.
So, let's begin.
How to set up voice messages on VK?
The current service does not need any settings. The main thing is that the user’s equipment supports recording and sending audio. This requires:
- work smartphone or computer;
- microphone or appropriate headset for PC;
- Internet access to send what was said.
If you send a recording from a smartphone, there will be no problems with all of the above, since the specified components are present in every modern mobile phone.
From computer
There are only 2 conditions that must be met in order to be able to send audio messages to ok.ru from a computer:
- be registered in Odnoklassniki;
- have a microphone connected and configured.
I think you're okay with the first point. If not, here is a link to instructions for registering with Odnoklassniki.
Connecting a microphone
Now let's figure out how to connect a microphone. If you are using a laptop, then it already has a built-in microphone, and there is no need to connect additional equipment. But if you wish, you can turn on the headset for better sound quality. This is done in the same way as on a desktop computer.
A regular microphone with a 3.5 mm plug is connected to the corresponding input on a laptop or system unit. Typically, such a connector is marked in red or pink and next to it you can find a microphone icon or the inscription “mic”. Nowadays you can often find microphones with a USB plug. There will definitely be no problems connecting it, since the USB connector, unlike the sound card, is available everywhere.
Once connected, the operating system will detect the new device and report that everything is ready for use.
If you do not receive a message about microphone detection, or it simply does not work, then most likely you will need to install or reinstall drivers for your sound card.
Browser settings
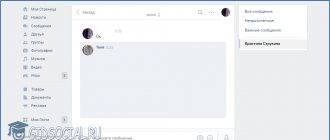
Now that all the details of connecting and setting up the microphone have been resolved, you need to go to Odnoklassniki and configure something in the browser. To do this, go to the “Messages” section and open a dialogue with the user to whom you want to record an audio message.
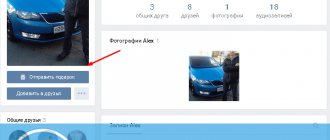
If you have never communicated with a user in OK before, and he is not on your friends list, then there will be no dialogue with this person in the “Messages” section. In this case, you need to create the correspondence yourself. To do this, go to the user’s page and click on the “Write” button. A window will appear in which you can start a conversation, send an audio message or a free postcard.
In the conversation window, click the “Applications” button (the paper clip icon), and select “Audio message” from the drop-down list.
If you have never used the voice message recording feature in Odnoklassniki or any other social network before, the browser will ask you to install or update Adobe Flash Player. Nothing wrong with that. This is a standard procedure that is performed almost automatically.
In the window that appears, click the button to go to the program download page.
On the download page, refuse to install additional programs by unchecking the corresponding items and click the “Install now” button.
After that, download and run the program installation file. During the installation process, you will need to close all browsers. After completing all the necessary steps, return to the conversation and try recording the audio message again.
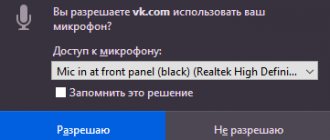
Most likely, the browser will ask you for permission to access the microphone. You will also need to allow your browser to run Flash. To do this, click on the lock icon to the left of the address bar and make the appropriate settings in the drop-down menu.
By default, all browsers do not allow sites to use the microphone and webcam. This is done to protect users from malicious resources that could take pictures and record audio without the person’s knowledge, without such a ban. Provide microphone access only to sites you trust 100%.
At this point, almost all preparations are completed. Now, when you go into the dialog and click the add audio button, an Adobe Flash Player settings window will appear in front of you. Check the boxes next to “Allow” and “Remember” so that this window does not appear again, and then click on the “Close” button.
If you still see a window asking you to install or update Flash Player, then most likely you are using a Chromium-based browser and it simply needs to be updated. The refresh button can usually be found on the settings page or in the browser's main menu.
Usually, after performing all the manipulations that I wrote about, no more problems arise, and you can easily record voice messages at any time of the day. But sometimes users encounter an error, as in the screenshot below.
To solve this, just go to settings and select another microphone in the column on the left. Then click the “Close” button.
Record and send a voice message
If you did everything according to the instructions, now after clicking the add audio message button, audio recording will immediately begin, and you will be able to speak your message. Immediately when you have told everything you wanted, click the “Send” button to send the audio to your interlocutor. The voice message will instantly appear in the dialogue, and both your interlocutor and you can listen to it.
When recording sound on a computer, you can only listen to the audio file that has already been sent. It is impossible to do this before sending.
To re-record a message or exit recording mode, click “Stop” and select the required item in the window that appears.
One audio message cannot be longer than three minutes.
You can send audio messages, just like regular messages, not only to friends, but also to any unfamiliar Odnoklassniki users. Of course, provided that the user has not enabled ]“Close profile”[/anchor], has not prohibited the sending of letters from strangers and has not added you to the blacklist.
How to record a voice message on VK?
To record a message to your interlocutor, you will need:
- open the dialogue window and select the appropriate conversation;
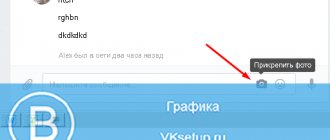
- click the icon with a small microphone (in the lower right corner);
- say what is planned;
- end the recording by clicking the corresponding icon (stop);
- send the phrase using the usual send button.
If you follow the proposed instructions, there will definitely not be any difficulties with communication, and your interlocutors will have the opportunity to save time that was previously spent on typing text.
How to send voice messages on VK via a computer?
Sending audio recordings from a computer is no different from the procedure described above. The main thing is to think in advance about purchasing a microphone or a headset suitable for conversations. Without such technology, you won’t be able to use the function, since it will be impossible to record speech for obvious reasons. There are no other requirements or features for using the service on computers and laptops.
How to send a voice message to VK from your phone?
Those who are trying to figure out how to send a voice message to VKontakte will not encounter insurmountable difficulties. The order of transfer will remain the same, only the appearance of the dialogs will change slightly, since instead of the traditional browser version of the portal, users will use the mobile one. Otherwise, nothing will change, just press the record button and say what you want.
How to send a voice recording if there is no icon?
You cannot use the described function if there is no microphone icon. Therefore, if it suddenly disappeared or is simply missing, you need to understand the reasons for what happened. Usually the source of difficulties is:
- unconnected or malfunctioning equipment;
- browser that does not support the operation (Safari).
The solution to this problem is obvious. You need to double-check the connection and operation of the equipment and change the browser.
How to send an audio message from a PC
Before recording a voice audio message on VK on a computer, you need to make sure that there is a connected and configured microphone on the PC. It's easiest for owners of laptops and tablets; as a rule, their devices are equipped with a microphone by default. You can enable it through the “Sound” menu (the “Recording” tab). If the microphone is missing or faulty, then you can connect a third-party device to any PC to record sound:
- headset with microphone (for a desktop computer you need to choose models with two 3.5 jack plugs, for tablets and laptops - with one);
- Webcam;
- separate microphone.
If the microphone is working, connected and configured, then you can start recording an audio message on VKontakte. To do this you will need:
- Open the page of the desired dialog in the browser.
- Click on the microphone icon in the window to record a message.
- If necessary, give permission to use the microphone once/always.
- When the recording starts, dictate the message, and when the recording is finished, press the “stop” icon (red square).
- The red square will change to a blue arrow icon. You can either listen to the result by clicking the arrow on the left, or send the recording by clicking the airplane on the right.
- If you decide to delete a recorded voice message, you can do this using the cross to the right of the recording.
We are often asked in the comments why voice messages on a computer are not sent to VK; a little less often we hear about difficulties with the mobile application. Now we will analyze these problems in detail.
Changing voice in voice SMS
Changing your voice can make even the most boring and uninteresting conversation more interesting. To change the sound, just find the appropriate VK application and use it. The principle of operation is extremely similar everywhere. You need to type the text and send it to the bot, which will make the required changes. After that, all that remains is to send the resulting phrase on your own behalf to the person you want to prank, using the basic functions of the selected application.
How to use voice input
After activation, the function will be available in all applications that use text input - instant messengers, programs, etc. To use the option and start dictating text, you need to click the message input field, and on the keyboard (not in the application) press the microphone once. The inscription “Speak” will appear, after which you can begin dictation, which will immediately be converted into words on the screen.
When the dialing is complete, all that remains is to press the “Send” button. Interestingly, punctuation marks can also be placed; to do this, just say “Comma”, “Vocal”. sign", "Colon", etc.
Text typed by voice can be displayed underlined; if necessary, it can be edited and then sent.
How to upload a voice message to VK?
When, instead of creating a standard voice message on VK, the user plans to send a ready-made speech to a friend, the usual approach turns out to be useless. In such situations, you will have to upload a previously created file (in mp3 format) with the monologue as an ordinary audio recording. As a result, the message will be a simple addition to the dialogue (an attached file). But the result - the transfer of important information - will remain.
Changing the voice recorder recording format
The first way to upload a dictation to VK is to change the file format. After the change, you will be able to accomplish your plans. You can use the online converter https://online-audio-converter.com/ru/.
You can change the file to be sent via a browser on your mobile phone:
- Open the converter using the link; Audio editor online
- Click on the “Open file” button;
- In the second step, choose what you want to do with the file: select the MP3 format; Change music file settings
- Adjust quality and other parameters (by clicking the “Advanced” button);
- Click on the “Convert” button below. Click on the "Convert" button
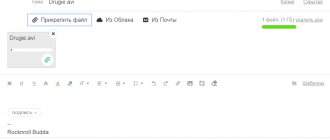
Click on the “Download” button, after which the file can be found in the “Downloads” or “Download” folder. Next, you need to open your music on VKontakte and click on the “Upload audio file” button.
Uploading a sound file to VK
Select a file in your phone's memory (in the Downloads folder), and the file will begin downloading immediately. Once it appears in your files, you can attach it to messages or send it from a list. This file will also be available to other VK users. After sending it, you can delete it, refresh the page and if no one has added it to your list, it will be deleted forever.
How to delete a VK voice message?
If the desire to send an entry suddenly disappears or you need to find other words, you should simply cancel the running process by clicking on the appropriate inscription. Cancellation from your phone will be even easier. To achieve the desired result, just swipe left. Deleting an already sent phrase occurs in the standard way and is no different from deleting text. That is, you will need to select the desired entry and click the “delete” button.
Voice messages on Android
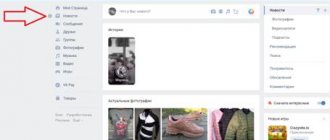
Currently, the social network VKontakte is more popular on smartphones. Recording a voice message will differ on the Android and iOS operating systems, although the process is largely similar. Let's consider the first option.
On Android, recording a message by voice works as follows:
- After logging into the application, you need to select the right person to send a message.
- To the right of the text line there is a button with a picture of a microphone.
- By holding this button, you need to speak the message and release the click.
- The message will be automatically sent to the interlocutor.
- If you need to cancel sending, then while speaking you should, without lifting your finger, swipe to the left.